

Craving farmhouse decor ideas for living room spaces that feel cozy, practical, and genuinely livable? These DIY projects and simple setup changes can make your room feel warmer and more finished without turning it into a staged showroom.
You know the feeling: everything in the living room works, but the space still does not invite you to flop down at 8:47 p.m. with a snack and zero ambition. Nothing is exactly wrong, yet the room feels a little empty and cold, as if moving in happened right before everyone got tired. The goal is a warm, lived-in, practical living room without buying an entirely new set of furniture: DIY the feeling instead of simply shopping for it.
Consider this the answer to, “Help, I want cozy, I have a drill and a budget, and my dog thinks throw pillows are a sport.” Start with one easy change: swap one lampshade, add one big basket, and bring in one warm wood element, even if it is only a shelf. Your room can feel softer by bedtime.
Choose a Living Room Project
Each project is practical enough to complete without turning the room into a major construction zone.
- For an upcycled wood project, choose a wine crate bookcase, an old door coffee table, a pallet console table, or a barn door TV stand.
- A thrifted frame gallery wall can bring handmade wall decor to the room. Other options include a reclaimed wood sign, barnwood picture frames, and a peel-and-stick shiplap wall.
- A faux beam mantel can anchor mantel shelving accents, complemented by floating shelves, pipe shelving, and a window frame mirror.
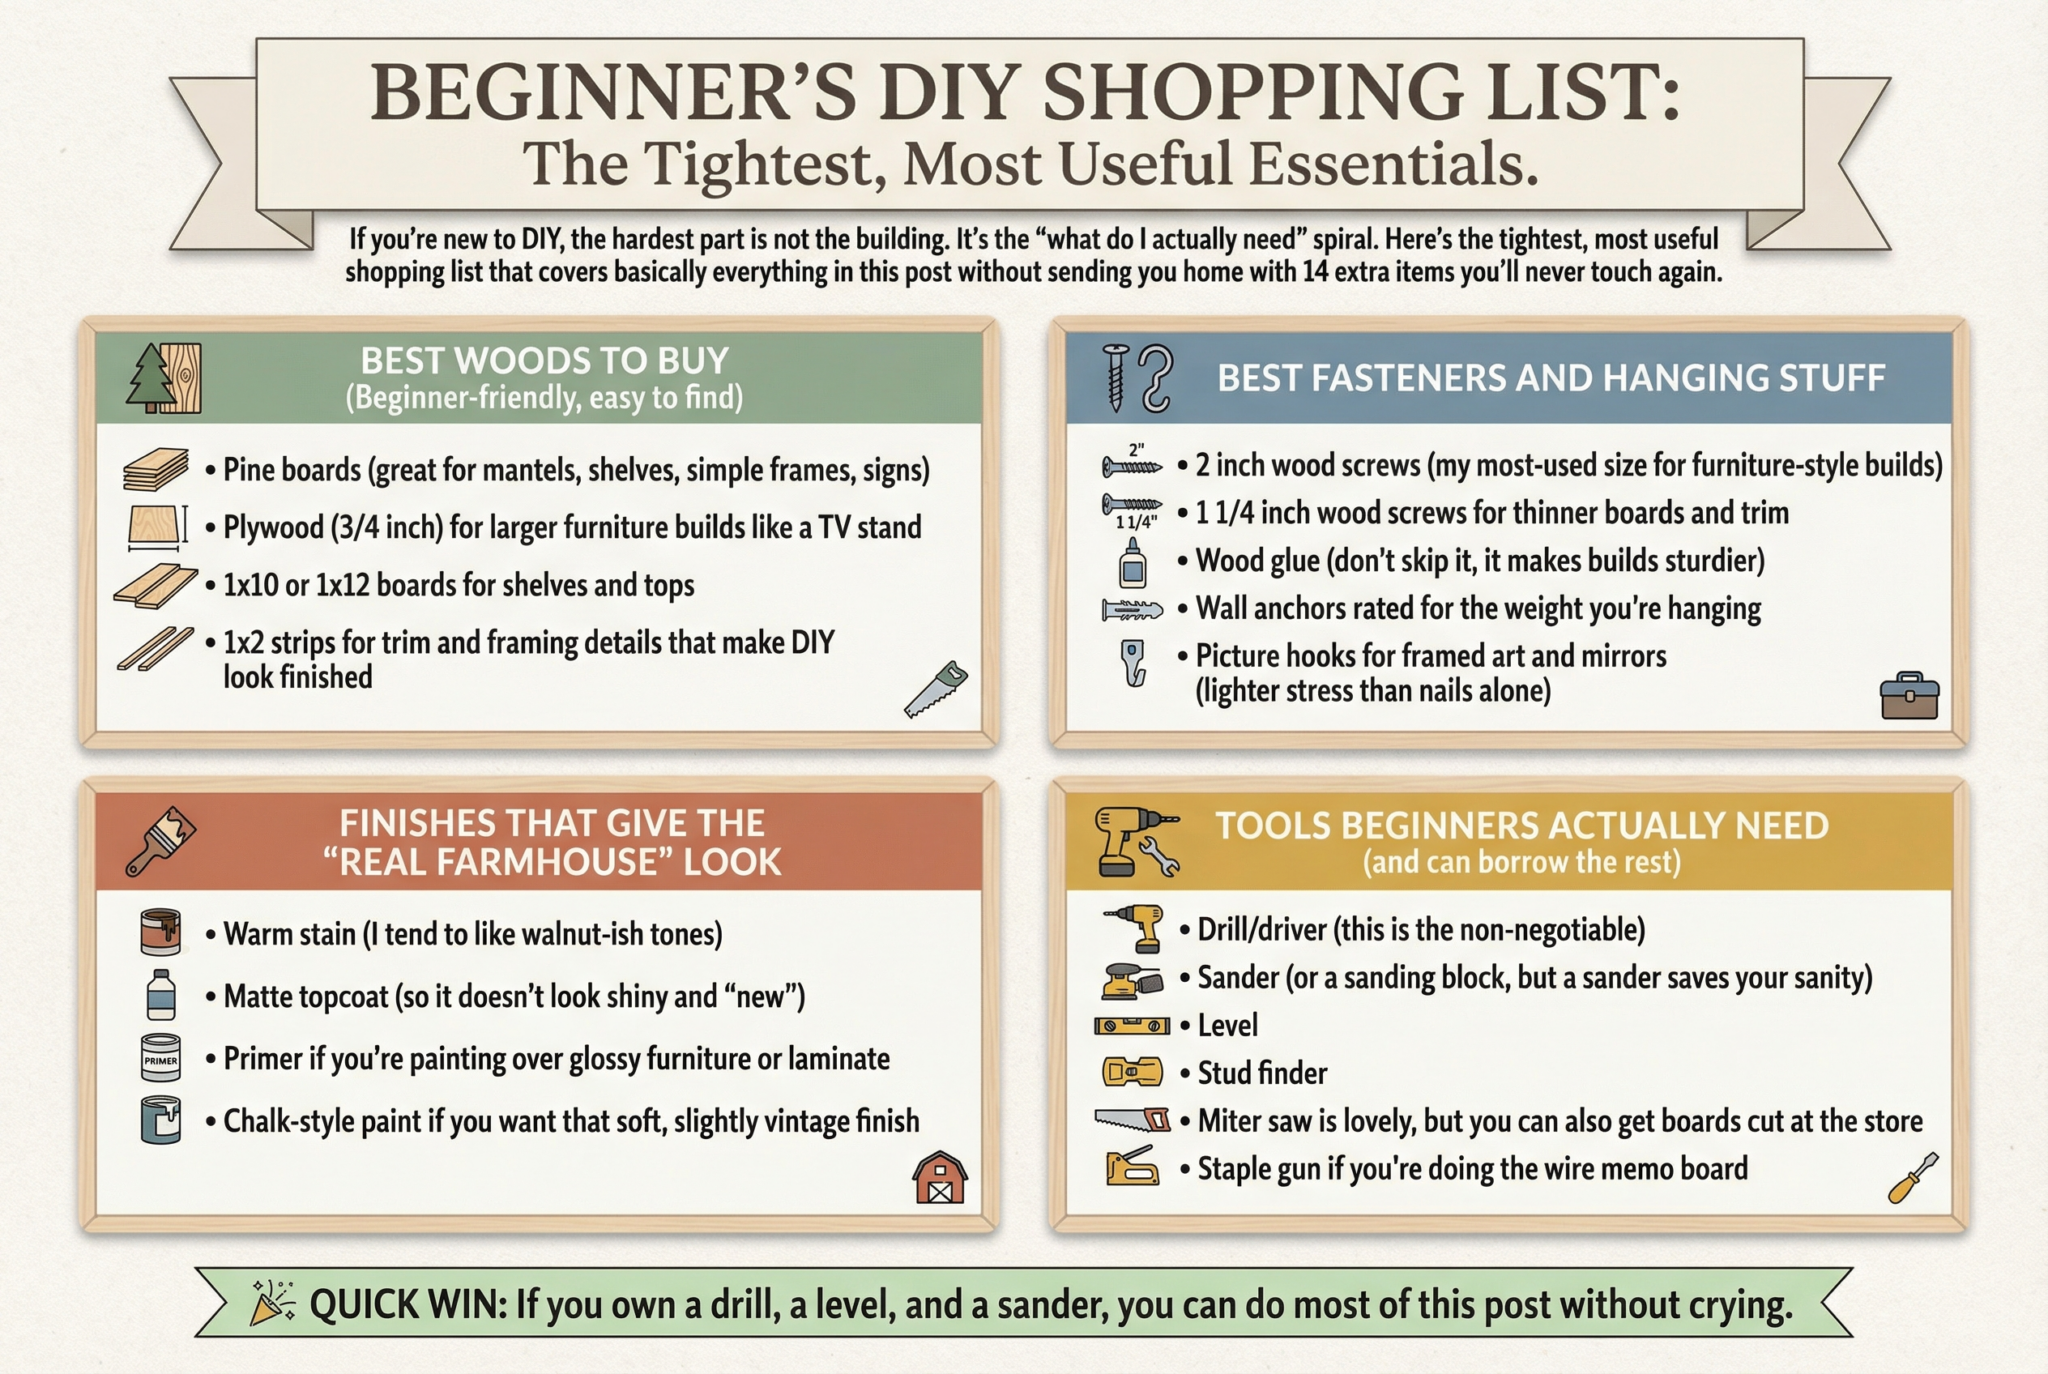
Project Supplies
Most projects can be supported by a small group of tools: a level, a sander, and a drill.
- Use a pencil with a tape measure to mark measurements; both belong with the project supplies.
- At the wall, use a stud finder or ask a friend for help.
- A drill with driver bits covers the basic fastening setup.
- Keep a level nearby to check placement during project setup.
- Sandpaper in 80, 120, and 220 grits covers the needed sanding stages.
- Use wood glue alongside wood screws, with 2inches as the default screw length.
- Use sacrificial rags to protect the work area, and use a paint brush and foam roller to apply the finish.
- The finishes include stain, paint, and a simple matte topcoat.
- Use wall anchors with a rating specific to the wall surface.
- Use a drop cloth to cover the area below the project and protect the surface.
Secure heavy items such as mirrors and shelves to studs whenever possible. If no stud is available, choose anchors with a rating matched to the item’s weight.
Project-Specific Shopping at 7:18 p.m.
Choose a Farmhouse Style Direction
Farmhouse style has several distinct directions rather than one fixed look, so choose the version that best suits your room. Mixing multiple farmhouse styles in one space can feel overwhelming; even three distressed birdhouses can contribute to that effect. Choose a style direction first to simplify the DIY decisions that follow.
- Black metal accents suit modern farmhouse, where warm neutrals, cleaner lines, and fewer frills shape the look.
- Thrifted wood gives vintage farmhouse more patina, while softer colors create a collected-over-time look.
- Shabby chic uses painted furniture, lighter distressing, and florals for a mood of romantic softness.
- Reclaimed wood and pipe shelving give industrial farmhouse a moodier contrast, especially with darker metals.
Choose one style direction, then add a single wild-card item to keep the room cohesive without making it feel too uniform.
More Livable Farmhouse Trends
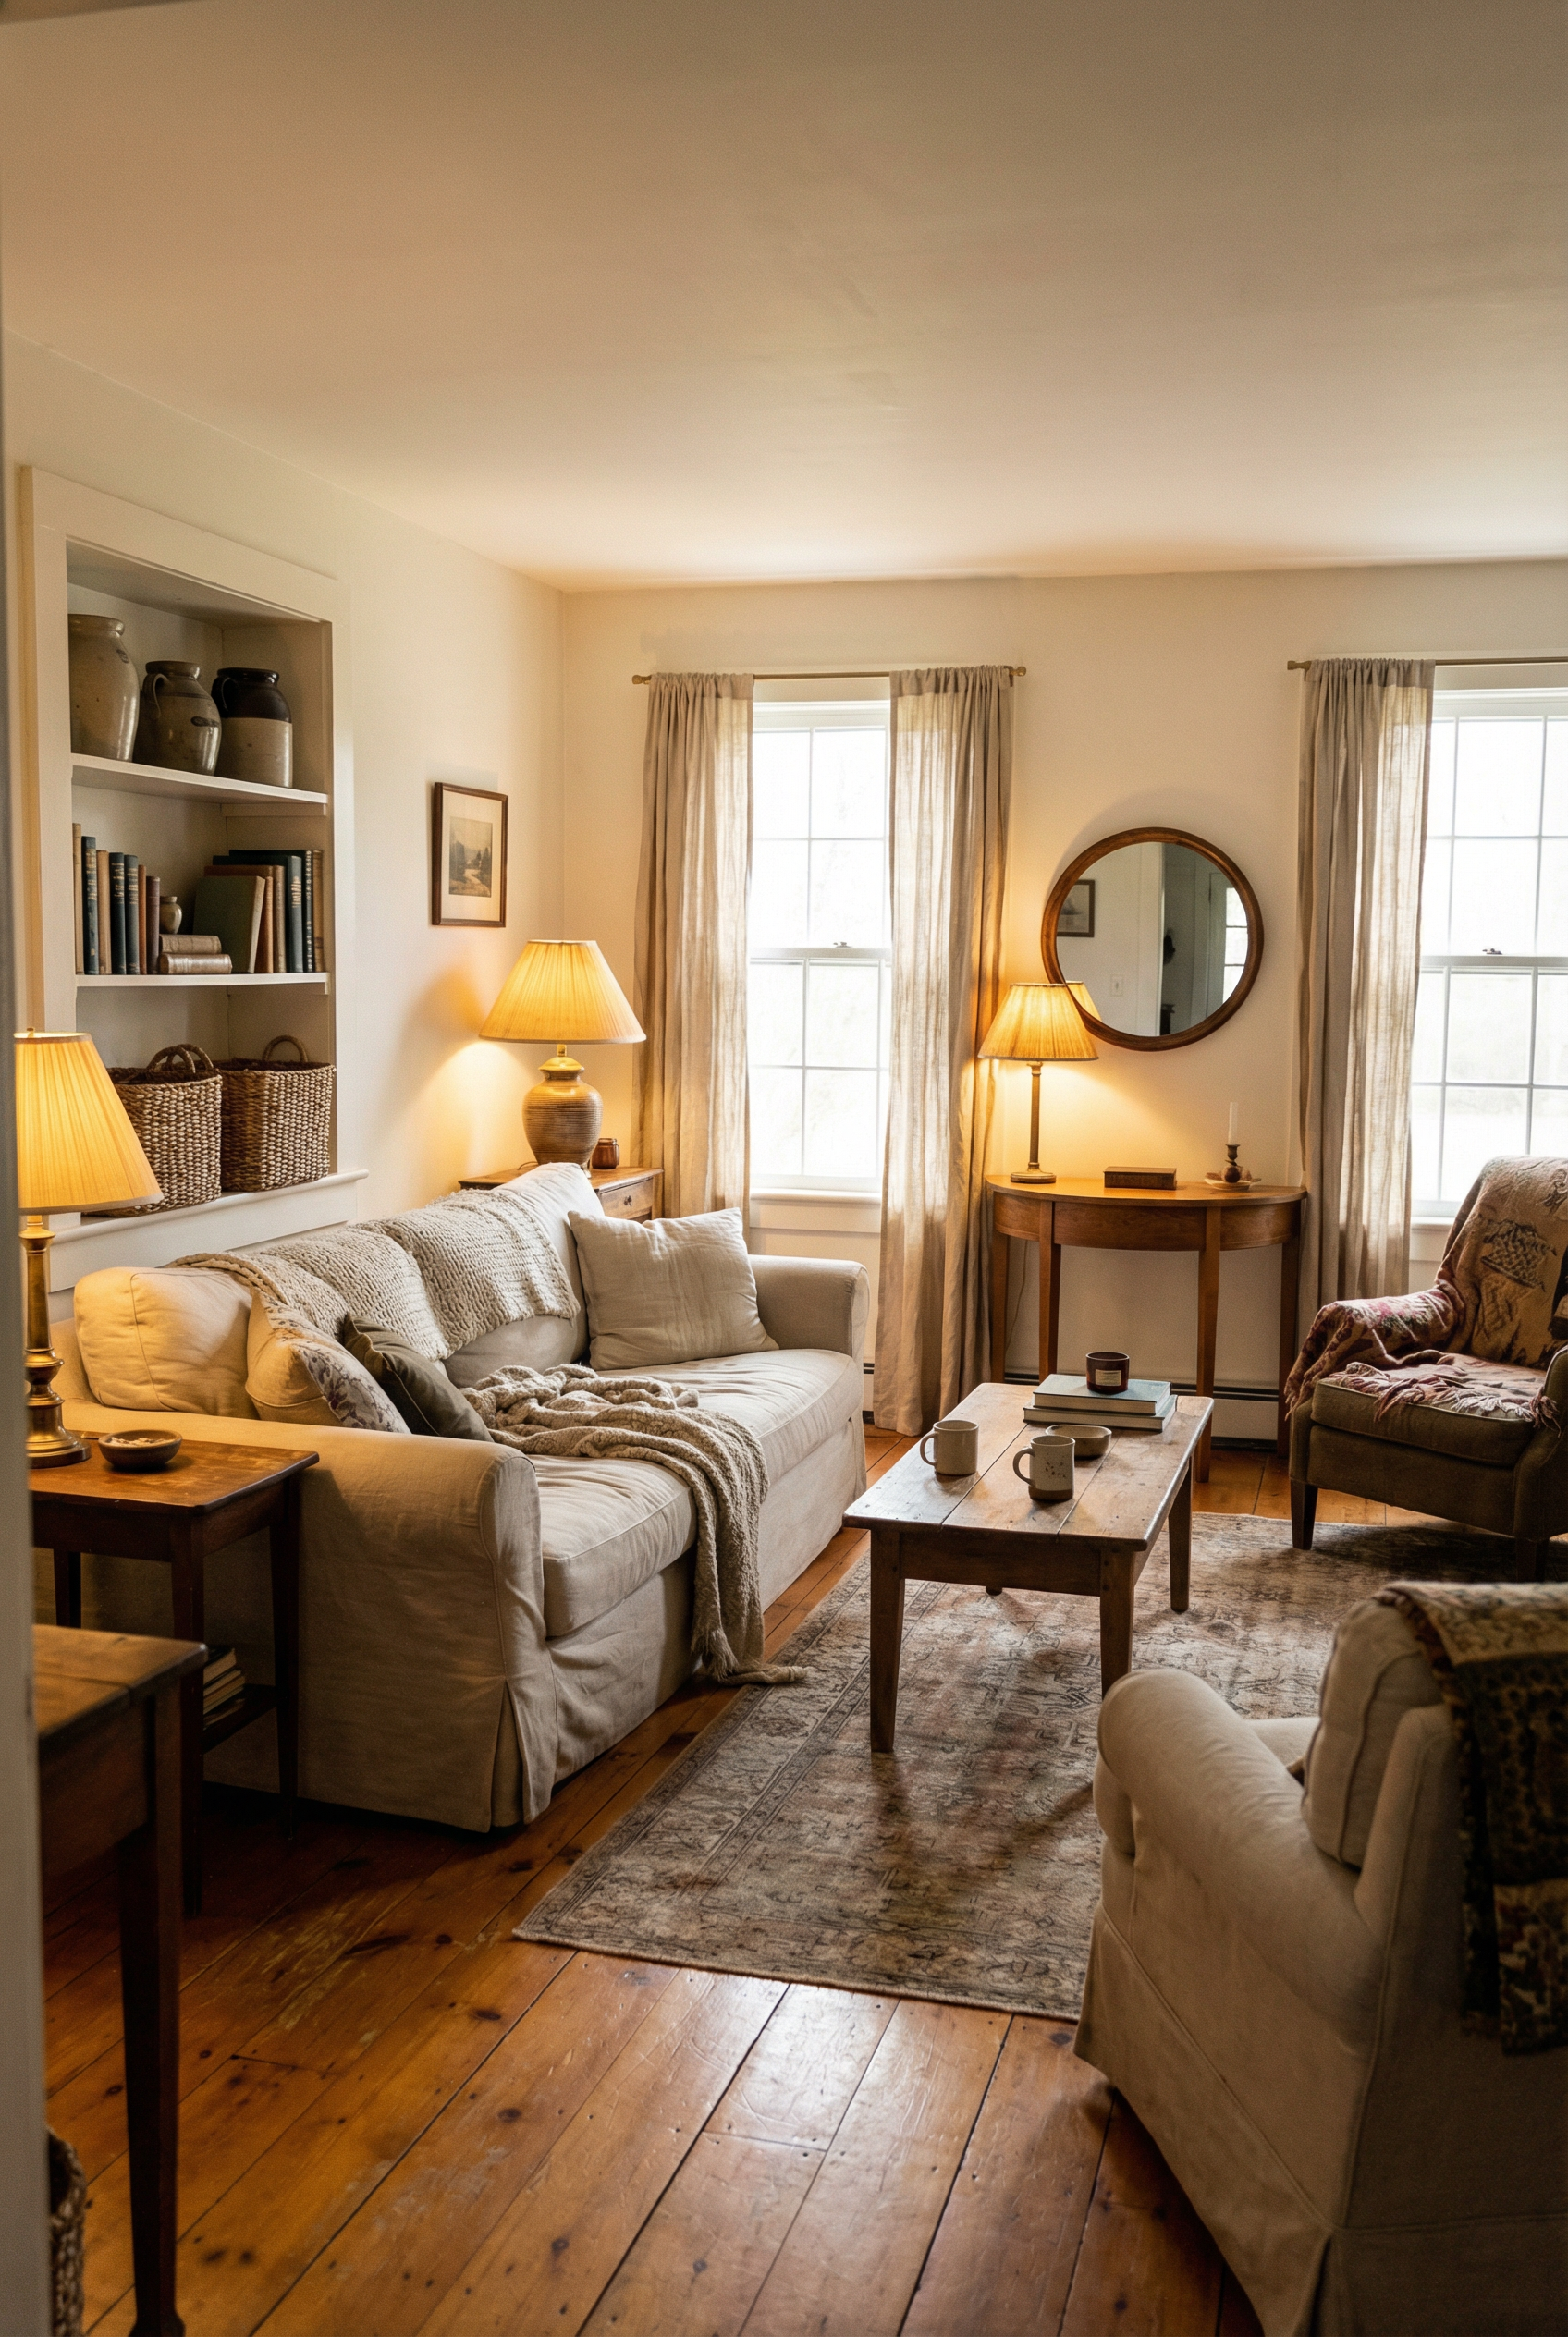
Wood tones are becoming more widespread, shifting from orange to honey-warm colors, while warm whites replace icy whites to give farmhouse style a softer, more grown-up look.
Word signs are becoming less common as texture takes a larger role through baskets, chunky ceramics, linen, and worn wood. Farmhouse lighting is shifting toward vintage pieces, such as shaded lamps and old-school sconces, that create a glow rather than glare. Organic shapes, including rounded mirrors and curvy decor, are also reducing the style’s boxiness, while sustainability and reuse are becoming more important.
Room Foundation Before Building
A small rug or low curtain placement can make the room look awkward, and a single ceiling fixture can create unflattering light. Begin with the room foundation before building the rest of the room.
- Finish the surrounding walls in warm white, soft greige, or muted sage.
- Choose a larger rug so the front legs of every seating piece rest on it.
- At the window, hang the curtains higher and wider. Set the rod 4 to 6 inches above the trim, then extend the curtain width 6 to 10 inches beyond the window on both sides.
- Use layers of overhead lighting and lamps, then include one glow source to complete the lighting plan.
A well-planned foundation supports the farmhouse color scheme and textiles, helping each project look more cohesive and finished. Swapping the lampshade is a low-cost way to provide a cozy boost.
Renter Farmhouse Decor Without Holes or Patching
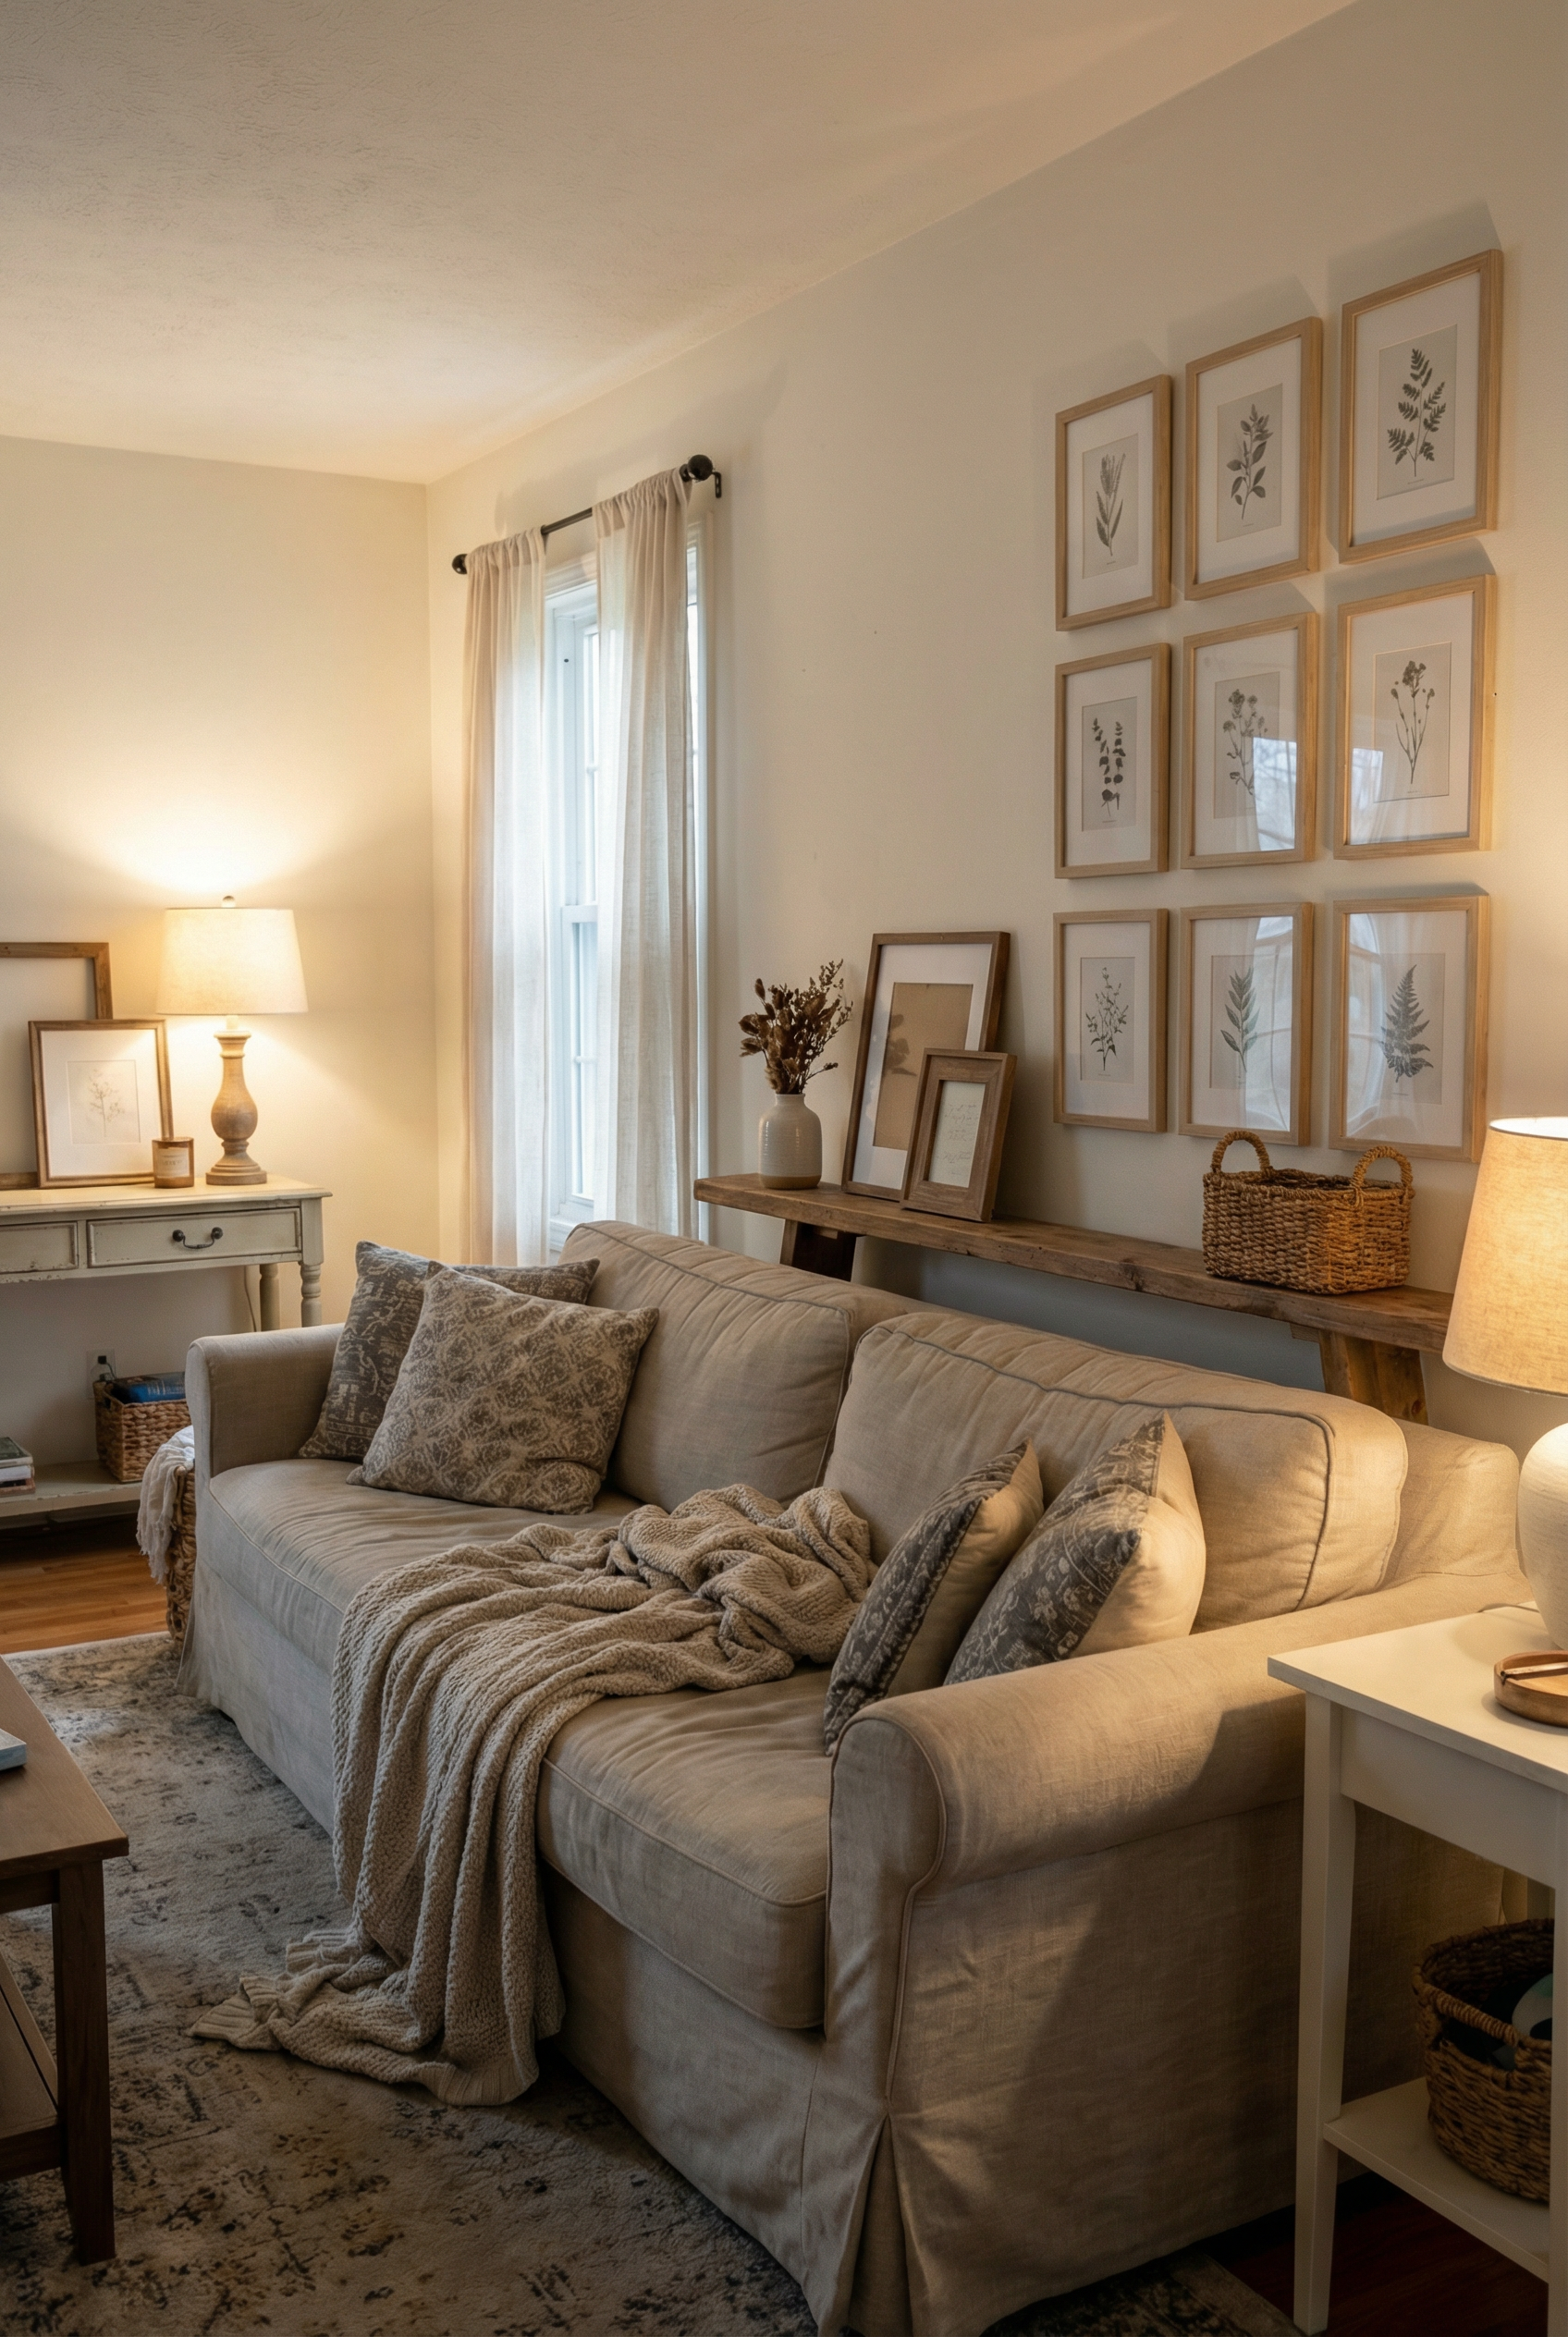
Renters can create a cozy farmhouse look without drilling or patching, helping avoid damage and deposit anxiety. Leaning pieces and removable strips can update the walls without leaving marks.
- Behind the sofa or beside a console, lean a long picture ledge against the wall. Layer frames, a small vase, and one basket across the ledge.
- A lightweight frame grid with uniform-size frames can go up with Command strips. Clean the wall before mounting it.
- Over the sofa, place a large, soft throw. The throw can hide stains while adding a layer of texture.
Common Farmhouse Mistakes to Avoid
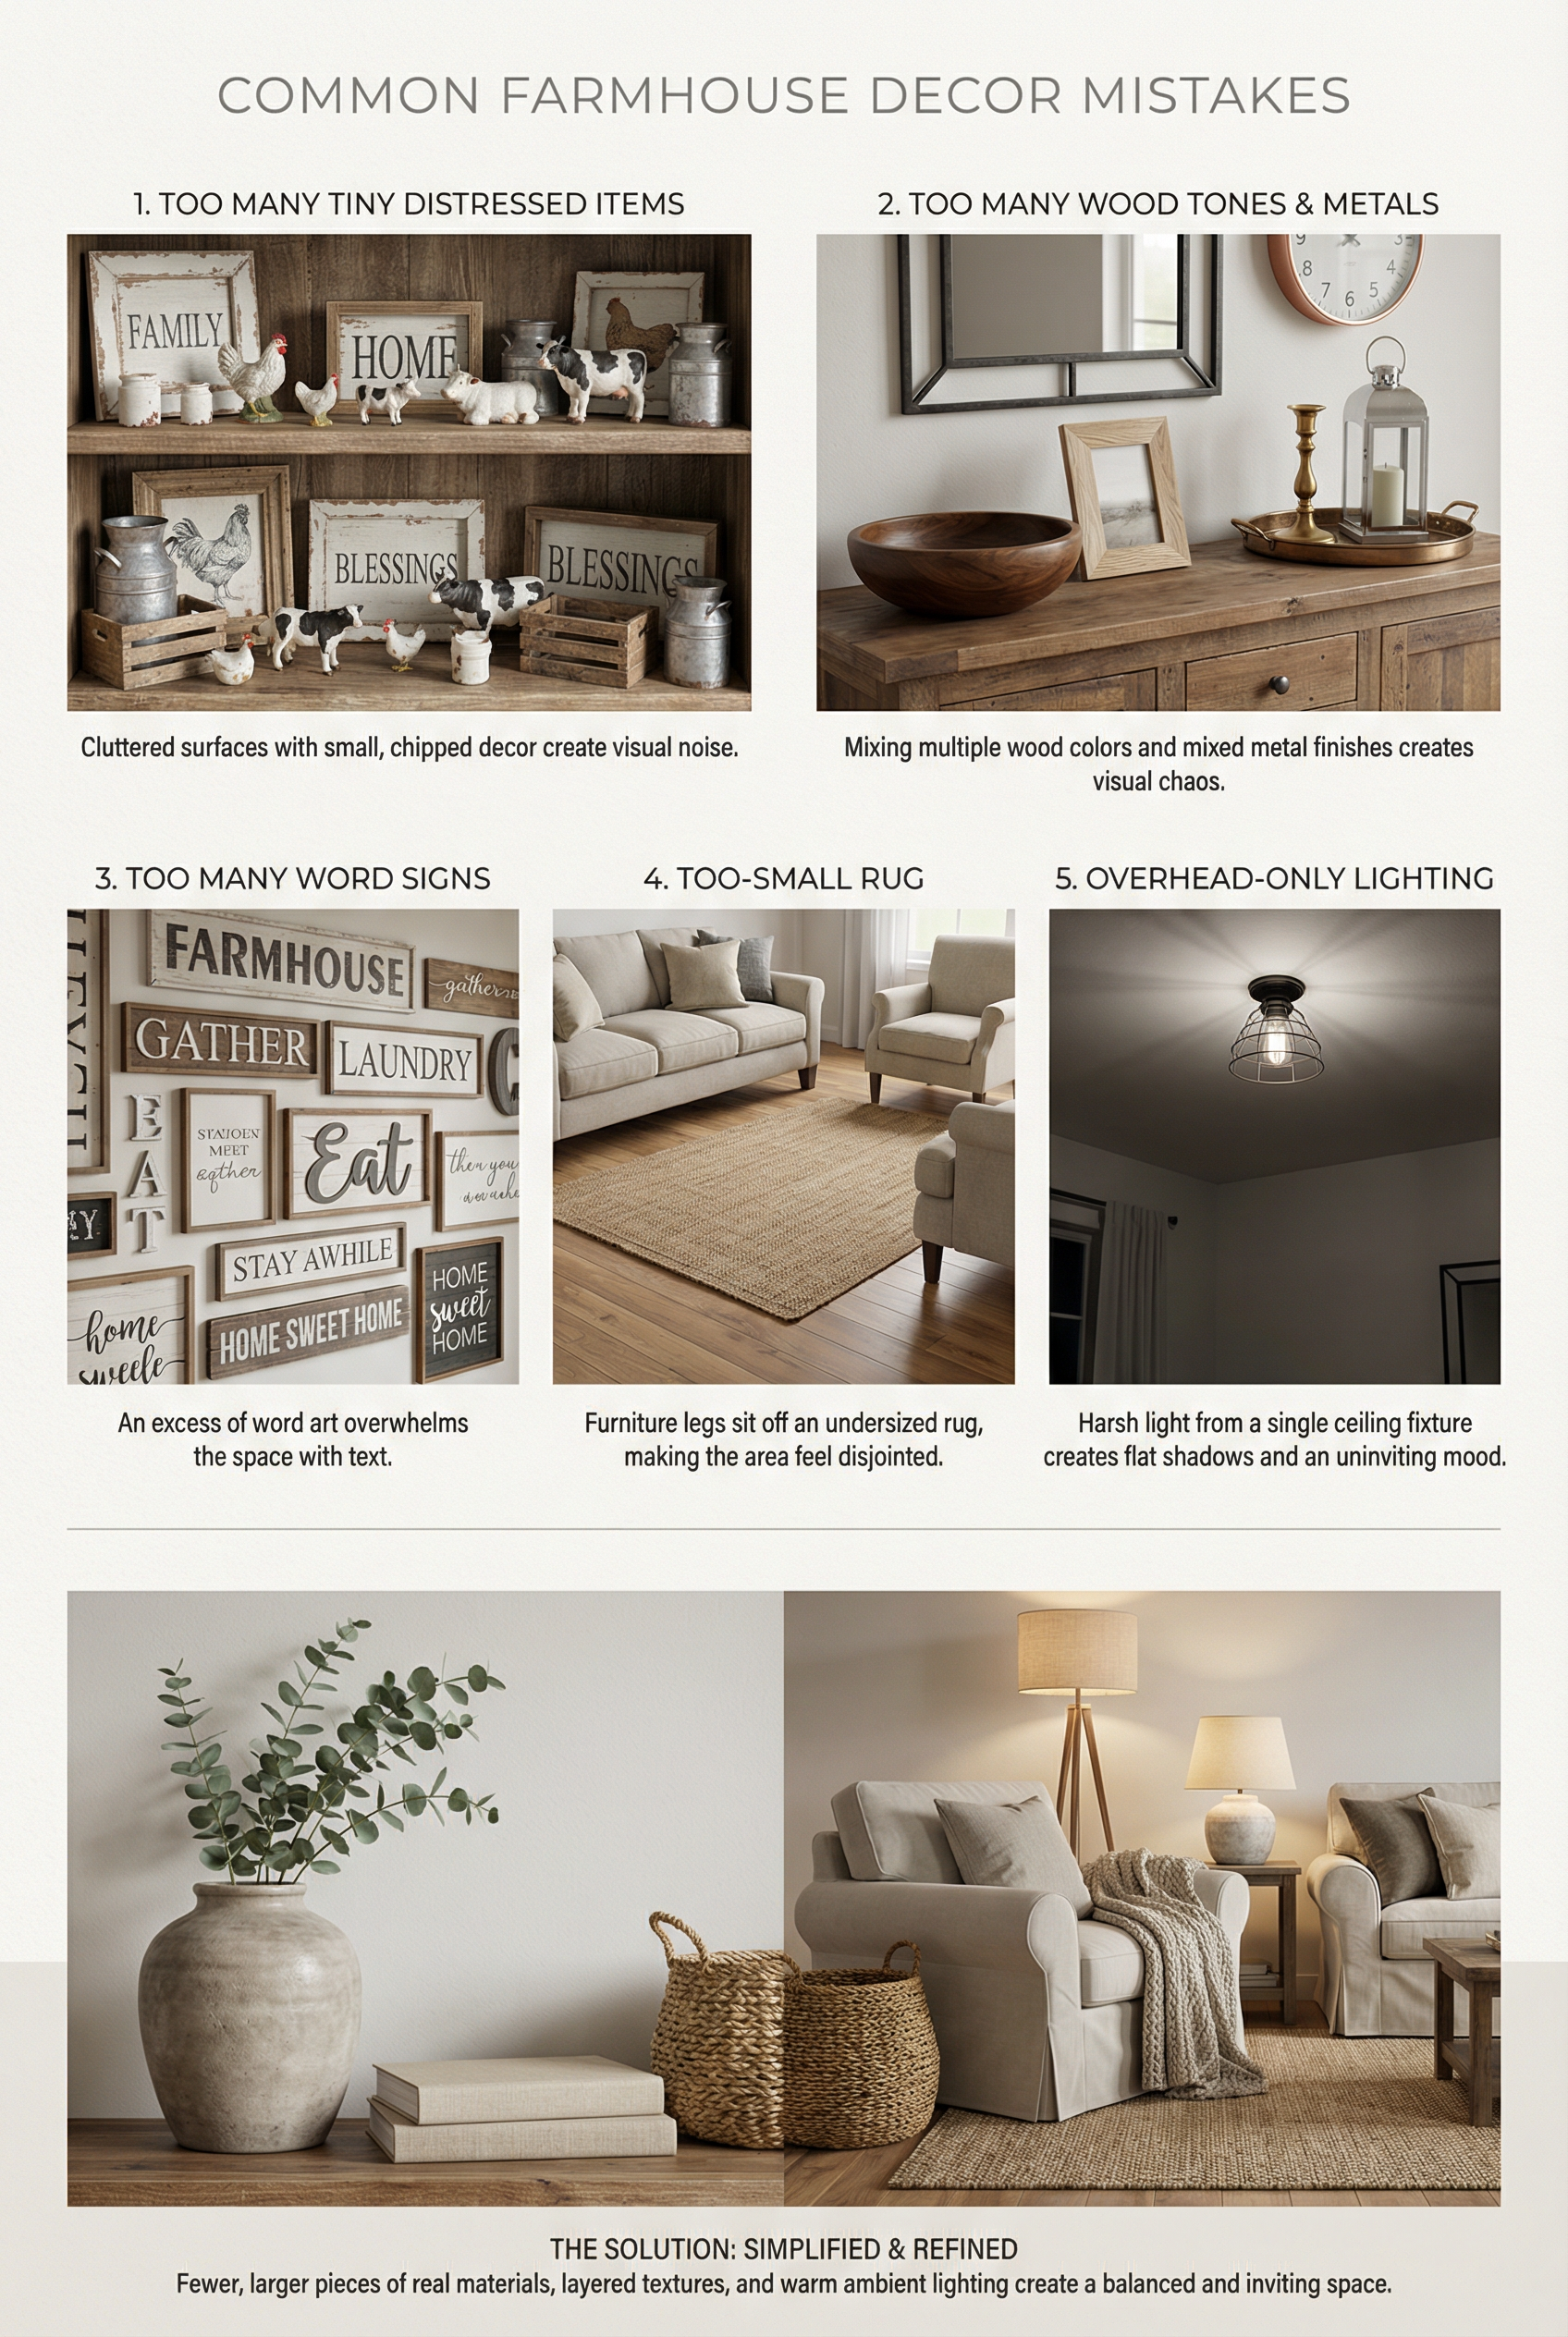
Tiny distressed chickens and other small distressed items can create a kitsch, craft-store effect, especially when grouped together. Mixed wood tones and metals can create visual noise when a room has five wood tones and four metals, while many word signs can make the walls feel noisy. An undersized rug can make furniture appear to float, and lighting that comes only from overhead can make the room feel less cozy.
Simplify farmhouse decor with larger furniture, fewer items, and more texture in the room materials. On a surface with several small objects, remove three of them and replace them with one larger item made from a real material.
Projects from Upcycled Wood
Wood gives a farmhouse room weight and warmth, and it can make the room feel sturdy. Dings may appear intentional in wood, while uneven stain can read as character.
Wood projects can offer quick rustic decor.
Narrow Pallet Console for Small Spaces
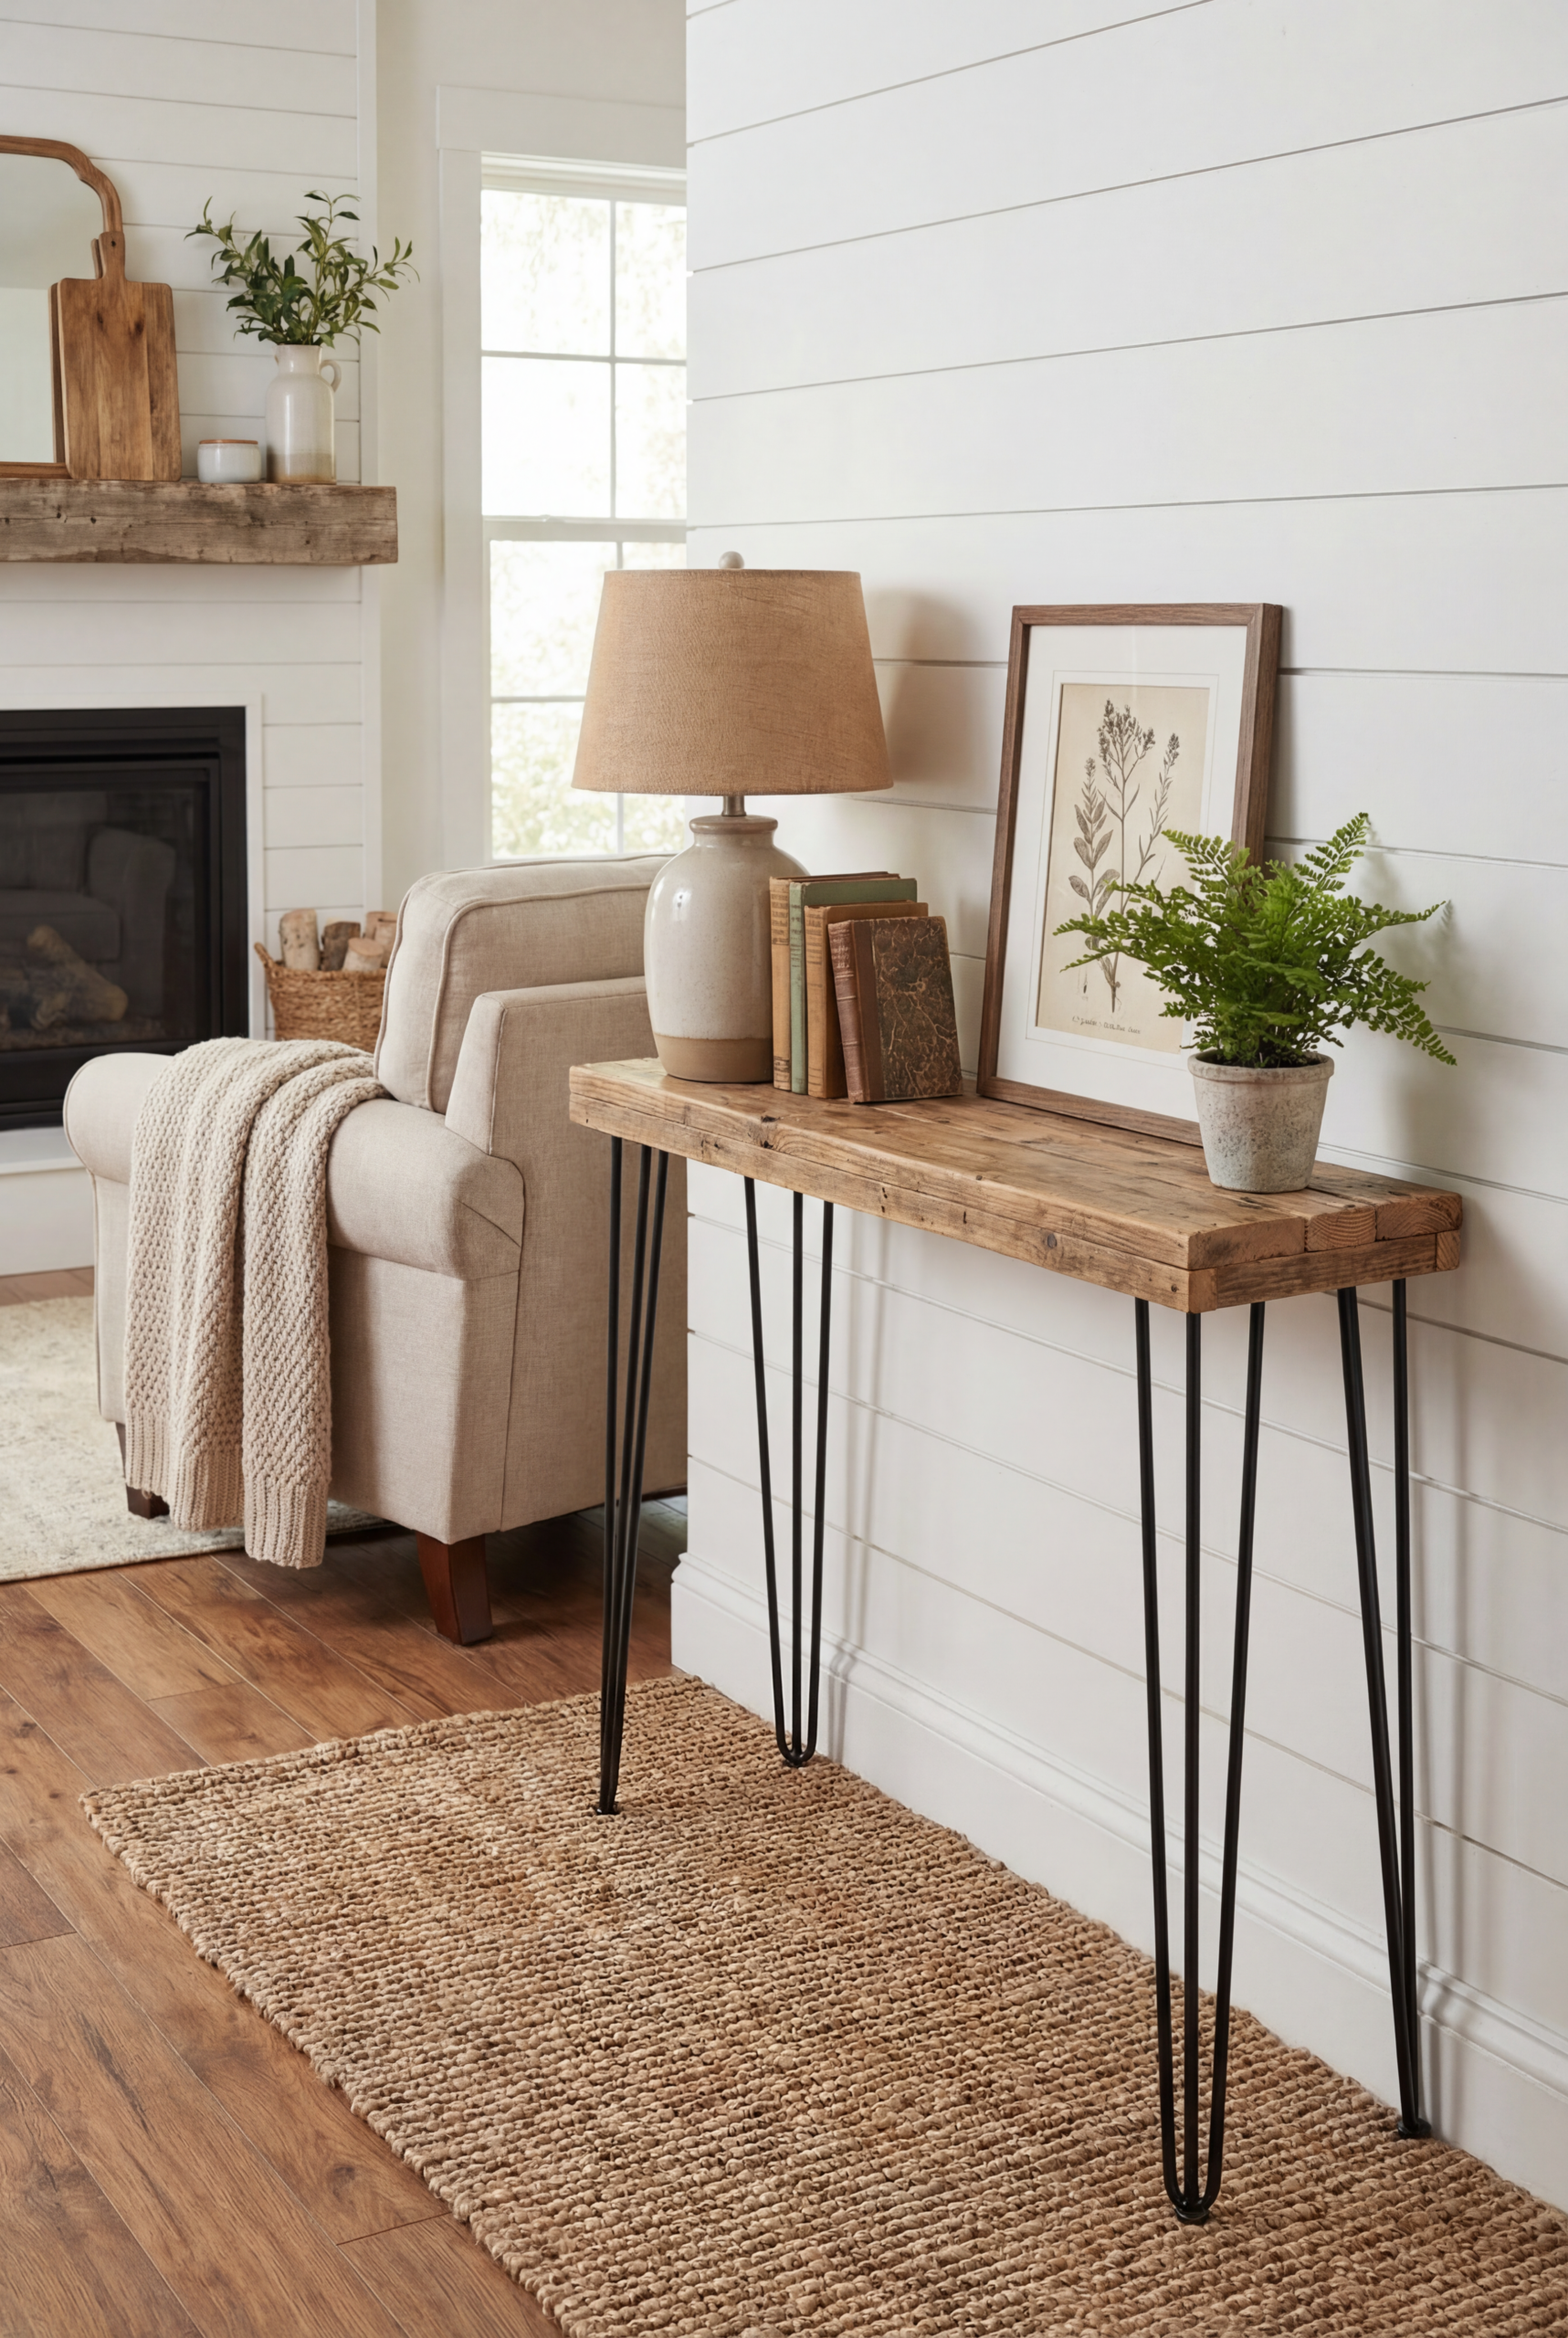
Keys and remotes can sit on the console beside a lamp, giving the table a clear landing surface. As a starter build, a pallet console table also helps with clutter control.
A pallet console table costs $20-$80 and suits a beginner build that takes 2-4 hours. Place it behind a sofa or along an entry wall to control clutter and support farmhouse organization.
Console materials
- Pallet boards or 1x boards can form the console table.
- Build the console frame from 2x4s.
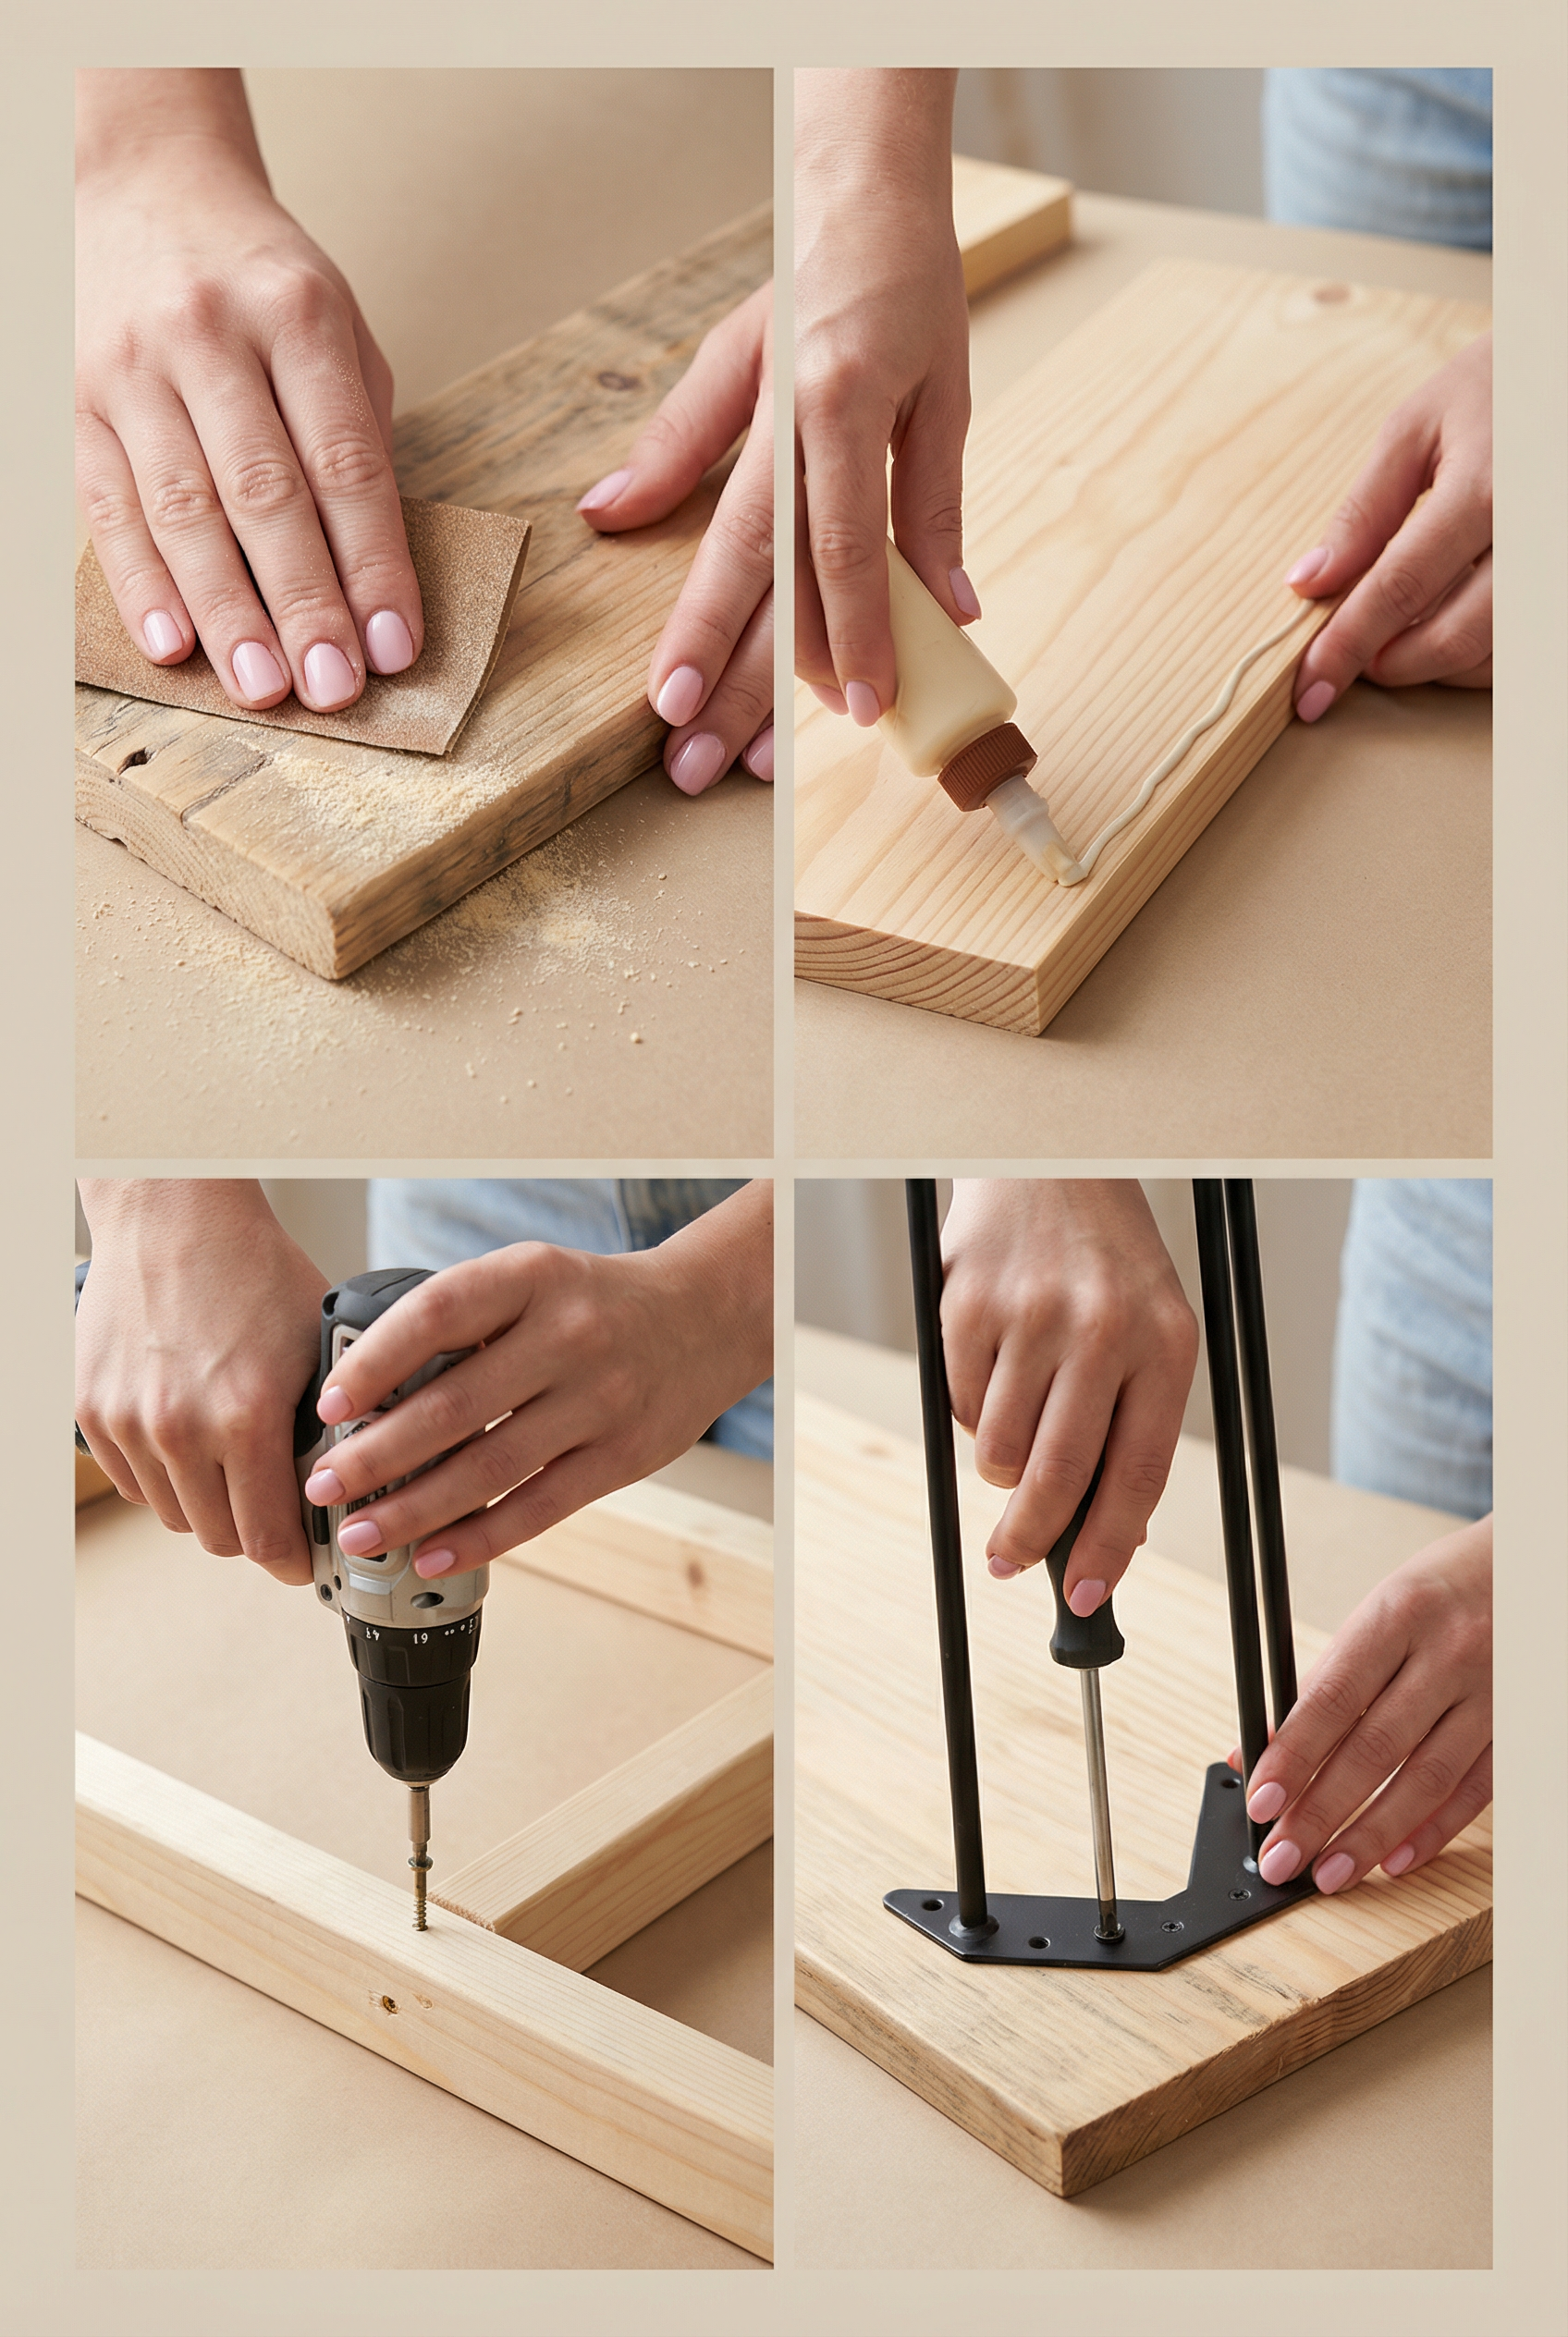
- Use screws, glue, and sandpaper to assemble the console table.
- Optional hairpin legs can support the console table.
Console construction steps
- Start with the console boards and sand them through 80 grit, 120 grit, and 220 grit.
- Build a rectangular frame for the console.
- Attach the console boards across the top.
- Add either hairpin legs or 2×2 legs to support the console.
- Finish the console with stain or paint, then seal it.
A warm stain with a matte topcoat can resemble aged wood without making the finish look grimy. Place a basket under the console and style the top with a thrifted lamp to create a functional zone.
Barn Door TV Stand for Storage
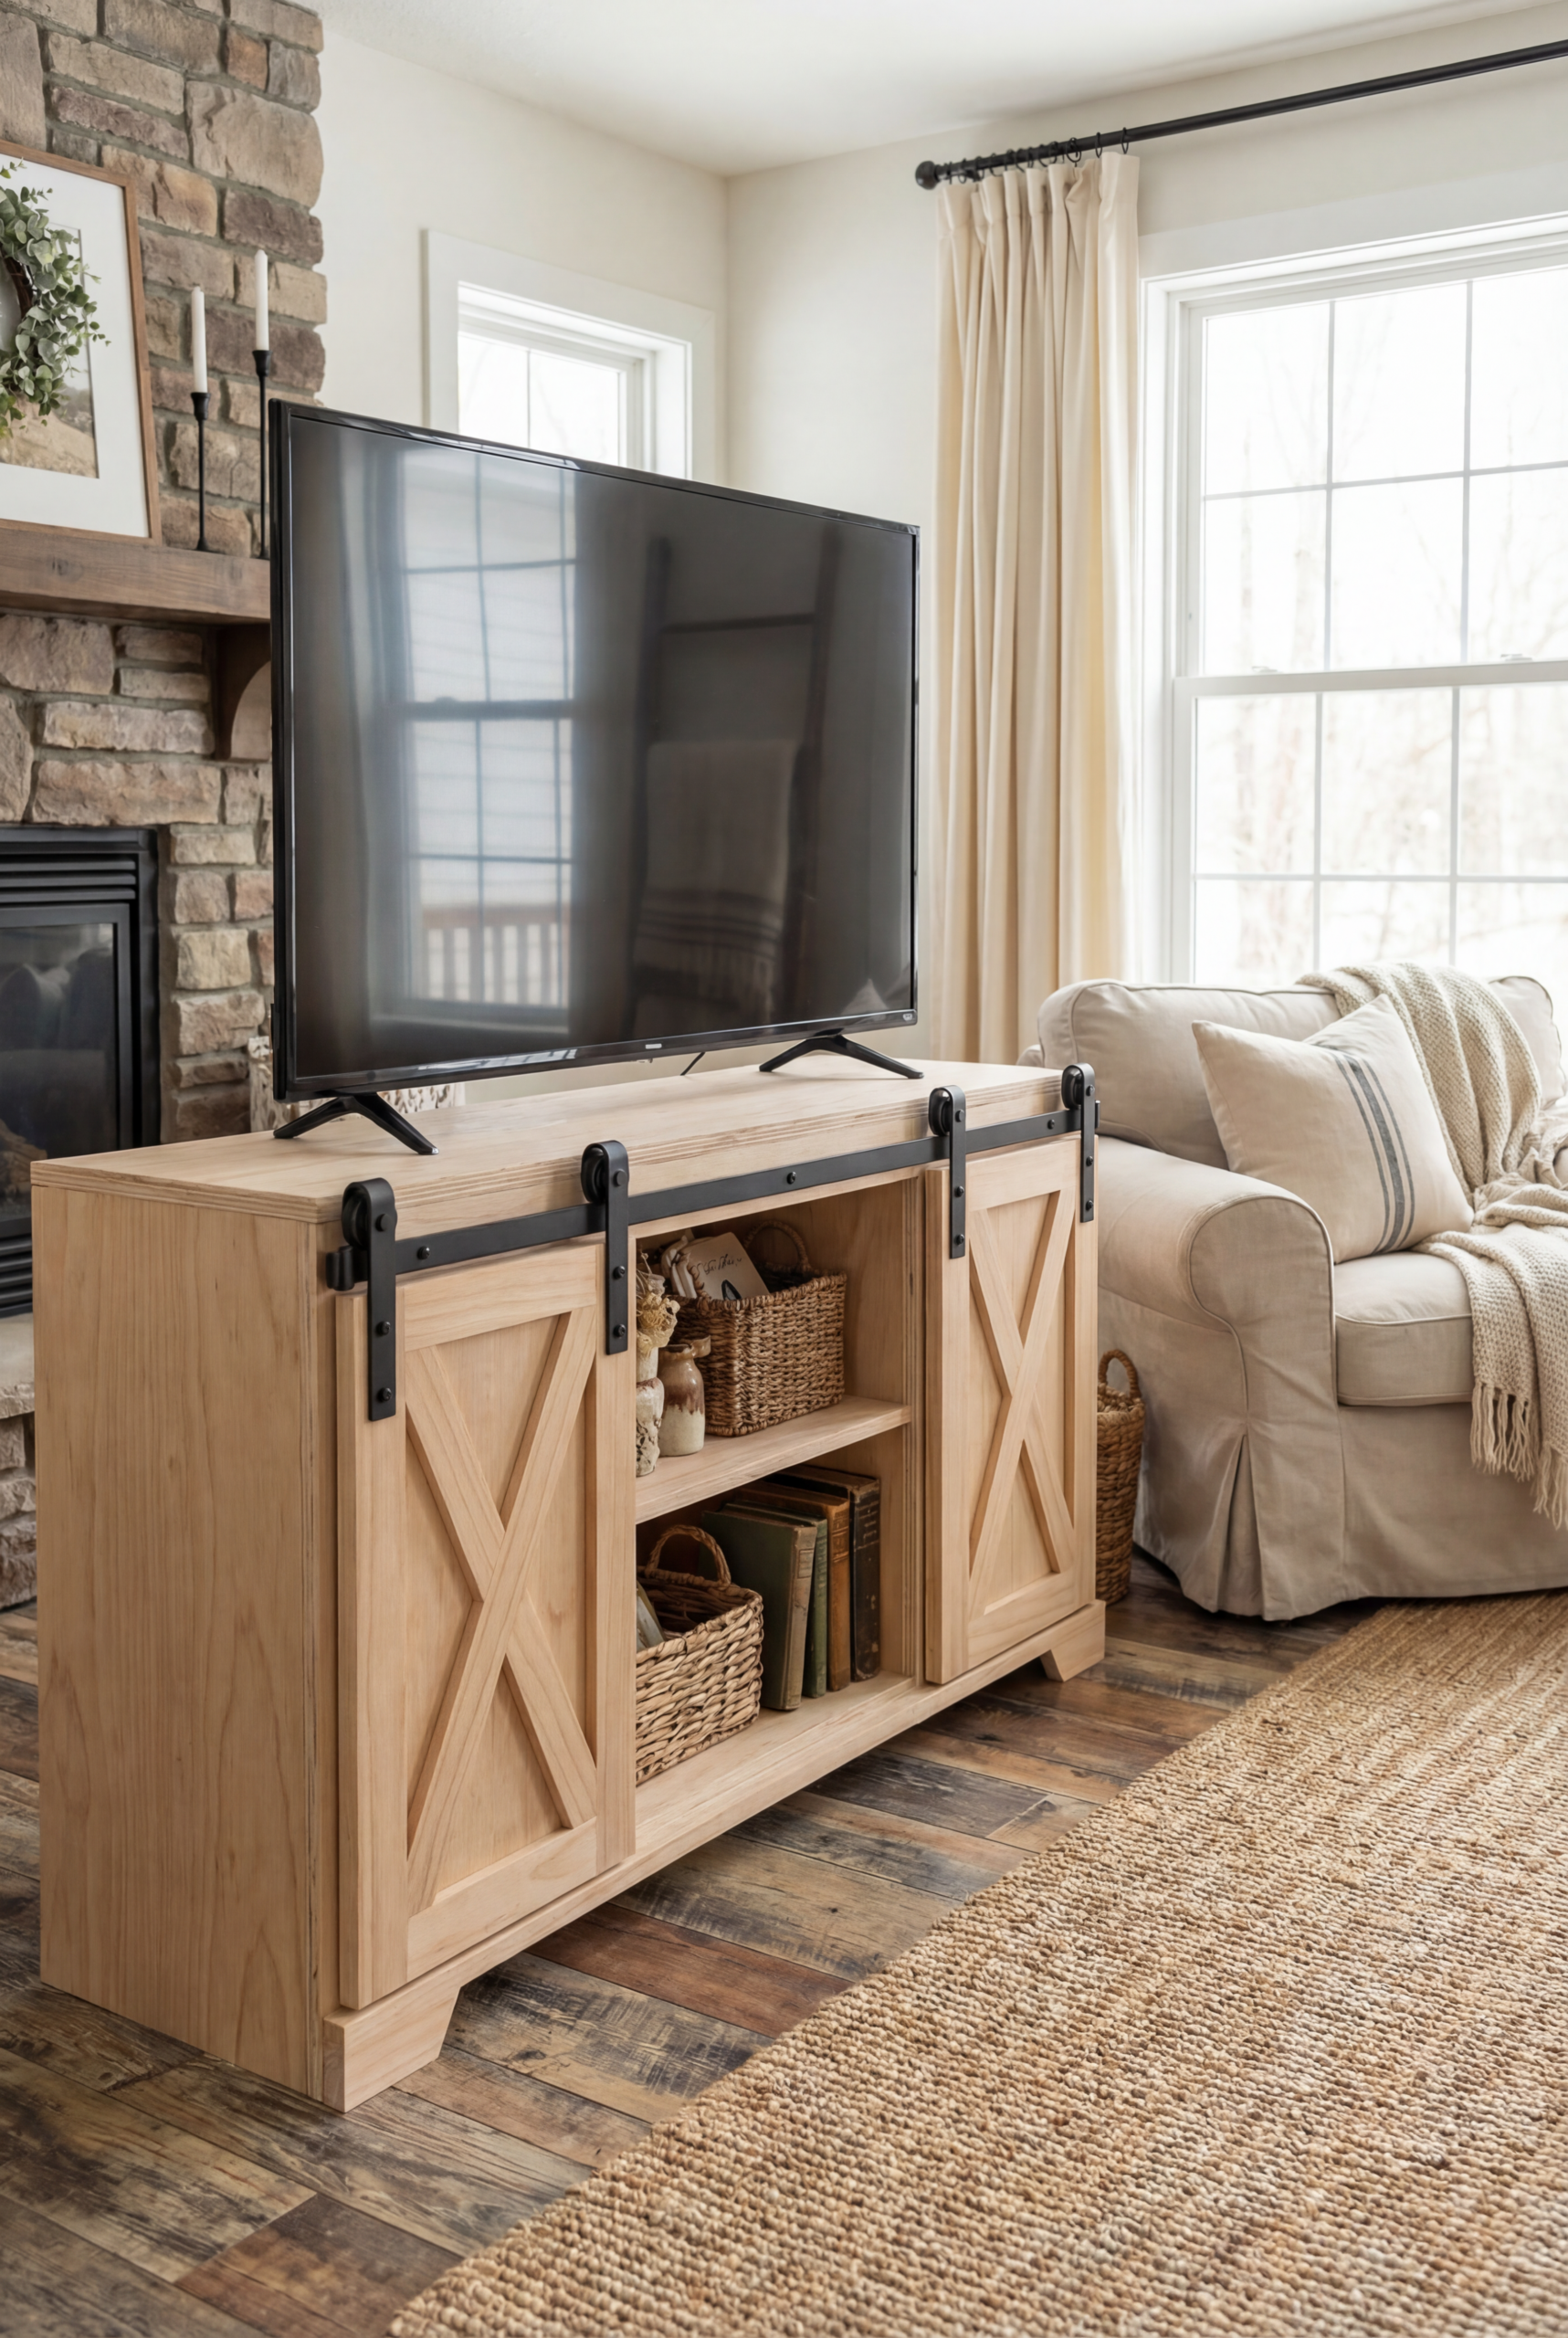
For an intermediate weekend project, a barn door TV stand costs $120-$250. It provides cable hiding, storage, and space for farmhouse accents.
A chunky wood TV stand can soften the TV wall, provide storage, and make the side of the room feel intentional.
Materials and tools:
- Use 3/4-inch plywood for the TV stand.
- Use 1×3 trim to finish the TV stand.
- Include barn door hardware.
- Use a drill, saw, and level.
Construction steps:
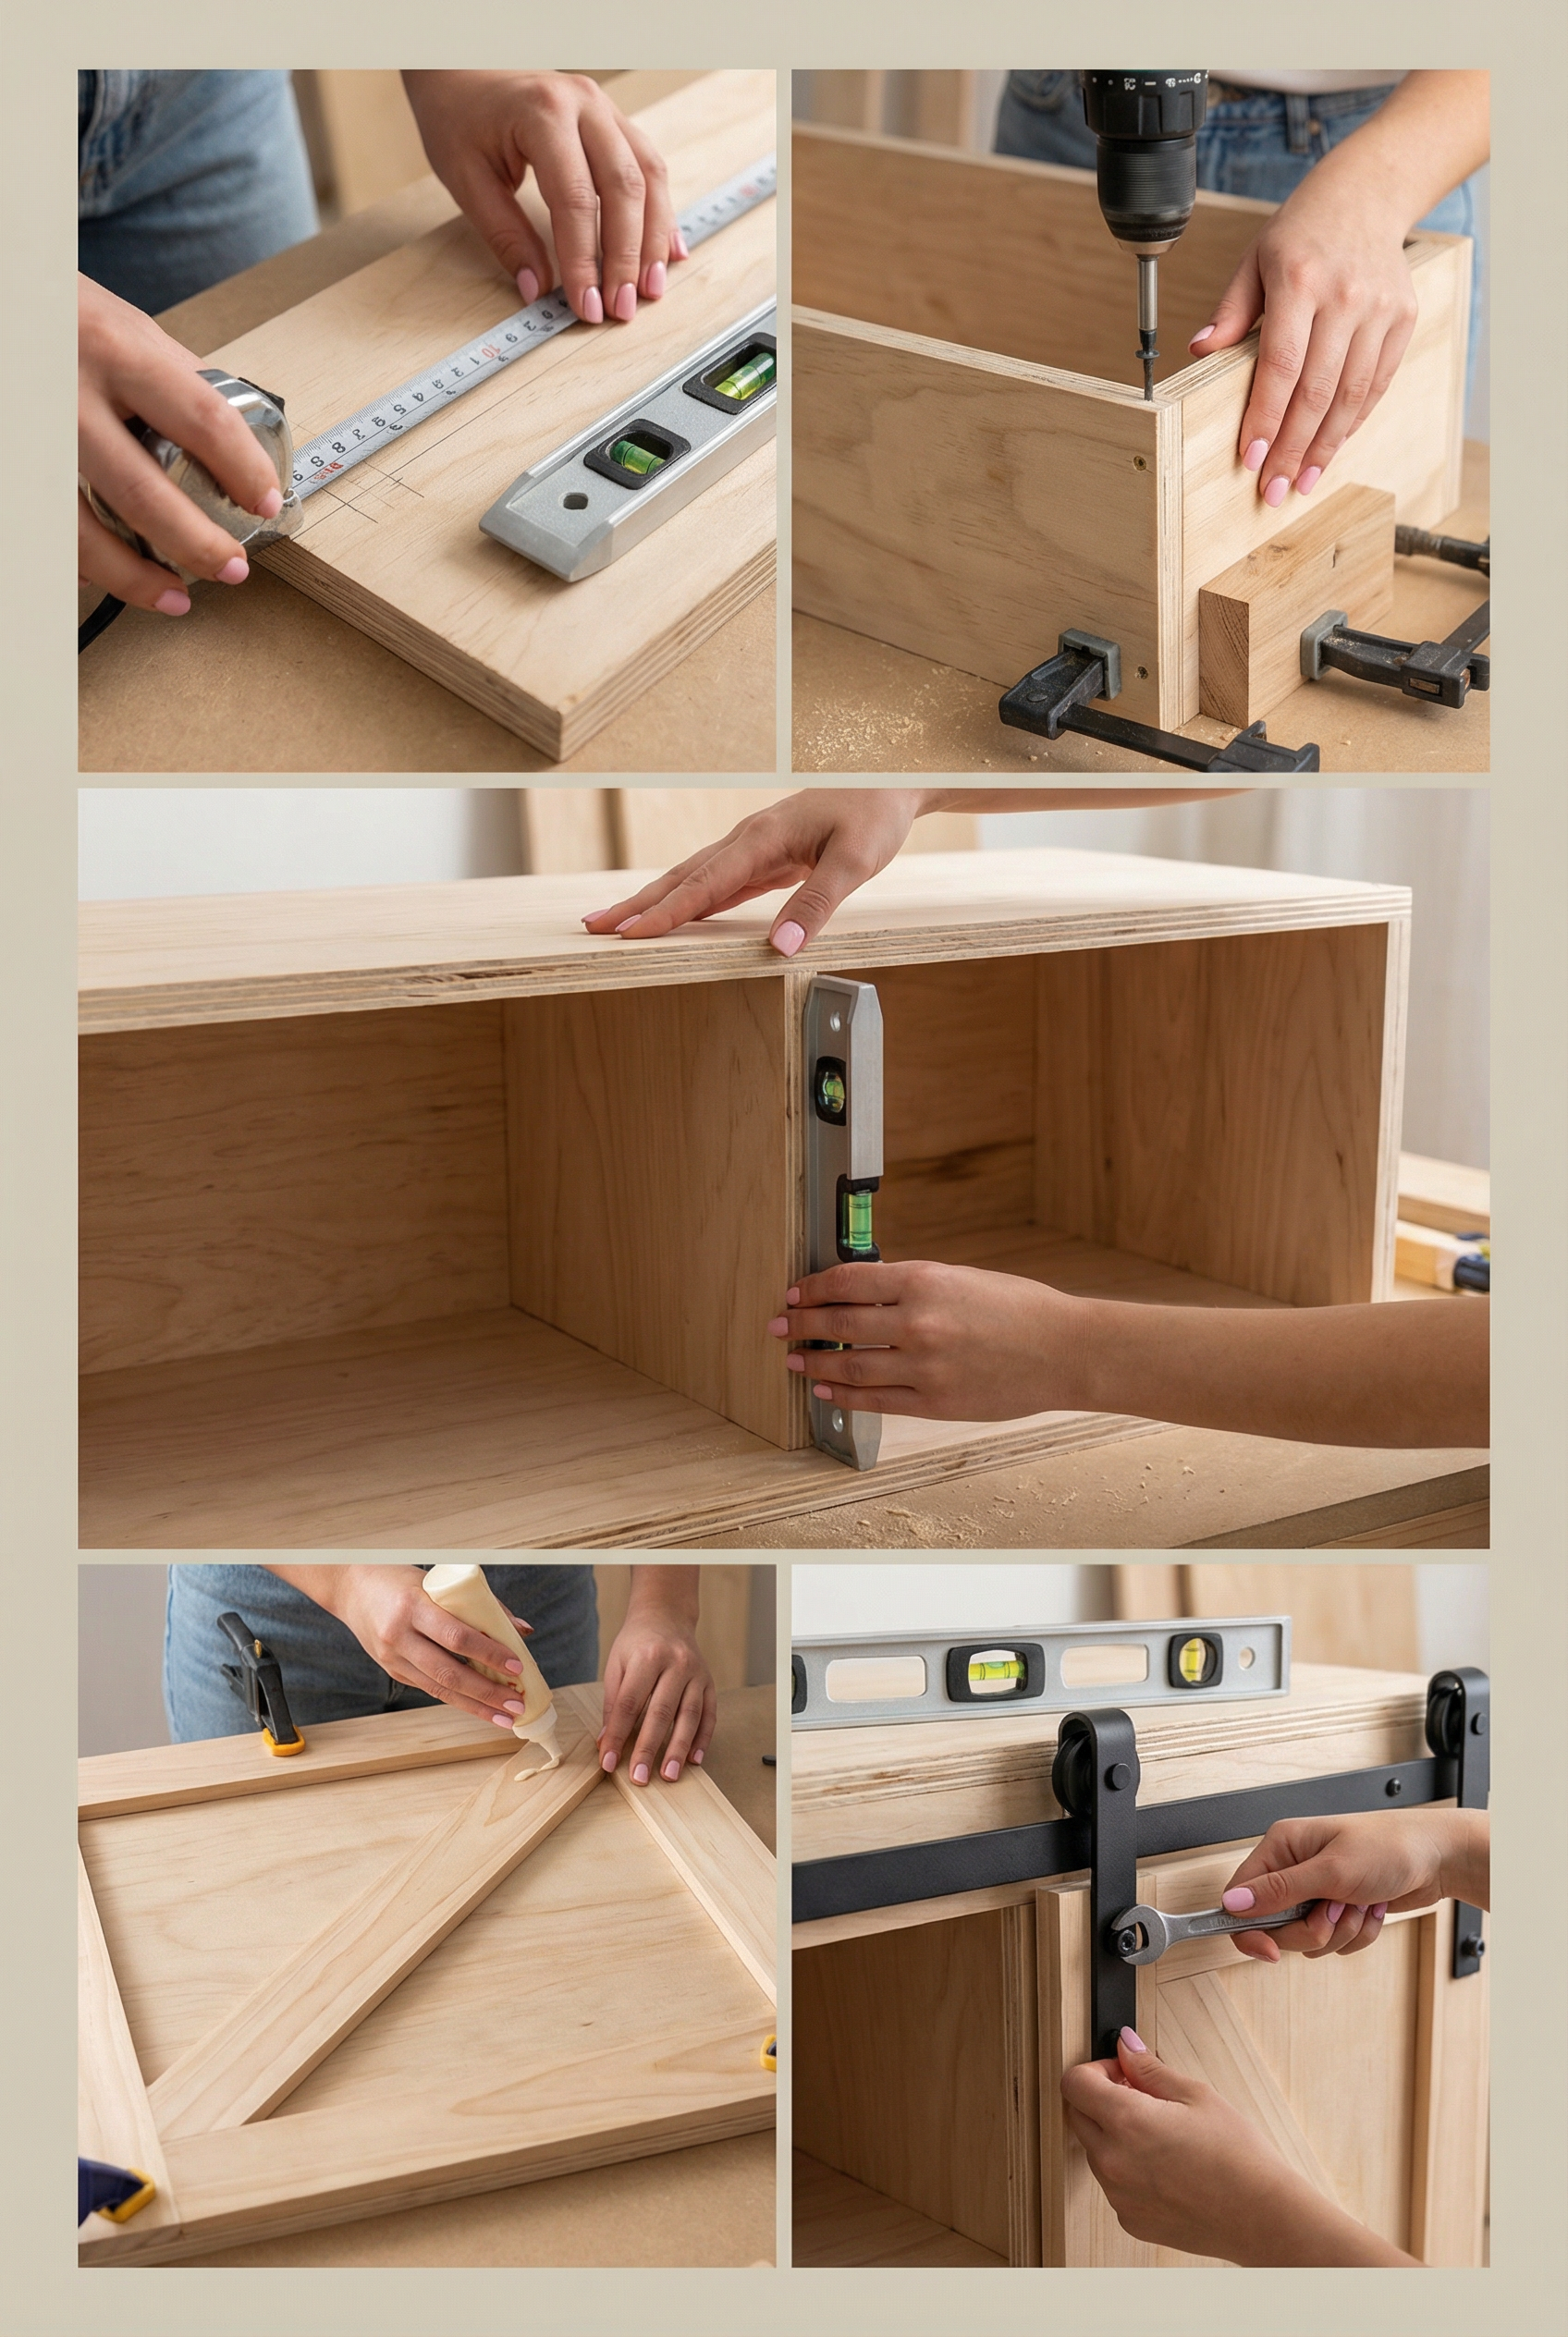
- Start by building the TV stand as a basic box.
- Add a center divider inside the TV stand.
- Make two doors for the TV stand, using a Z-brace as the easiest door-bracing option.
- Install the barn door hardware carefully, making sure it is level.
- Finish the TV stand with stain or paint.
Matte black hardware signals modern farmhouse style, while hiding the cables inside the TV stand can improve the room’s appearance.
Wine Crate Storage Bookcase
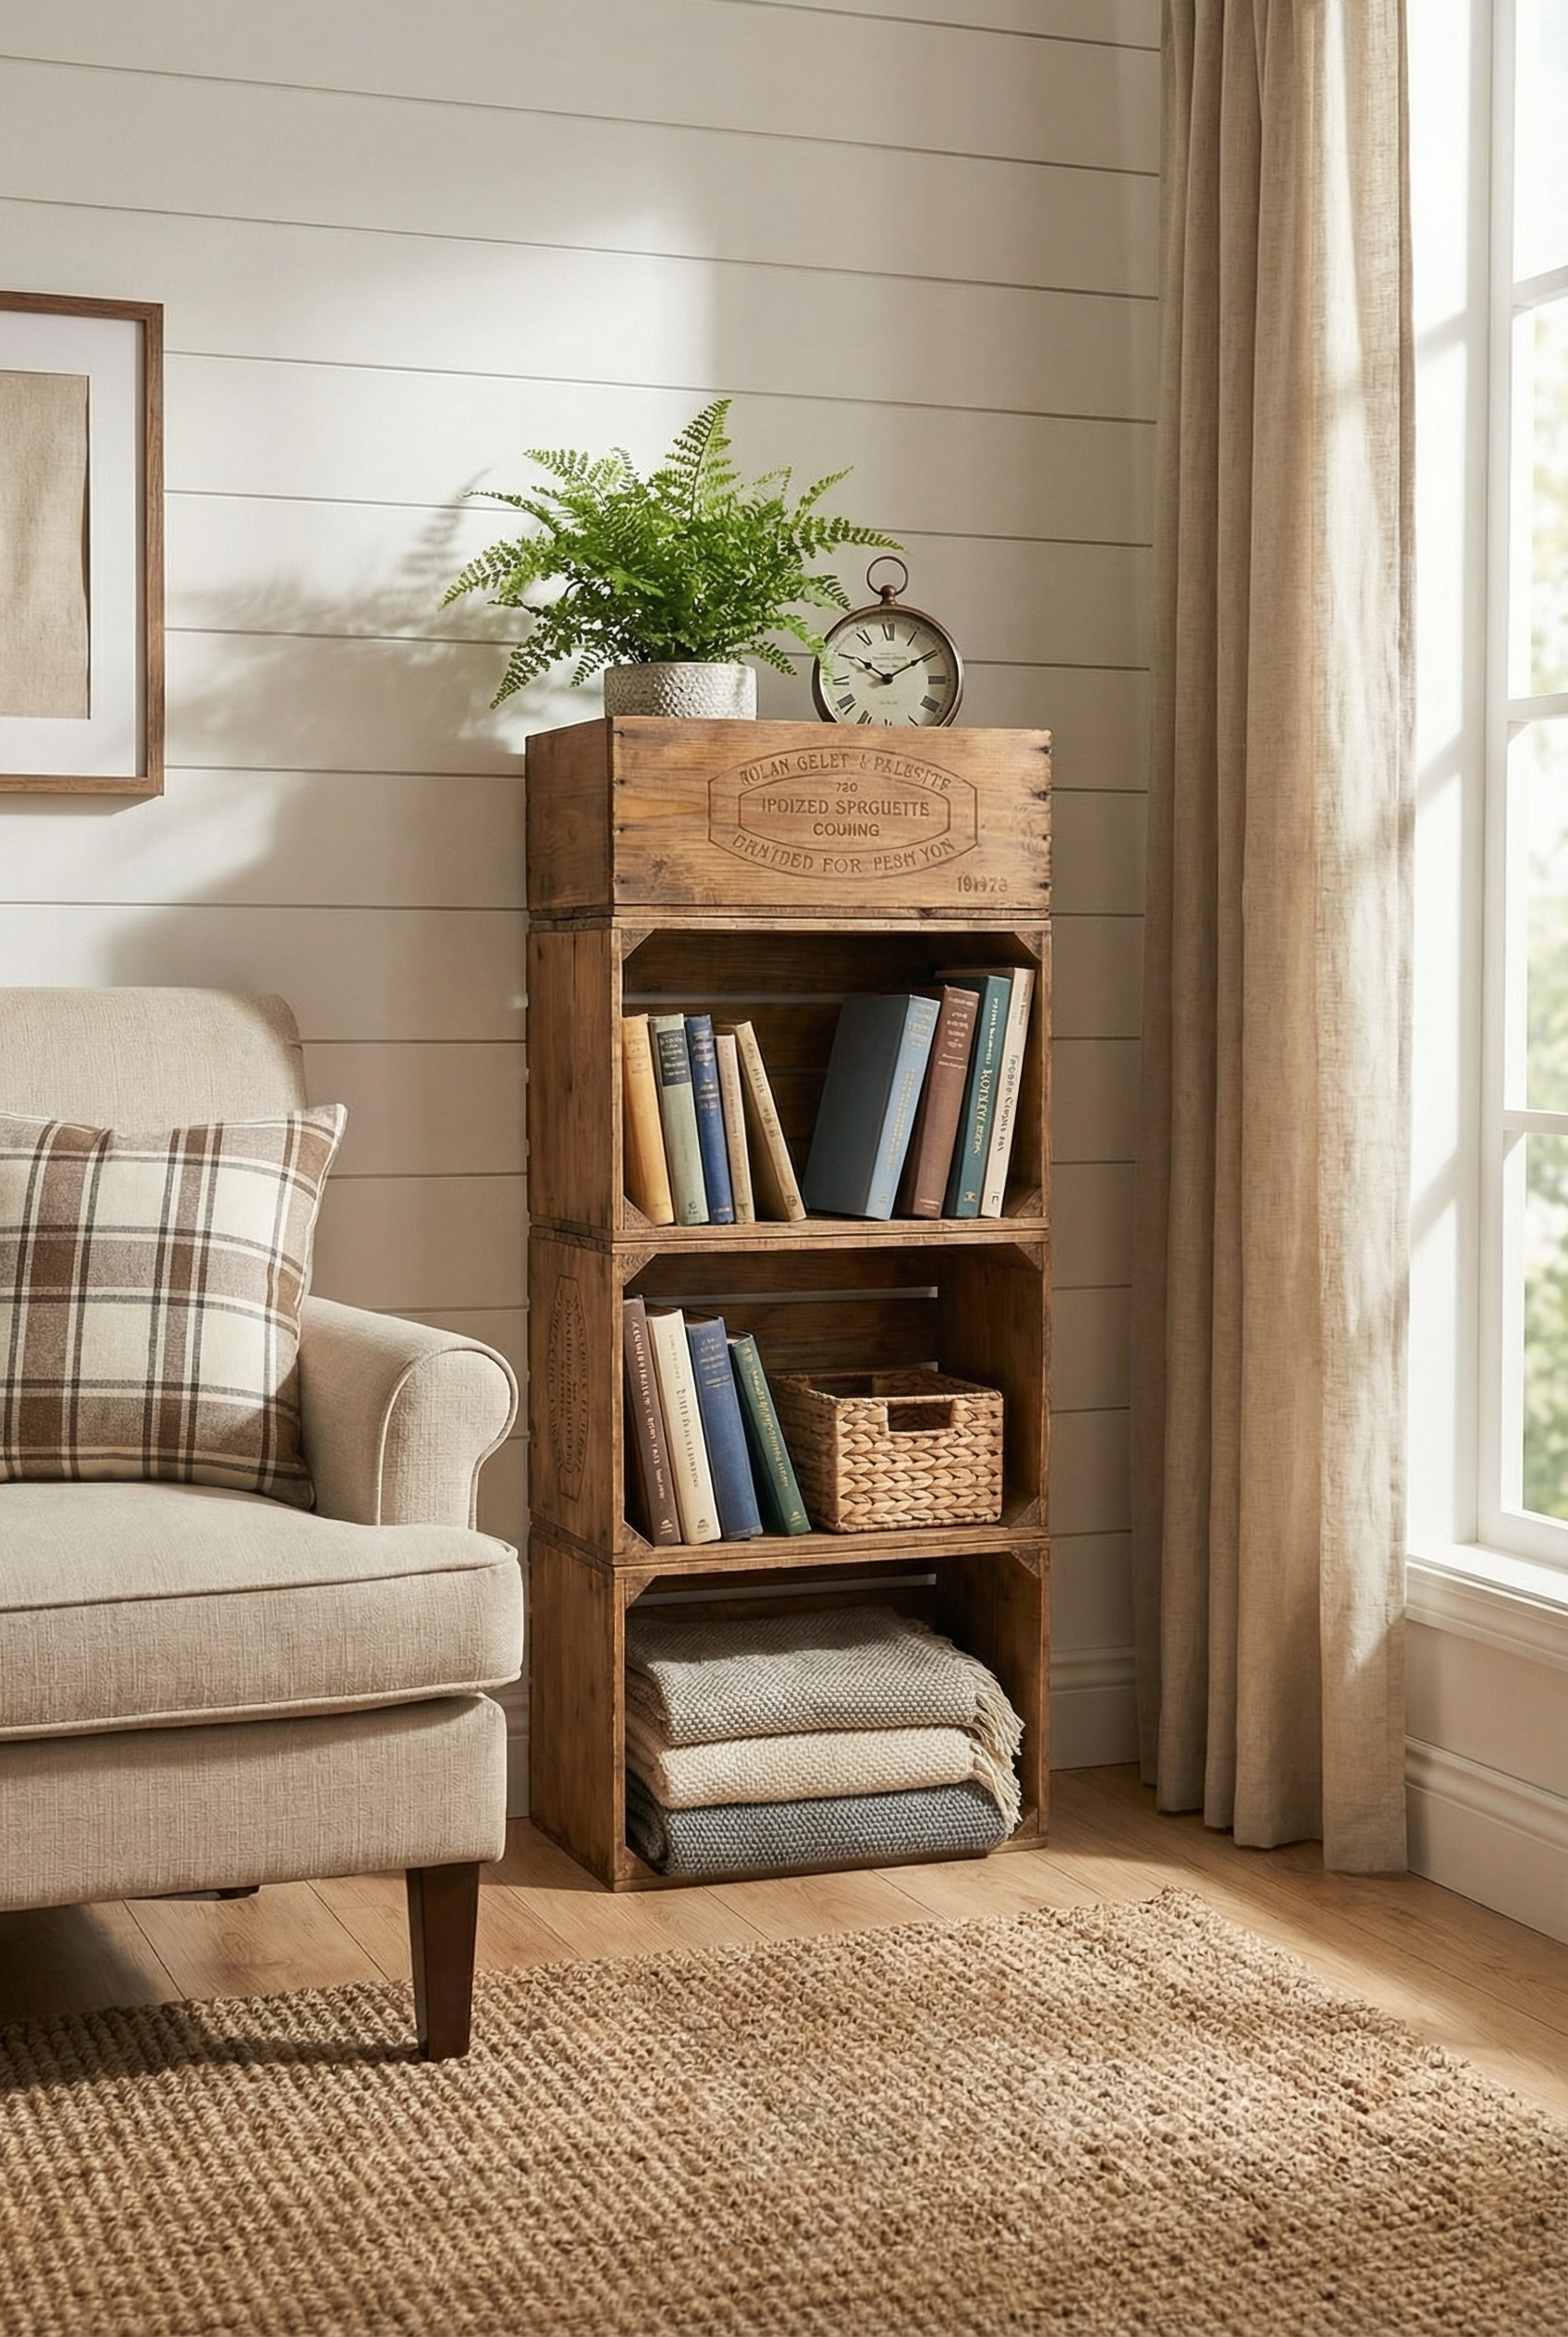
A wine crate bookcase suits small rooms, toy clutter, and storage, and it can sit near seating without crowding the area. The beginner project costs $60-$180 and takes 2-4 hours.
Arrange the crates low and wide so the bookcase feels like a stable piece of furniture rather than a tall stack that could tip. Secure the stack to reduce the risk of tipping.
Gather these bookcase materials:
- Use 6-10 crates for the bookcase.
- The bookcase requires screws and a drill.
- Sandpaper is part of the bookcase materials.
- Finish the bookcase with either paint or stain, followed by a topcoat.
- Baskets are optional for the bookcase.
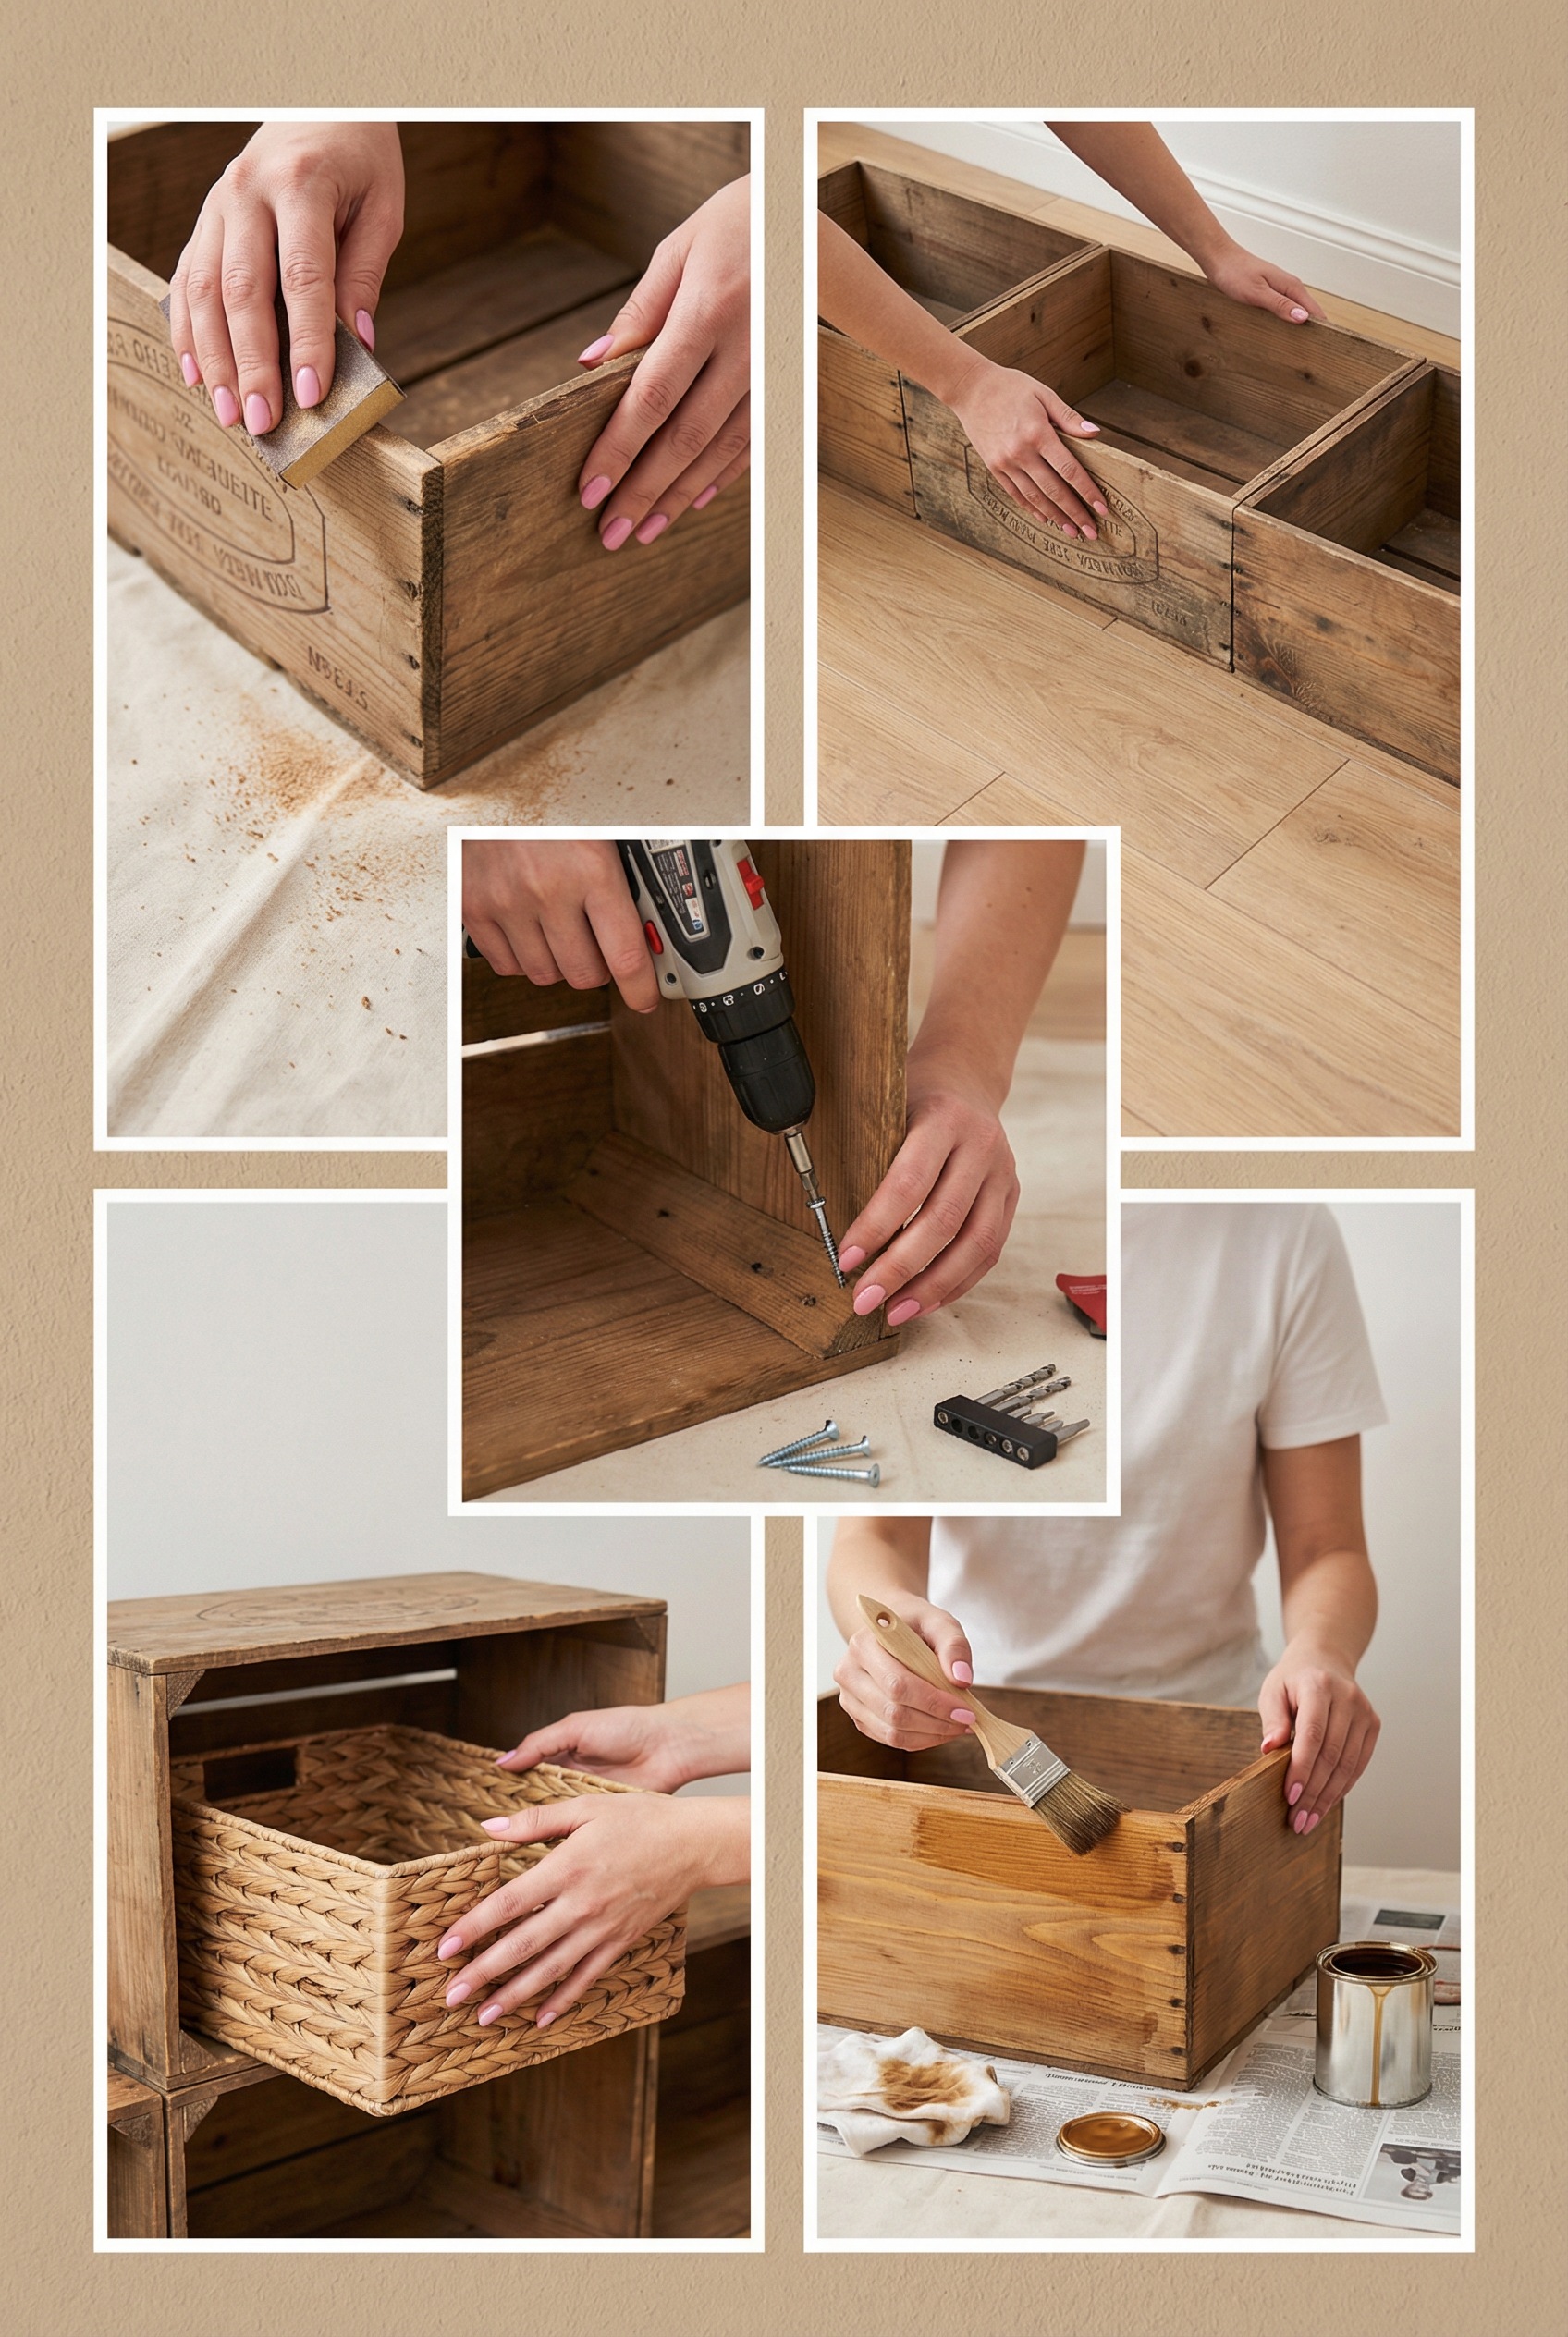
Build the bookcase in this order:
- Sand the crate edges before assembling the bookcase.
- Plan the crate layout on the floor.
- Screw the crates together through the inside corners.
- Add optional baskets to the bookcase.
- Seal the bookcase when the finish is complete.
Choose one finish for the bookcase. Use baskets on the bottom row to hide clutter.
Farmhouse Coffee Table with an Old Door Top and Hairpin Legs
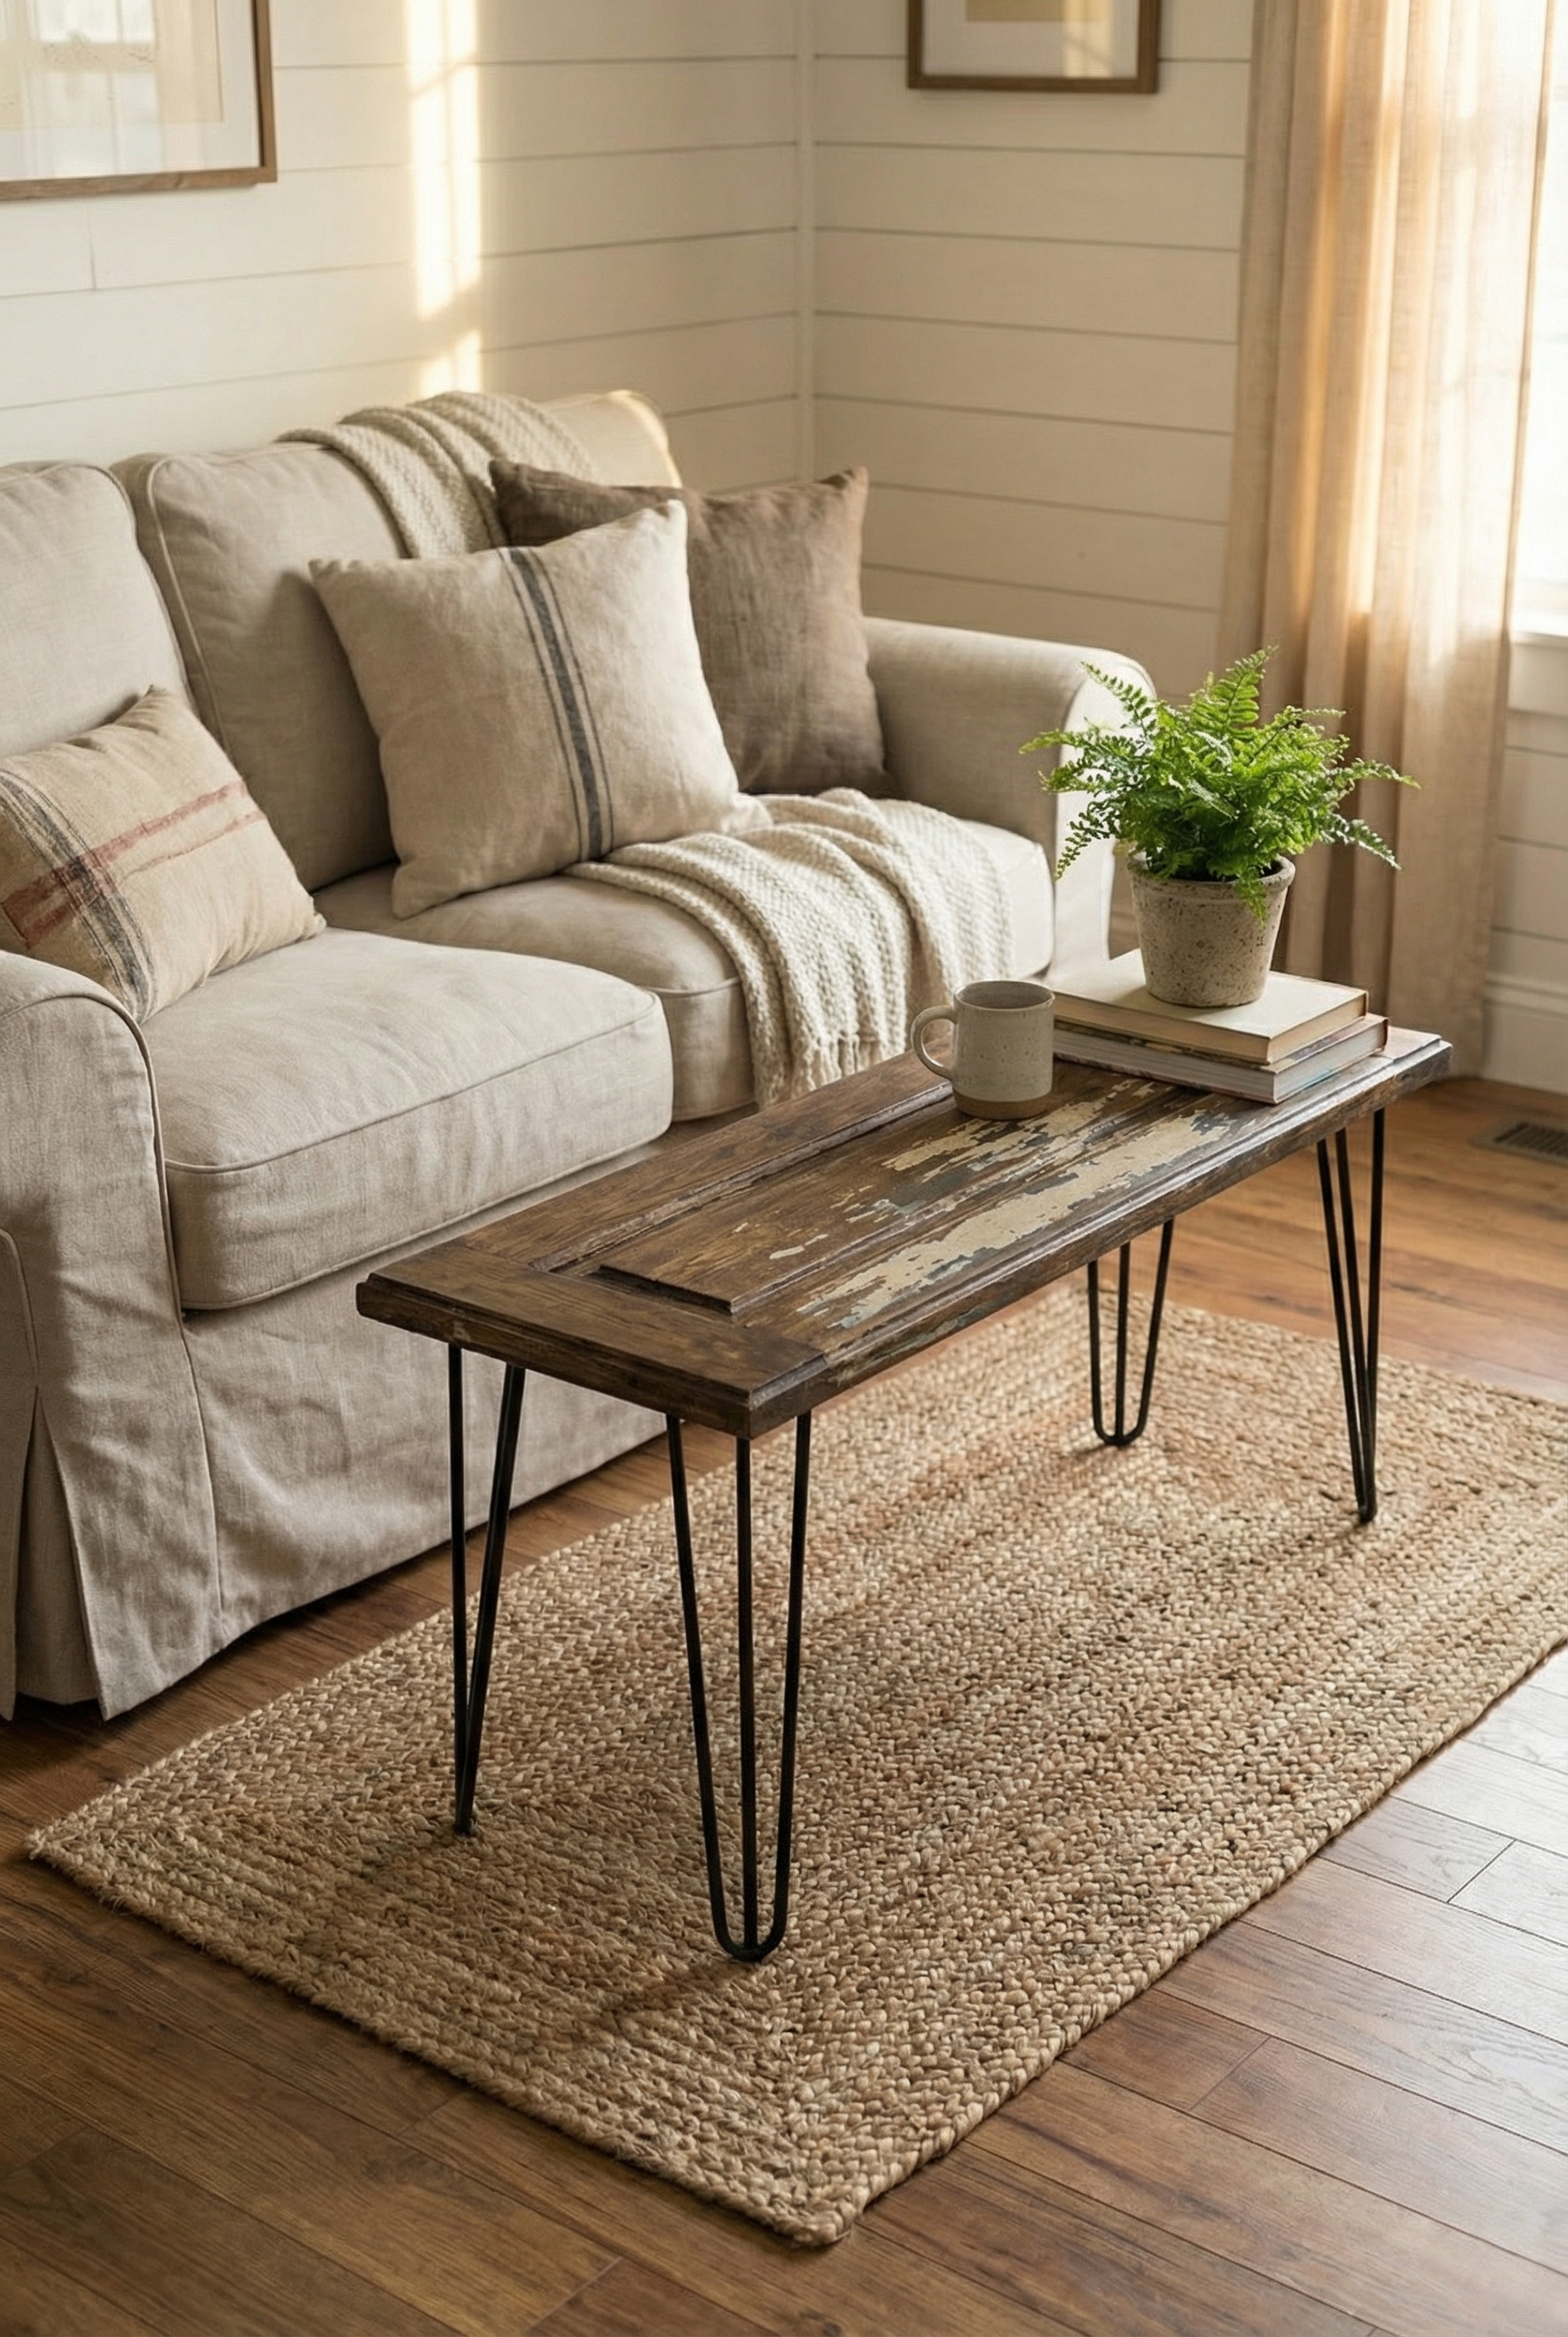
A farmhouse coffee table like this can make a cozy focal point in the room. It takes about 2 to 4 hours to build, plus additional drying time, and suits a beginner project with an estimated cost of $60-$140.
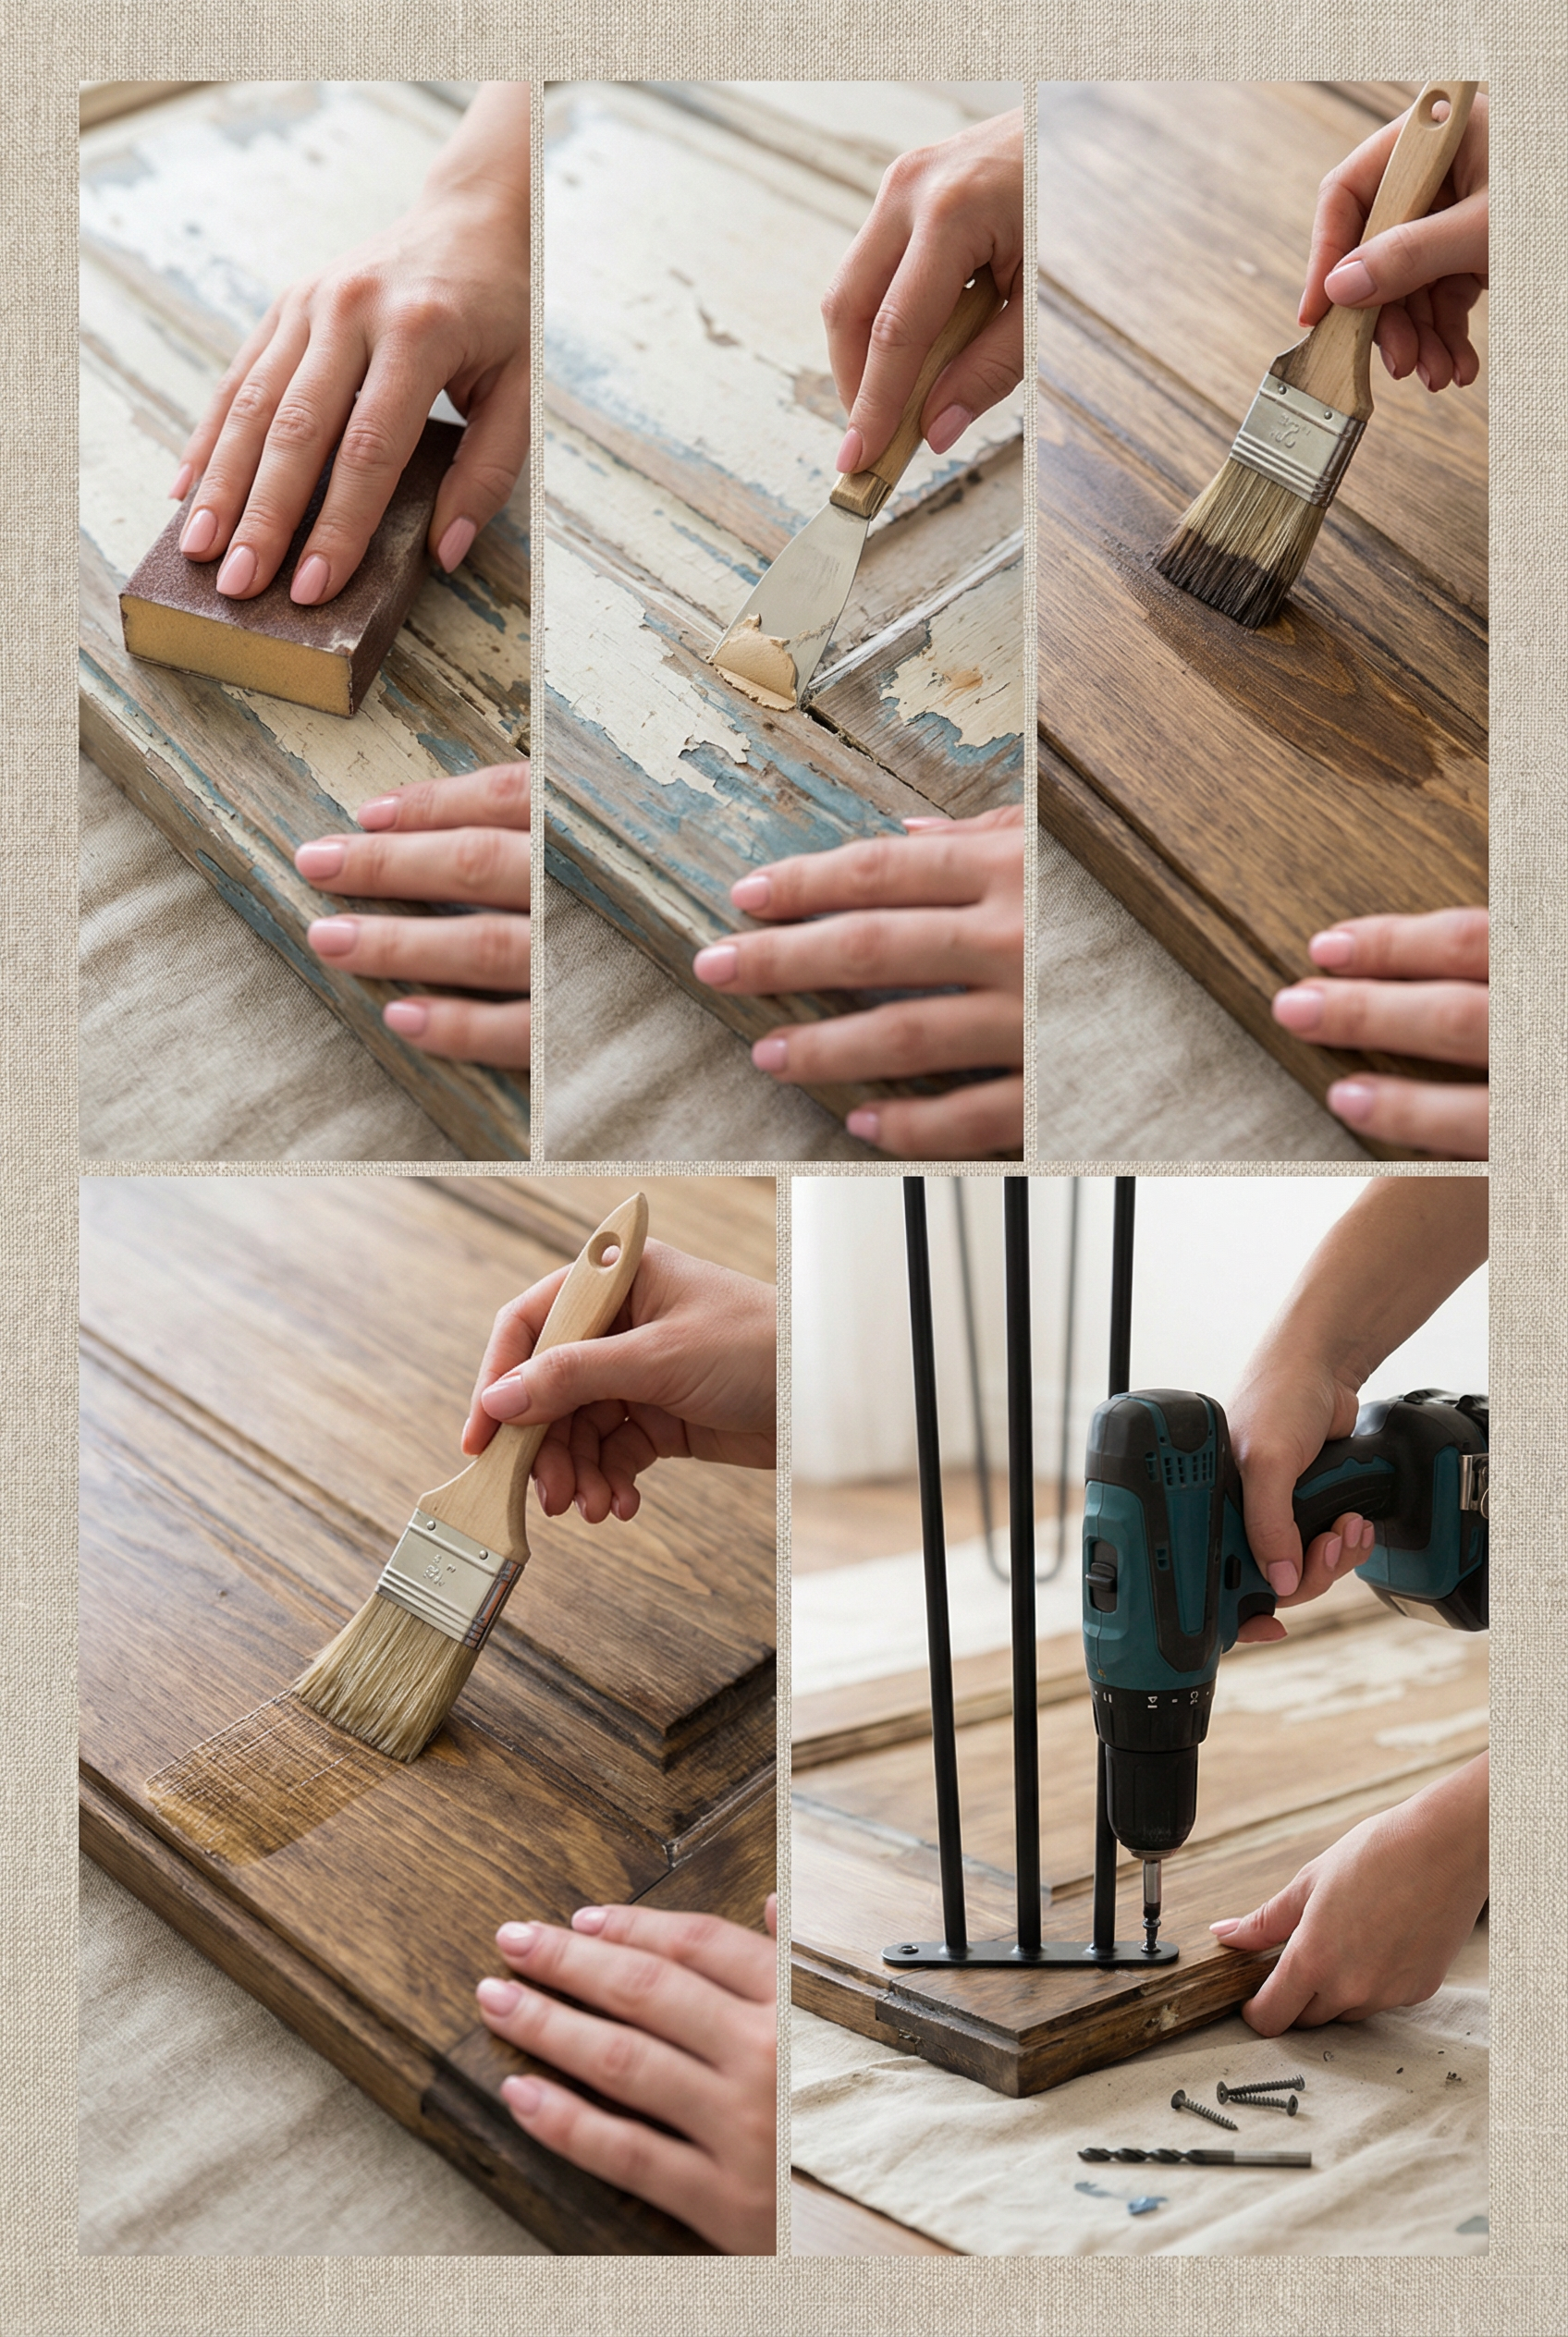
An old-door top and simple legs give this coffee table the look of expensive found furniture.
Materials
- An old door becomes the table top, providing the coffee table’s main surface.
- Hairpin legs support the table while keeping the base simple.
- Wood filler helps prepare the old door for finishing.
- Choose either stain or paint for the finish.
- A durable topcoat protects the finished table.
Construction steps
- Clean the door, then sand it lightly.
- Fill any deep holes with wood filler if needed.
- Once the surface is ready, apply either stain or paint. Let the finish dry before continuing.
- Apply a topcoat after the finish has dried.
- Attach the legs to the underside of the table.
If the surface looks too rustic, sand it again. Soft edges can read as an intentional style choice, and a tray on the table helps create a styled appearance instead of a cluttered one.
Wall Decor Made by Hand
A large wall element can work best on farmhouse walls when smaller elements support it. Pay attention to scale so the wall decor fits the space.
To avoid a themed appearance, use country-style decor with some restraint.
Warm Reclaimed Wood Wall Sign
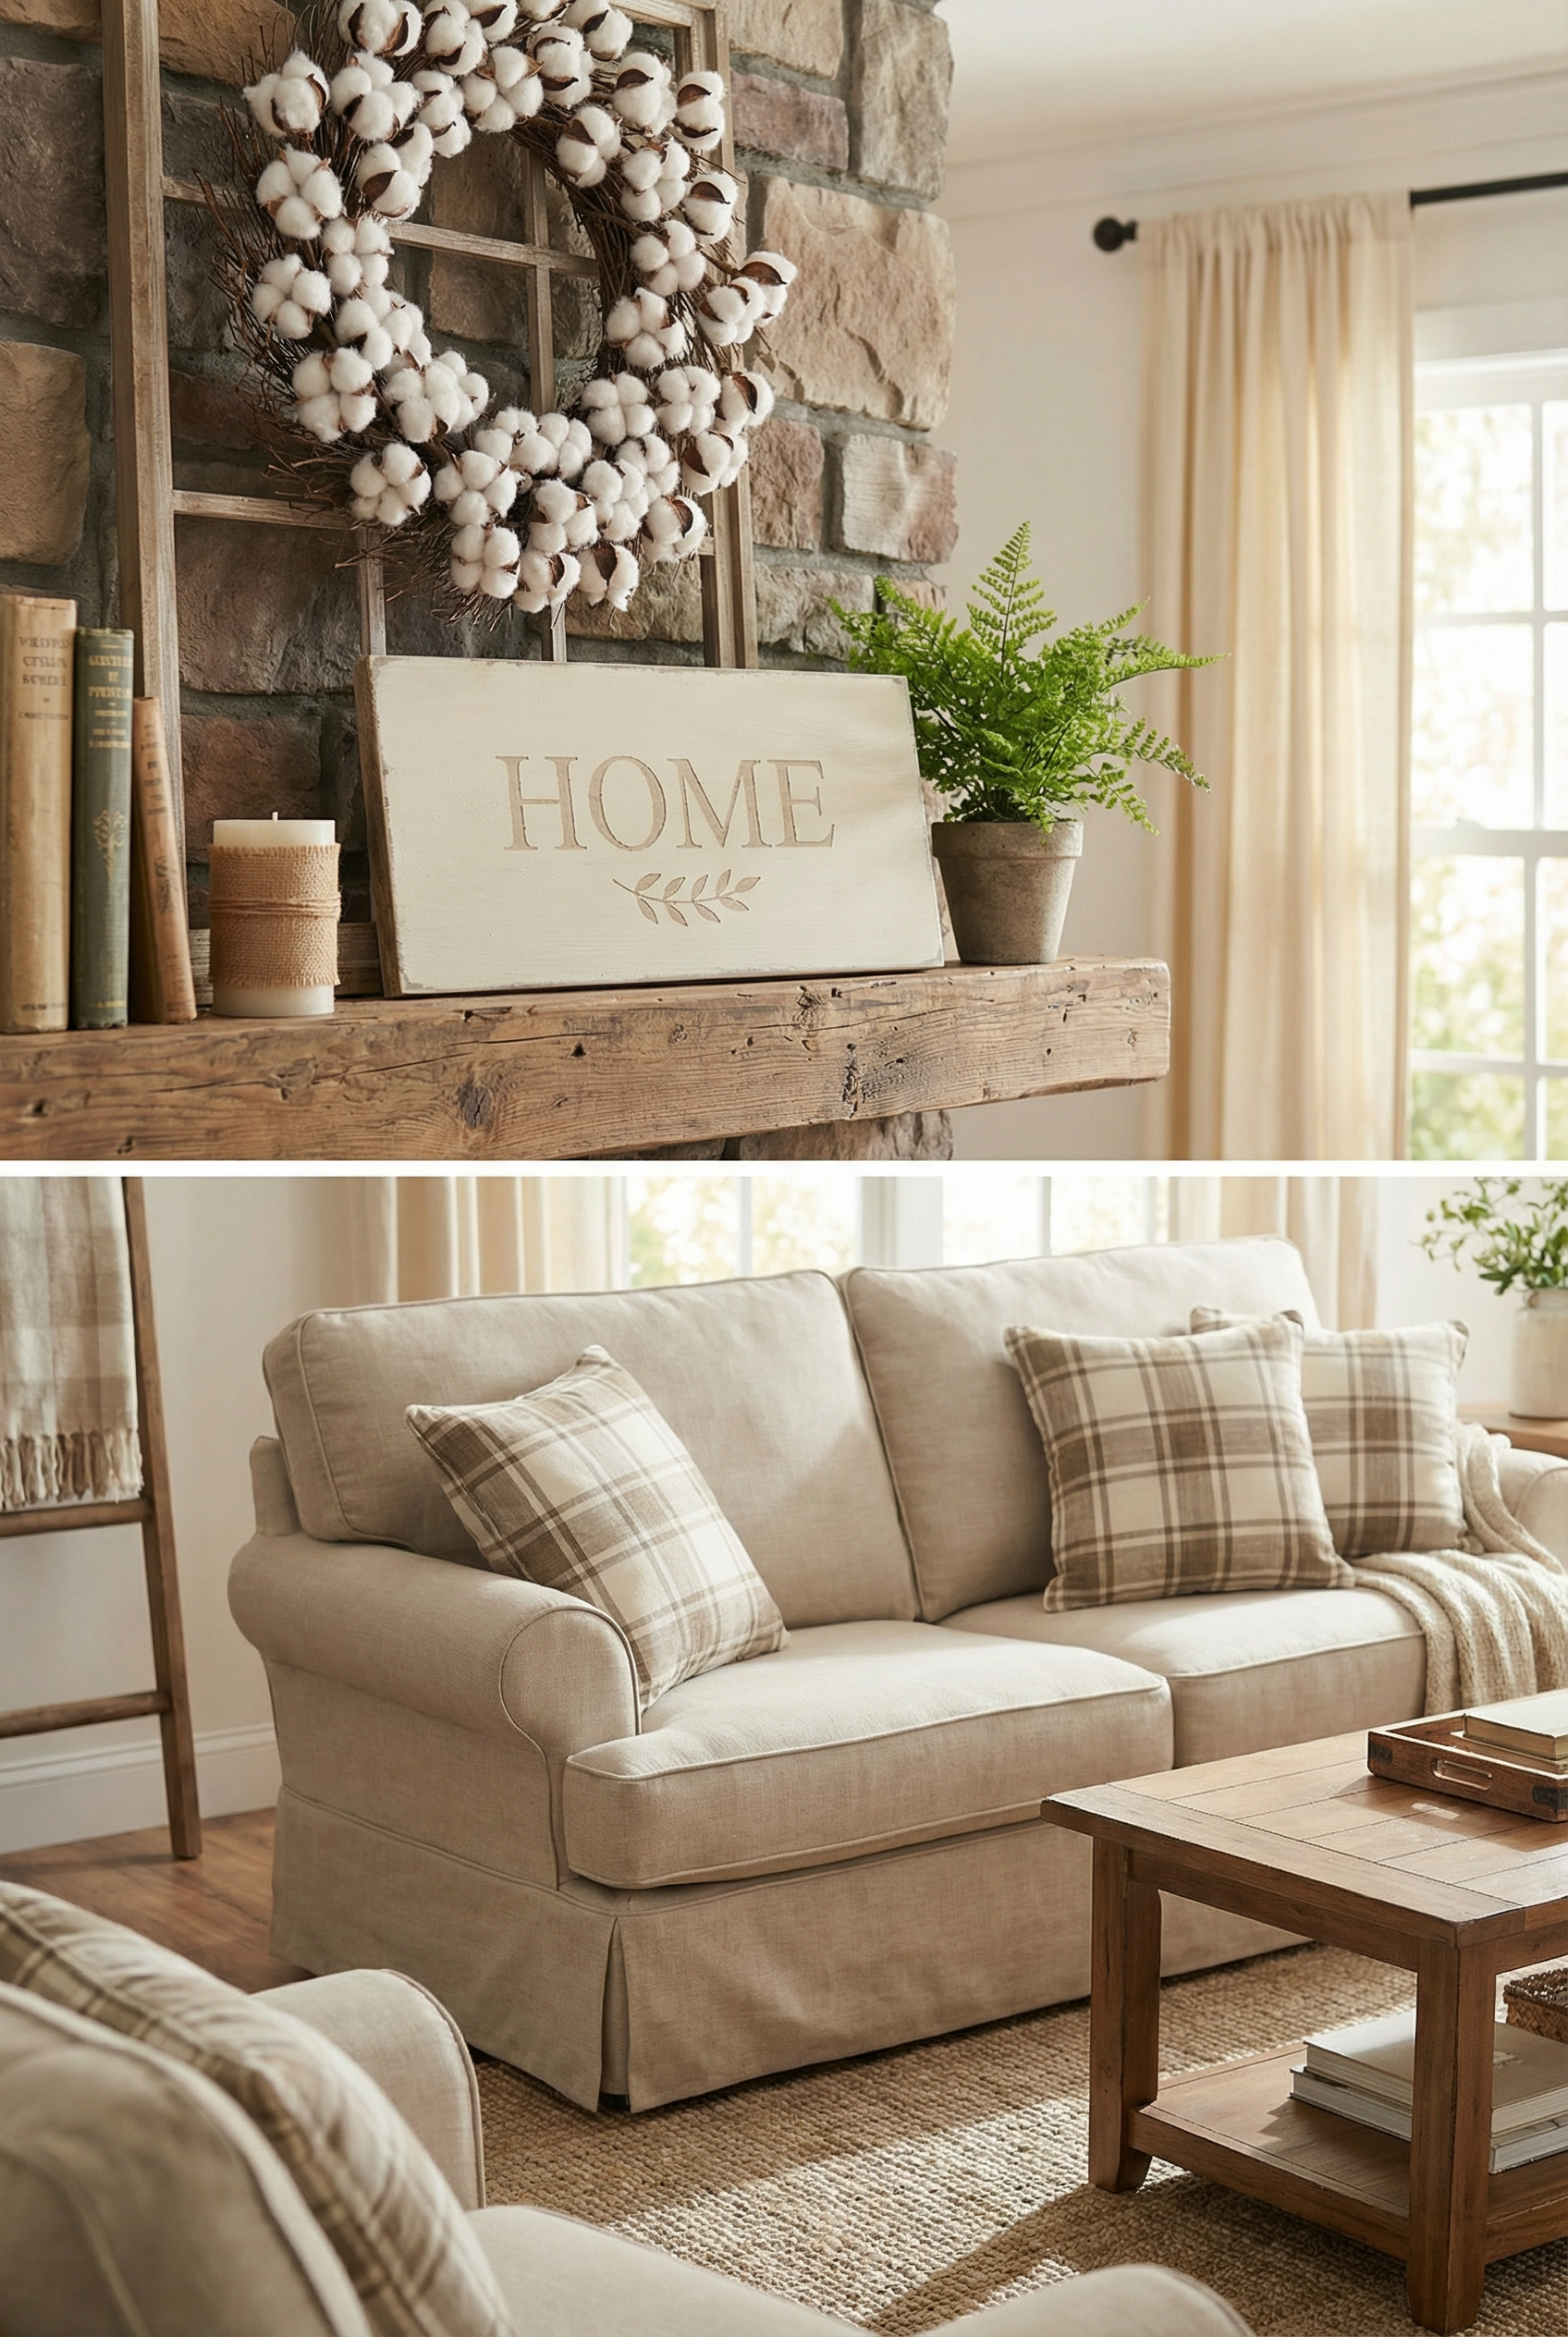
A warm reclaimed wood wall sign can fill a blank wall spot with a meaningful accent. It takes about 1 to 2 hours for a beginner and costs around $10-$35.
Keep the design graphic rather than slogan-heavy. It could feature one word, a number, subtle stripes, or a personal element.
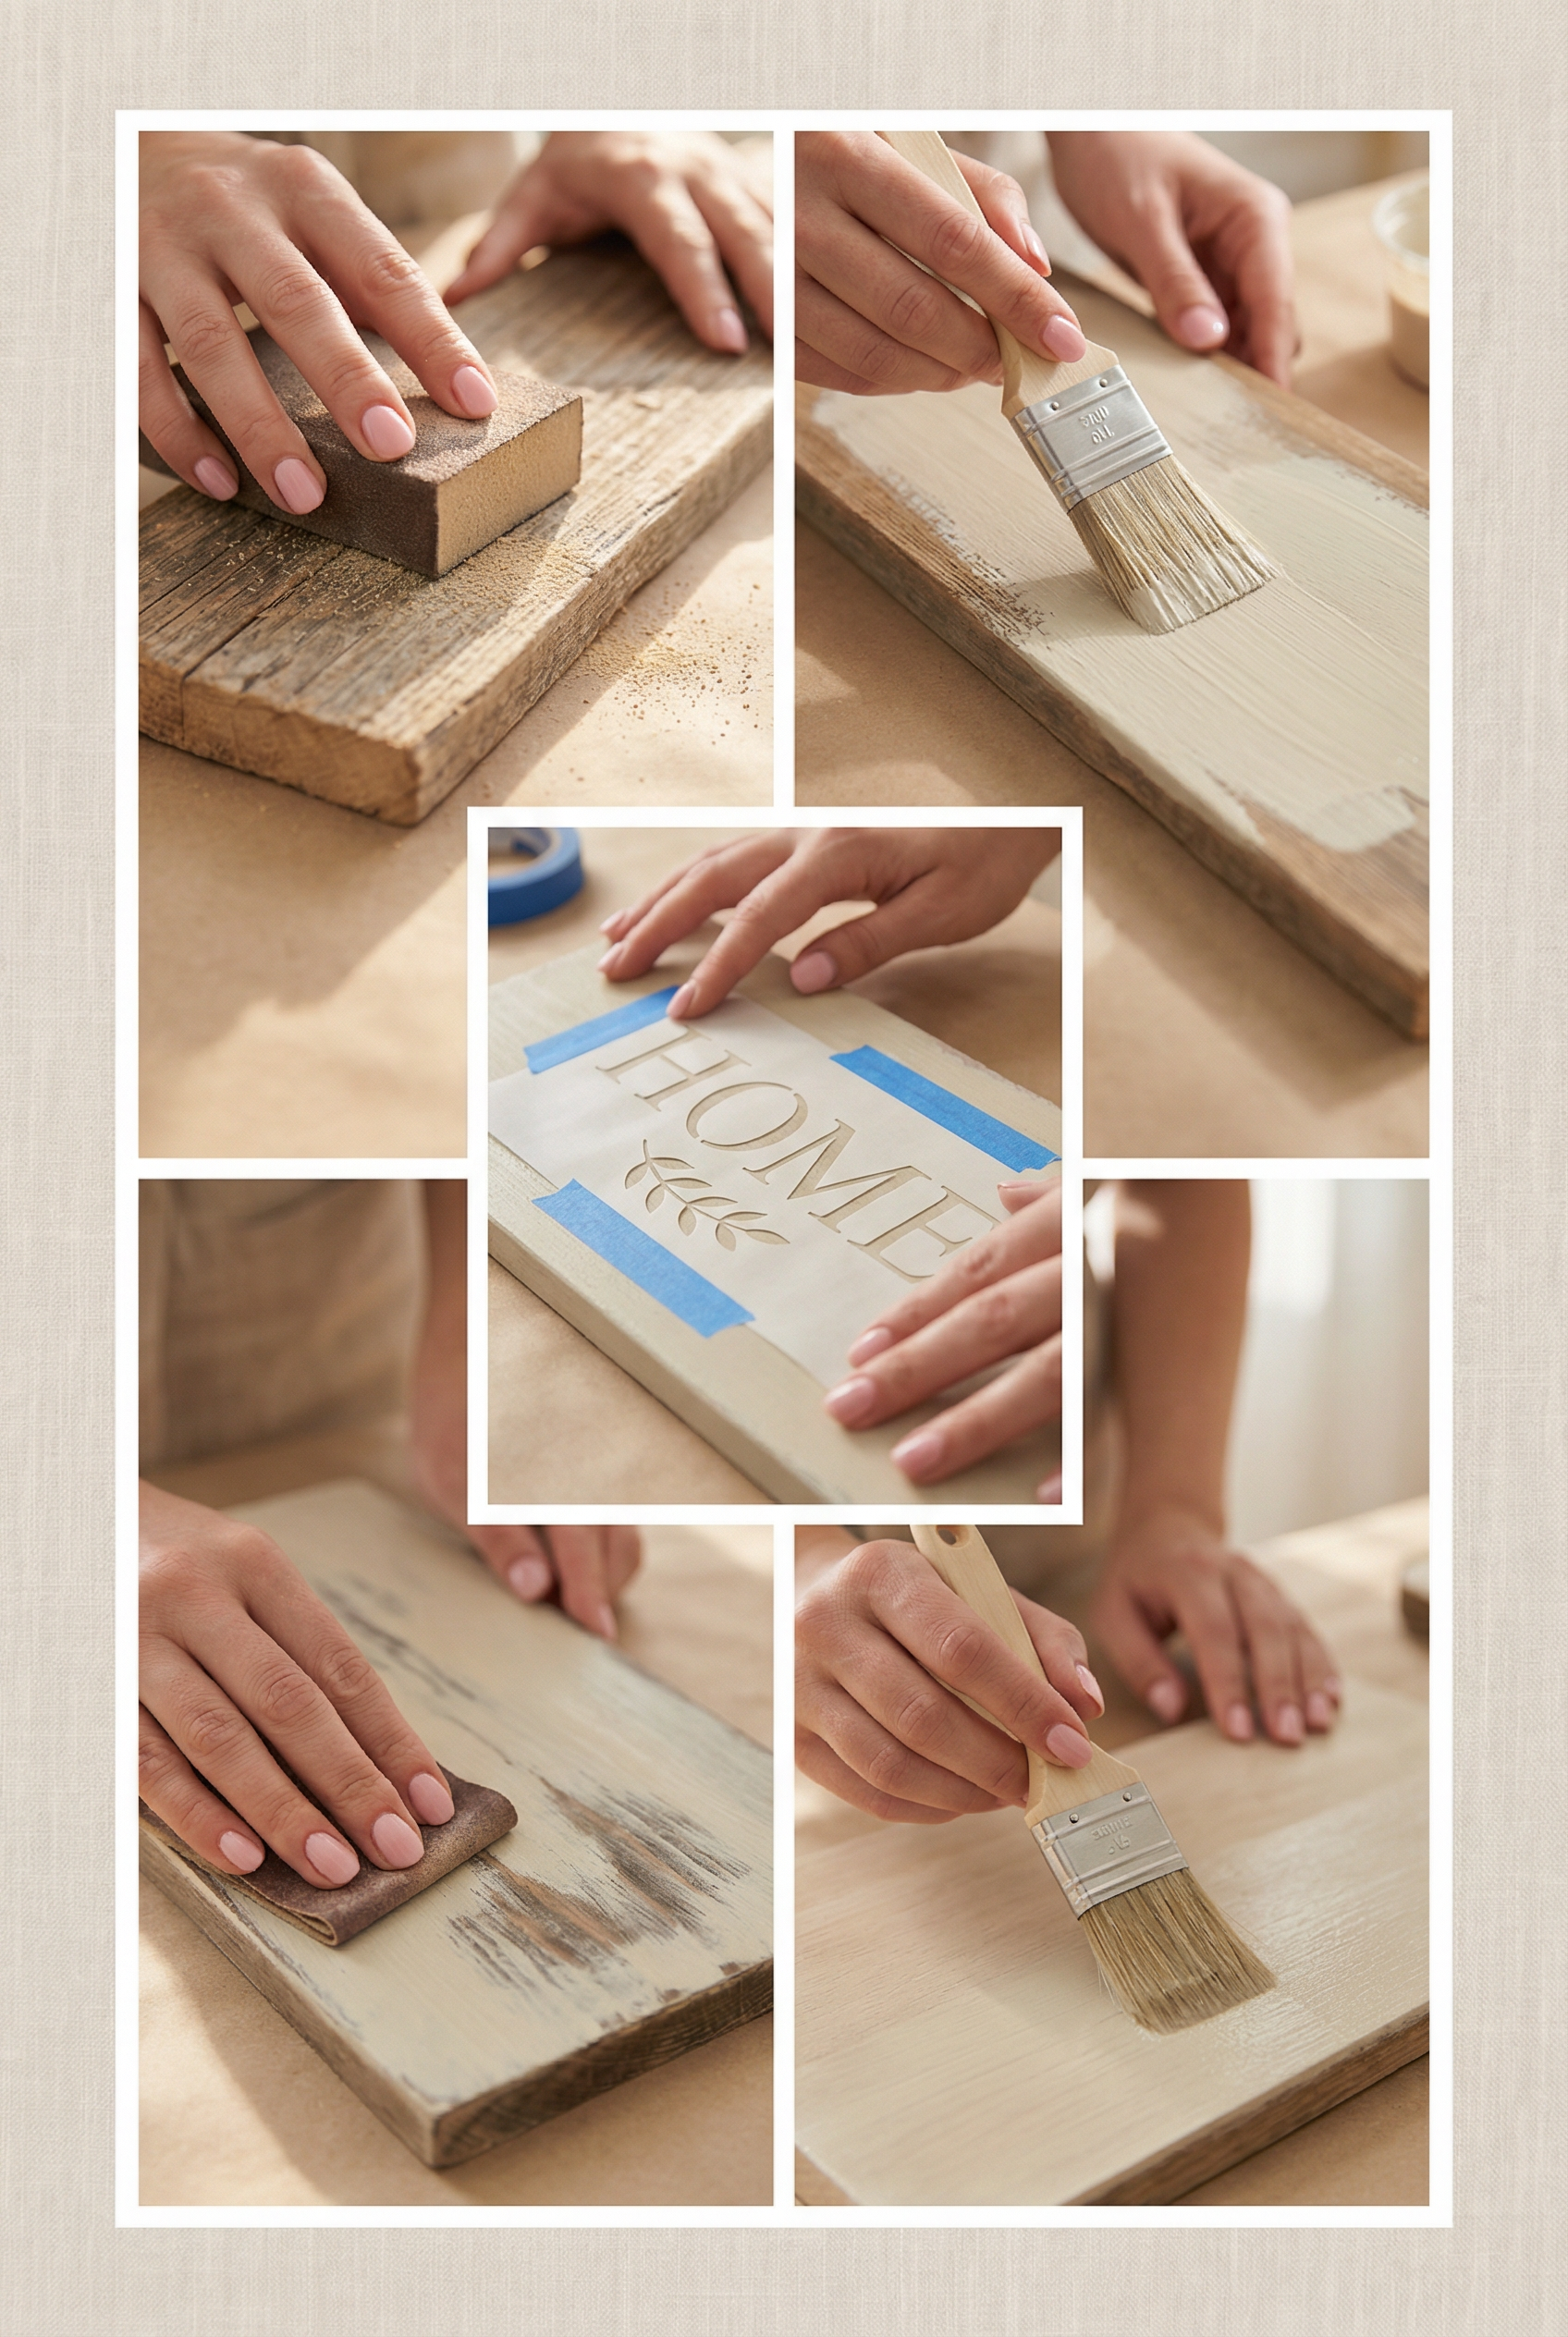
Use scrap wood for the sign, paint for the base color, a stencil or tape to create the design, and hanging hardware to mount the finished sign on the wall.
Construction steps
- Sand the wood before adding the finish.
- Apply a base coat and let it dry.
- Create the design with a stencil or tape.
- Lightly distress the finished sign for a worn surface.
- Seal the sign with a matte finish.
One wall sign can be enough, while using five or more signs risks making the room look themed. For a cozier feel, hang the sign lower than expected.
Collected Gallery Wall with Thrifted Frames
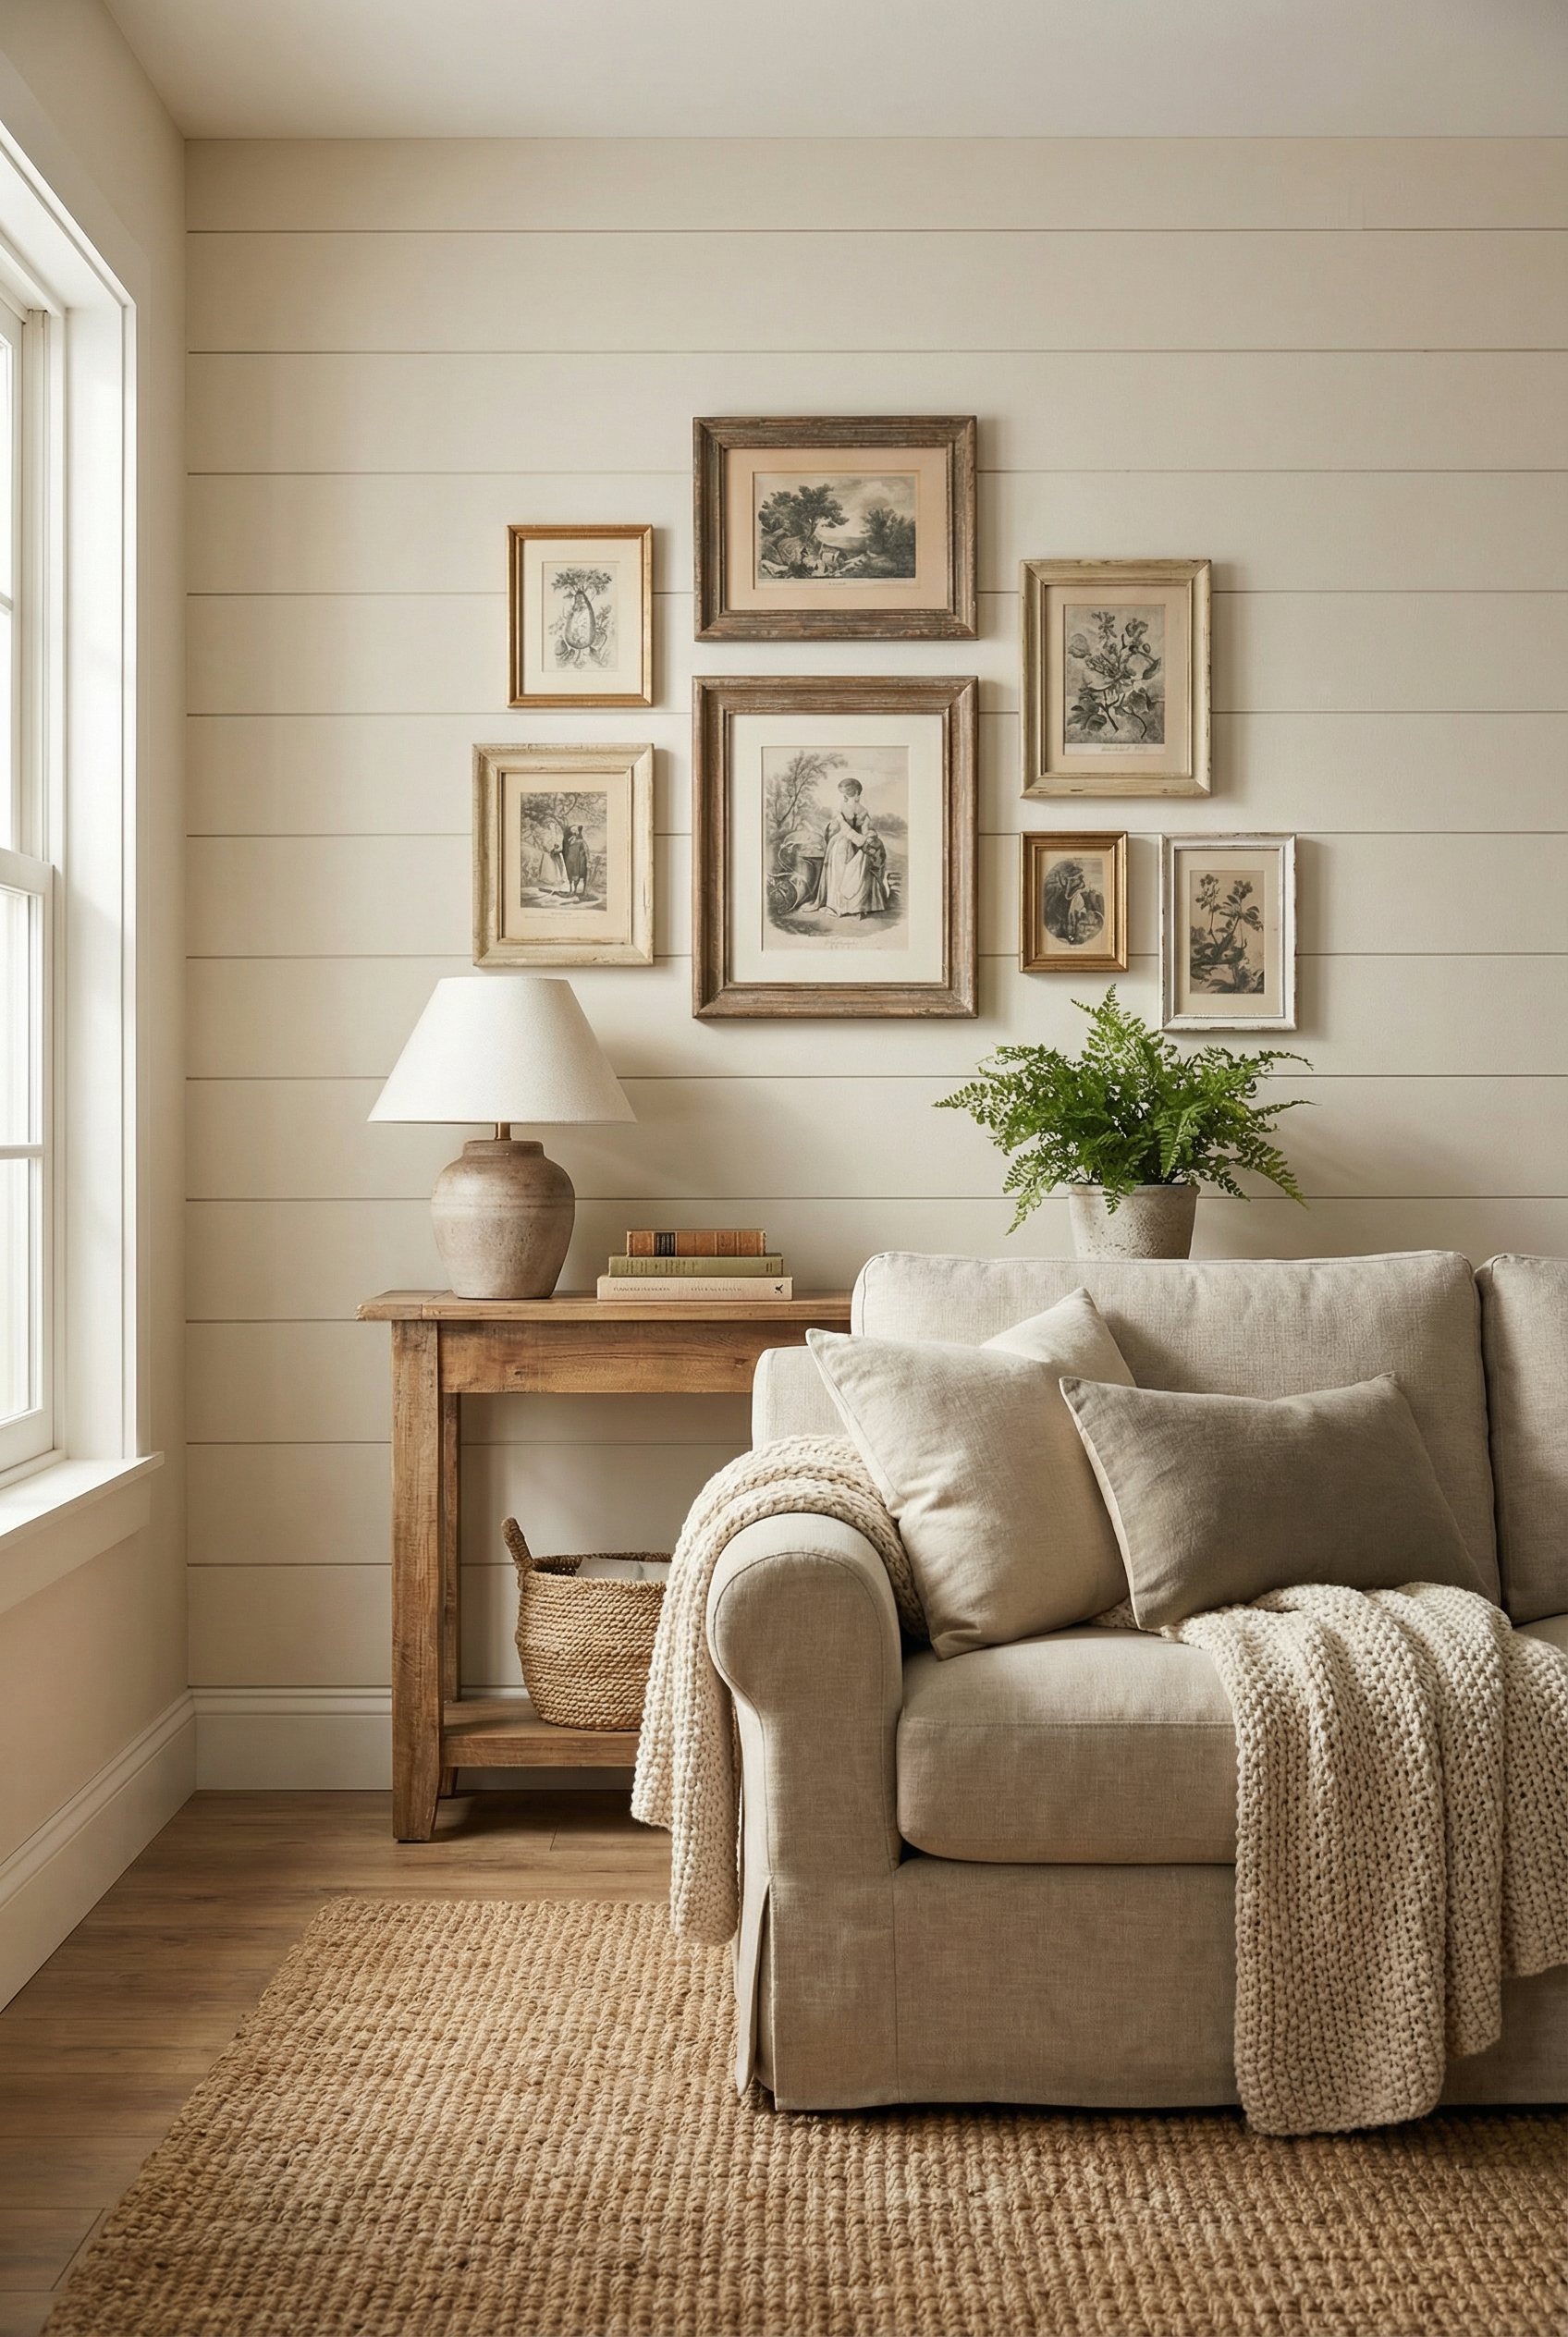
On the wall, thrifted frames can create a collected look that makes the room feel lived-in. This is suitable for a beginner project that takes about 2 to 3 hours and costs $25-$90, with accessories that can be swapped seasonally.
Choose either matching frames or matching art for the gallery wall.
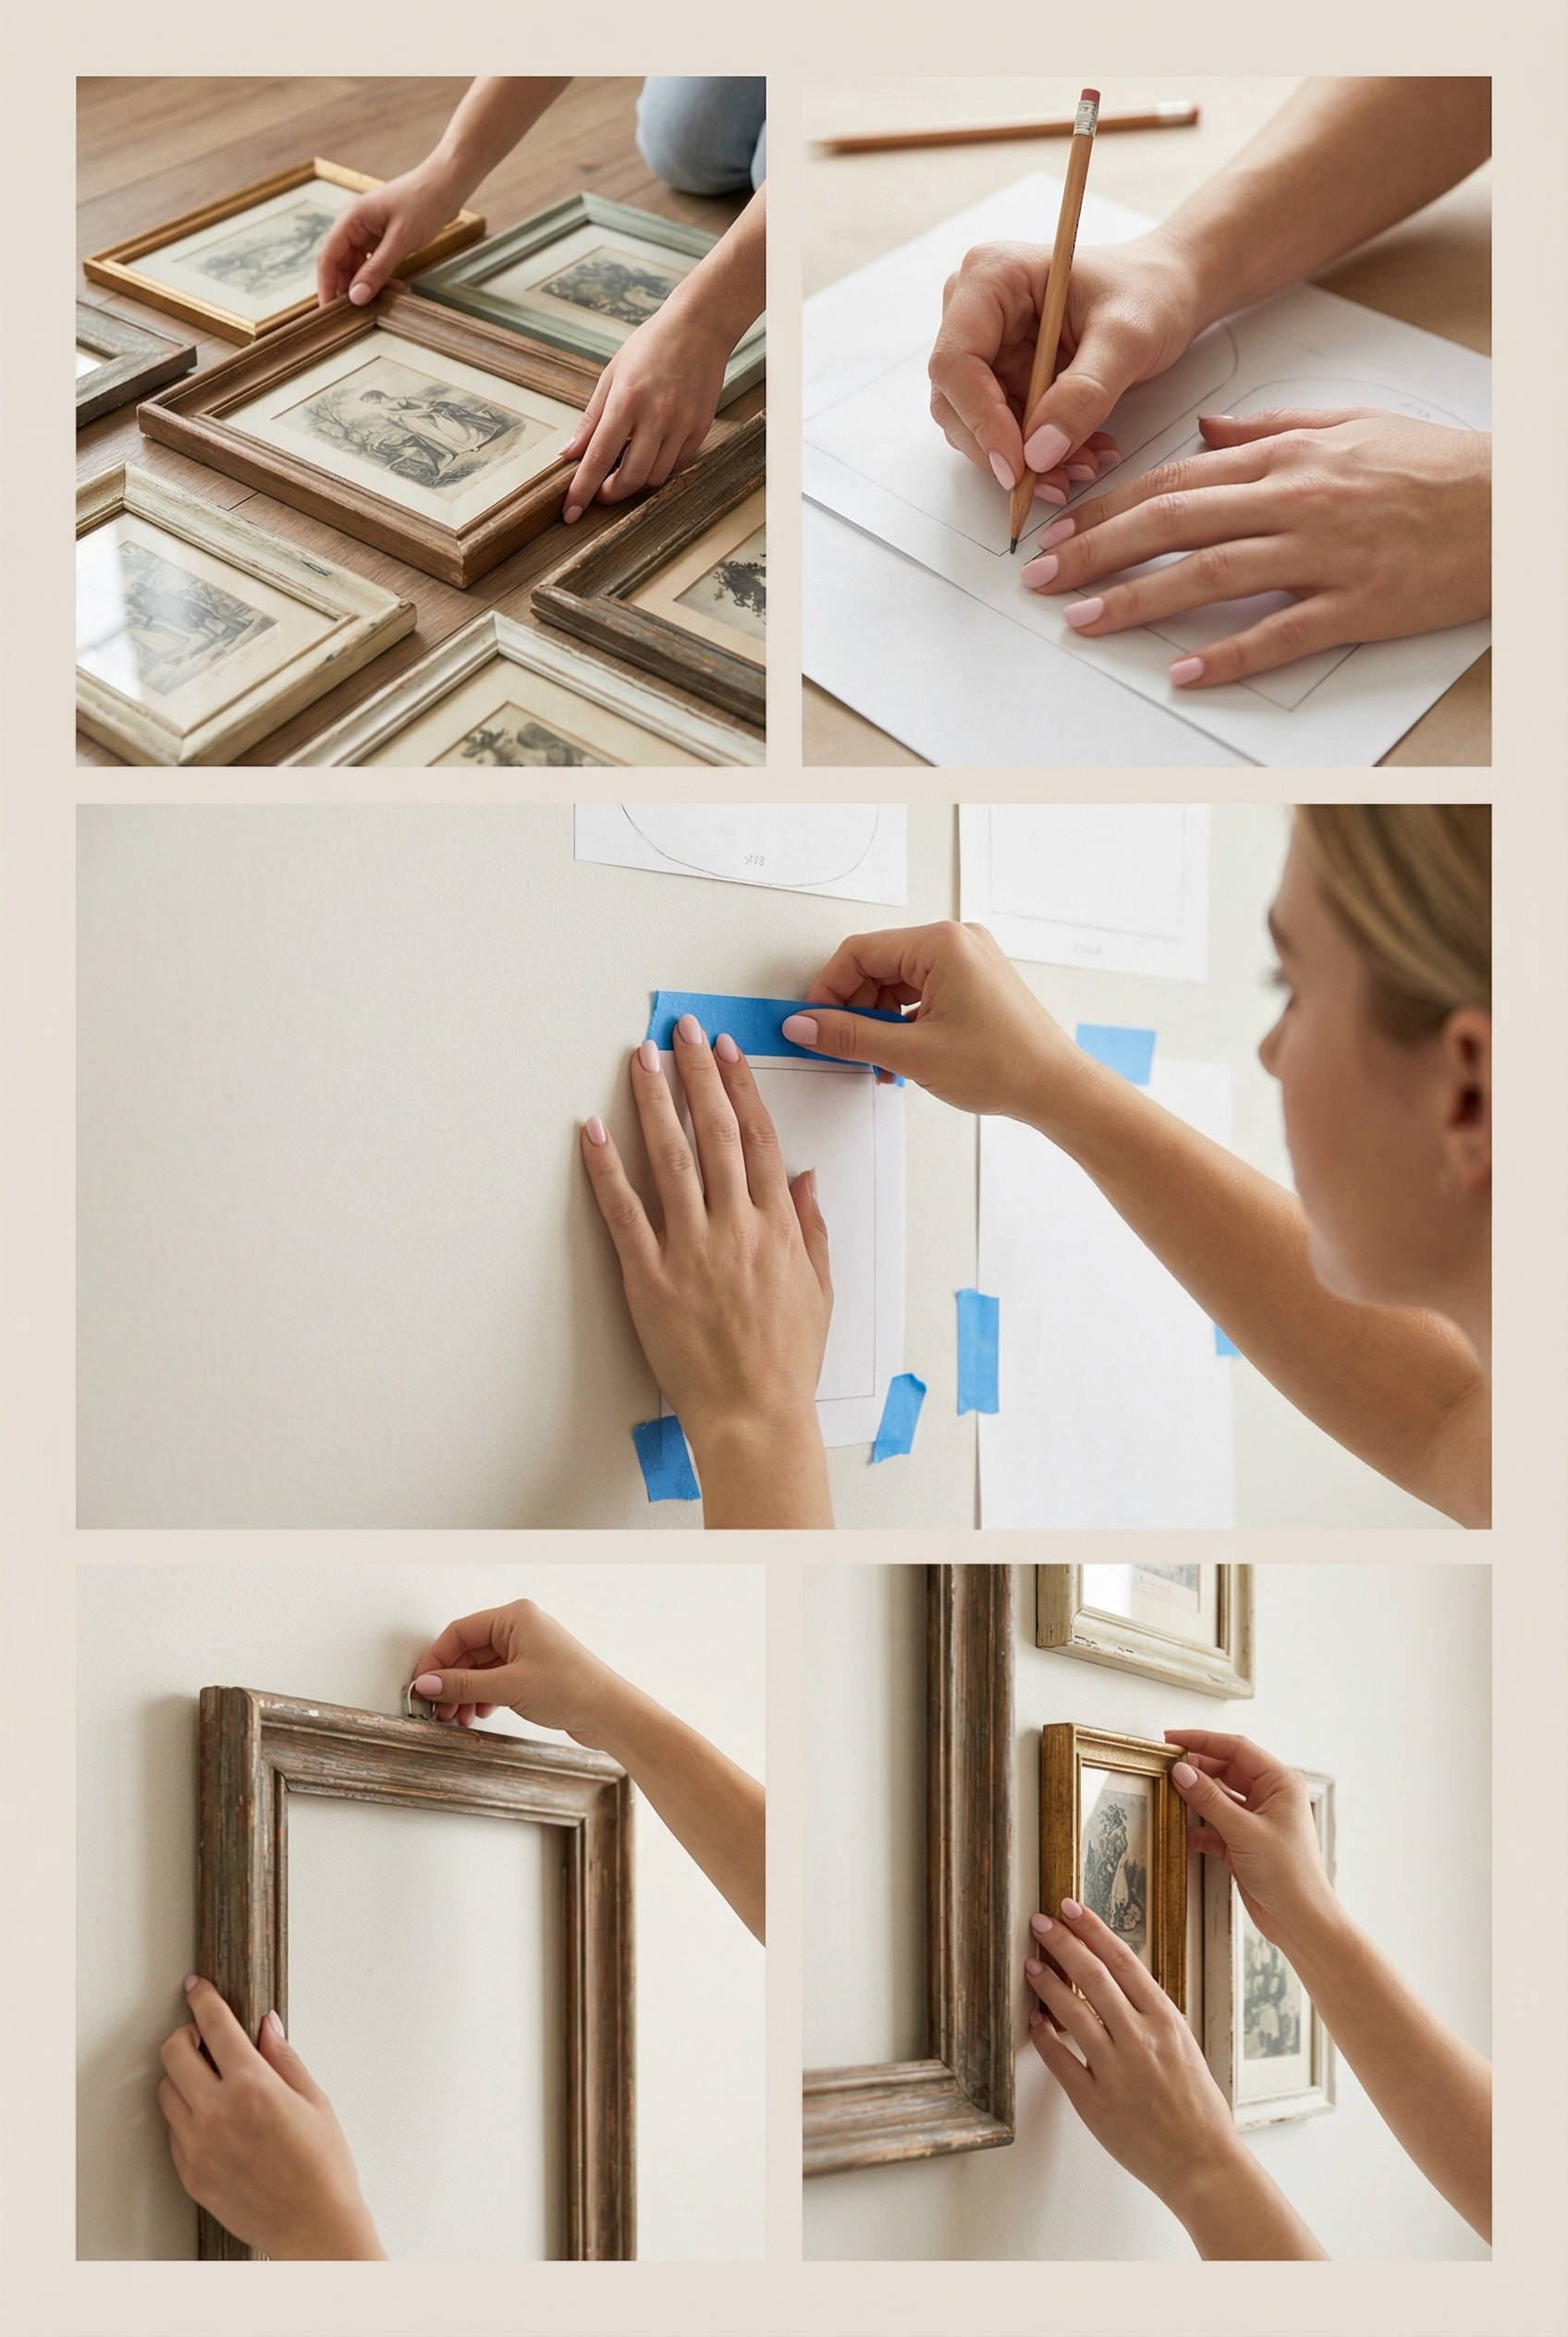
Materials
- Use 6-12 thrifted frames.
- Paper templates help plan the arrangement.
- Choose hooks or strips for the hanging hardware.
- Fill the frames with art prints or photos.
Construction steps
- Arrange the frames on the floor before putting them on the wall.
- Trace the templates so each frame has a guide.
- Tape the templates to the wall to check the arrangement.
- Hang the biggest frame first, then build around it.
- Fill the remaining spaces with the other frames.
Use one odd-size frame in the gallery wall. Black-and-white photos can give the display a more unified look.
Shiplap Accent Wall for Renters
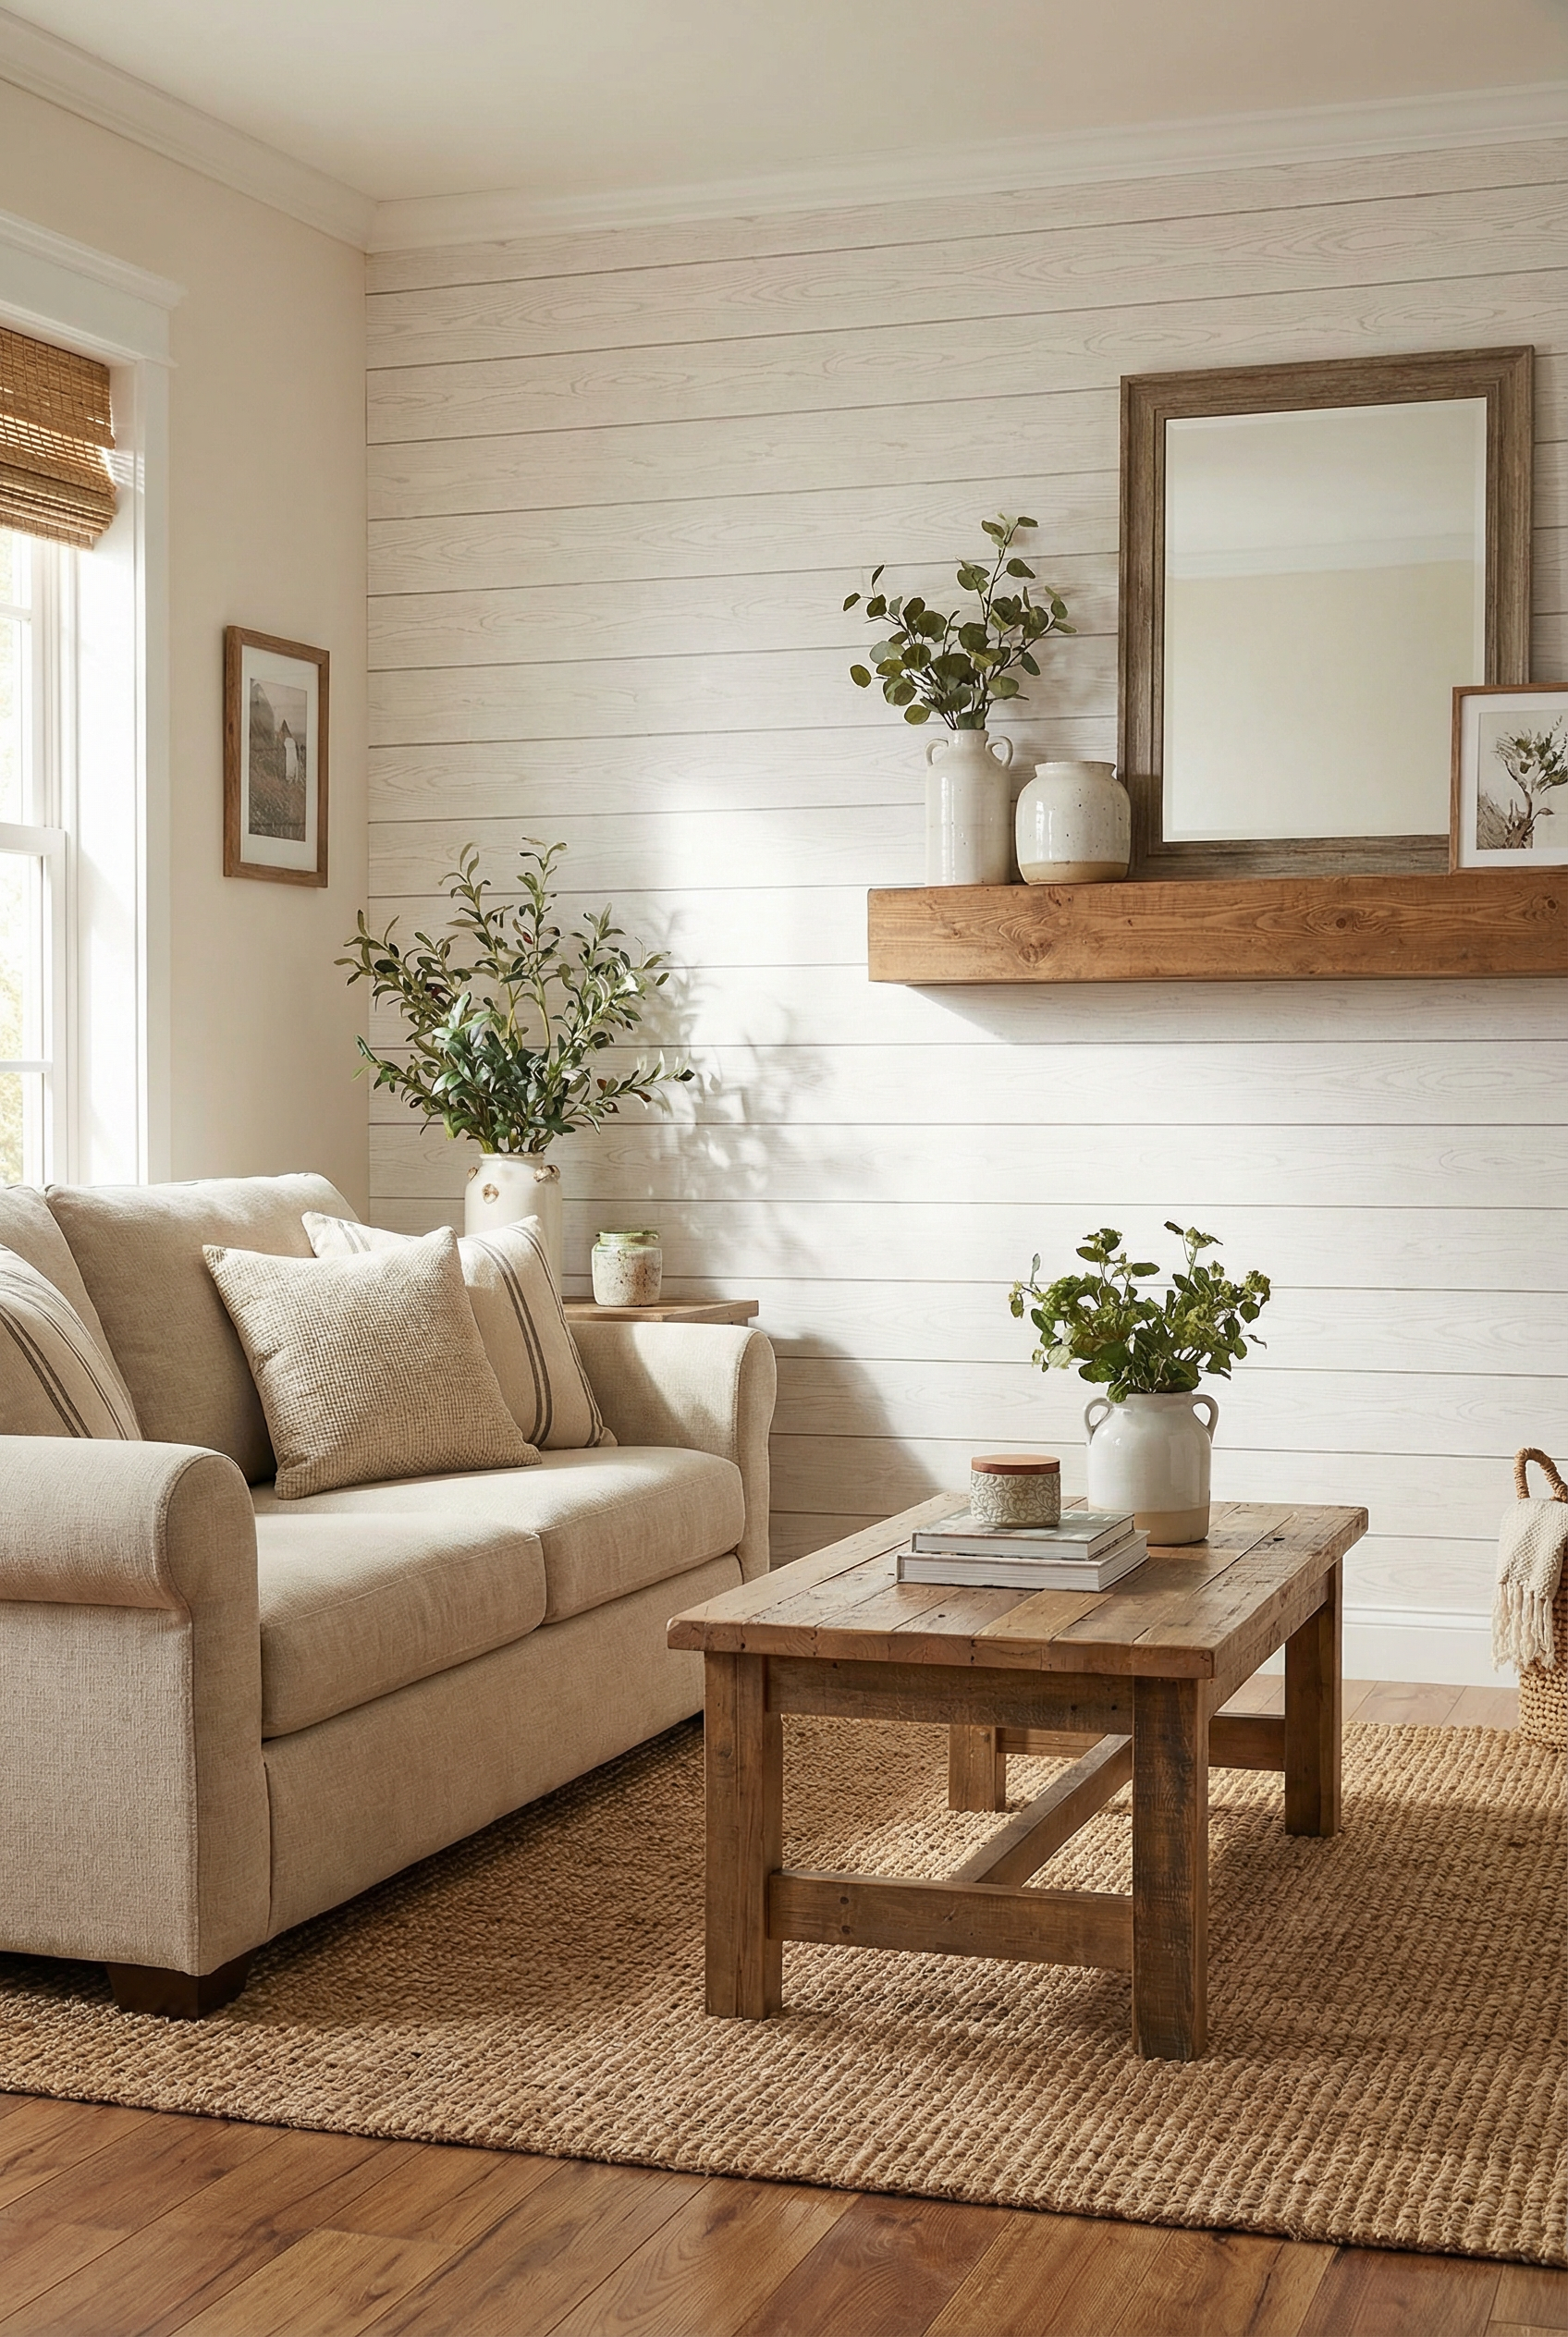
A peel-and-stick shiplap accent wall can go on a TV wall or behind a sofa. It brings farmhouse style to the room, takes about 2 to 4 hours for a beginner, and costs $30-$120.
The accent wall adds texture and shadow lines, giving the room immediate farmhouse character. For a cozier color choice, use warmer whites instead of icy whites. Limit the shiplap to one wall; that is enough to add texture without overwhelming the room.
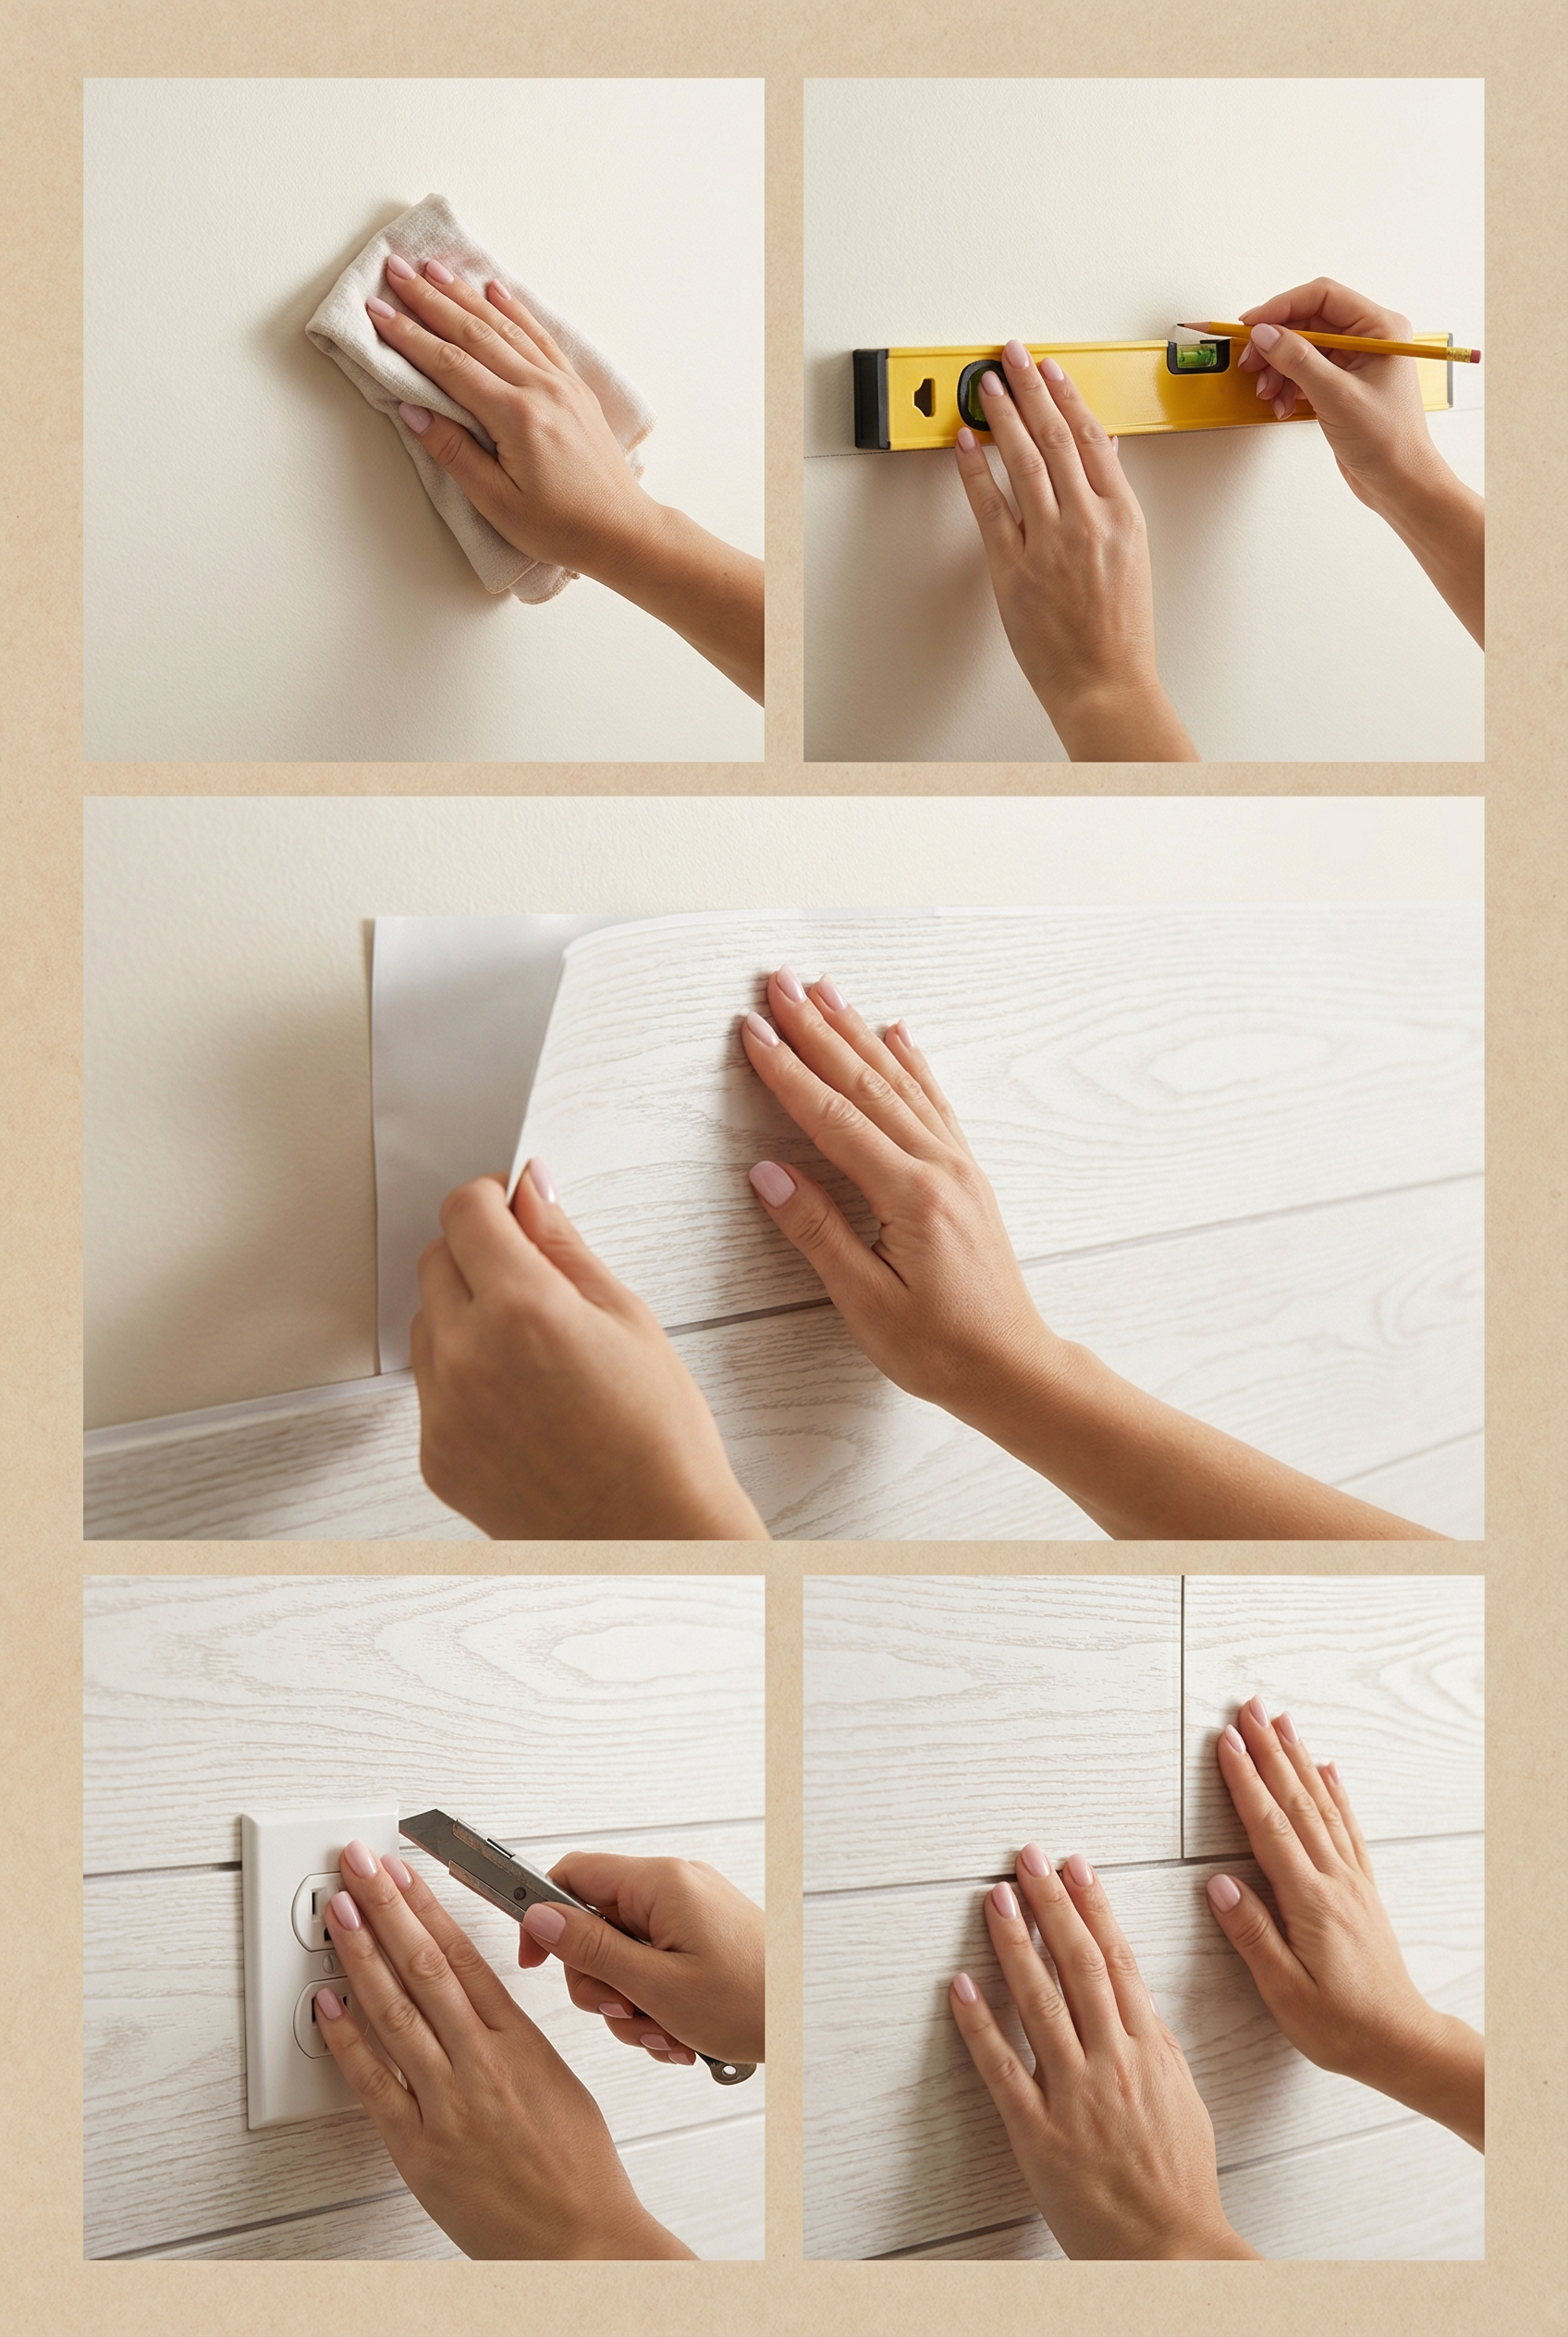
- Peel-and-stick panels cover the accent wall.
- A level helps keep the panels straight.
- Use tape while measuring and positioning the panels.
- A utility knife cuts the panels to fit.
- Paint is optional.
- Clean the wall before applying the panels.
- Mark a level start line to guide the first row.
- Apply the panels slowly so they stay aligned.
- Trim the edges where the panels meet the wall.
- Touch up the corners after the panels are in place.
Barnwood Picture Frames
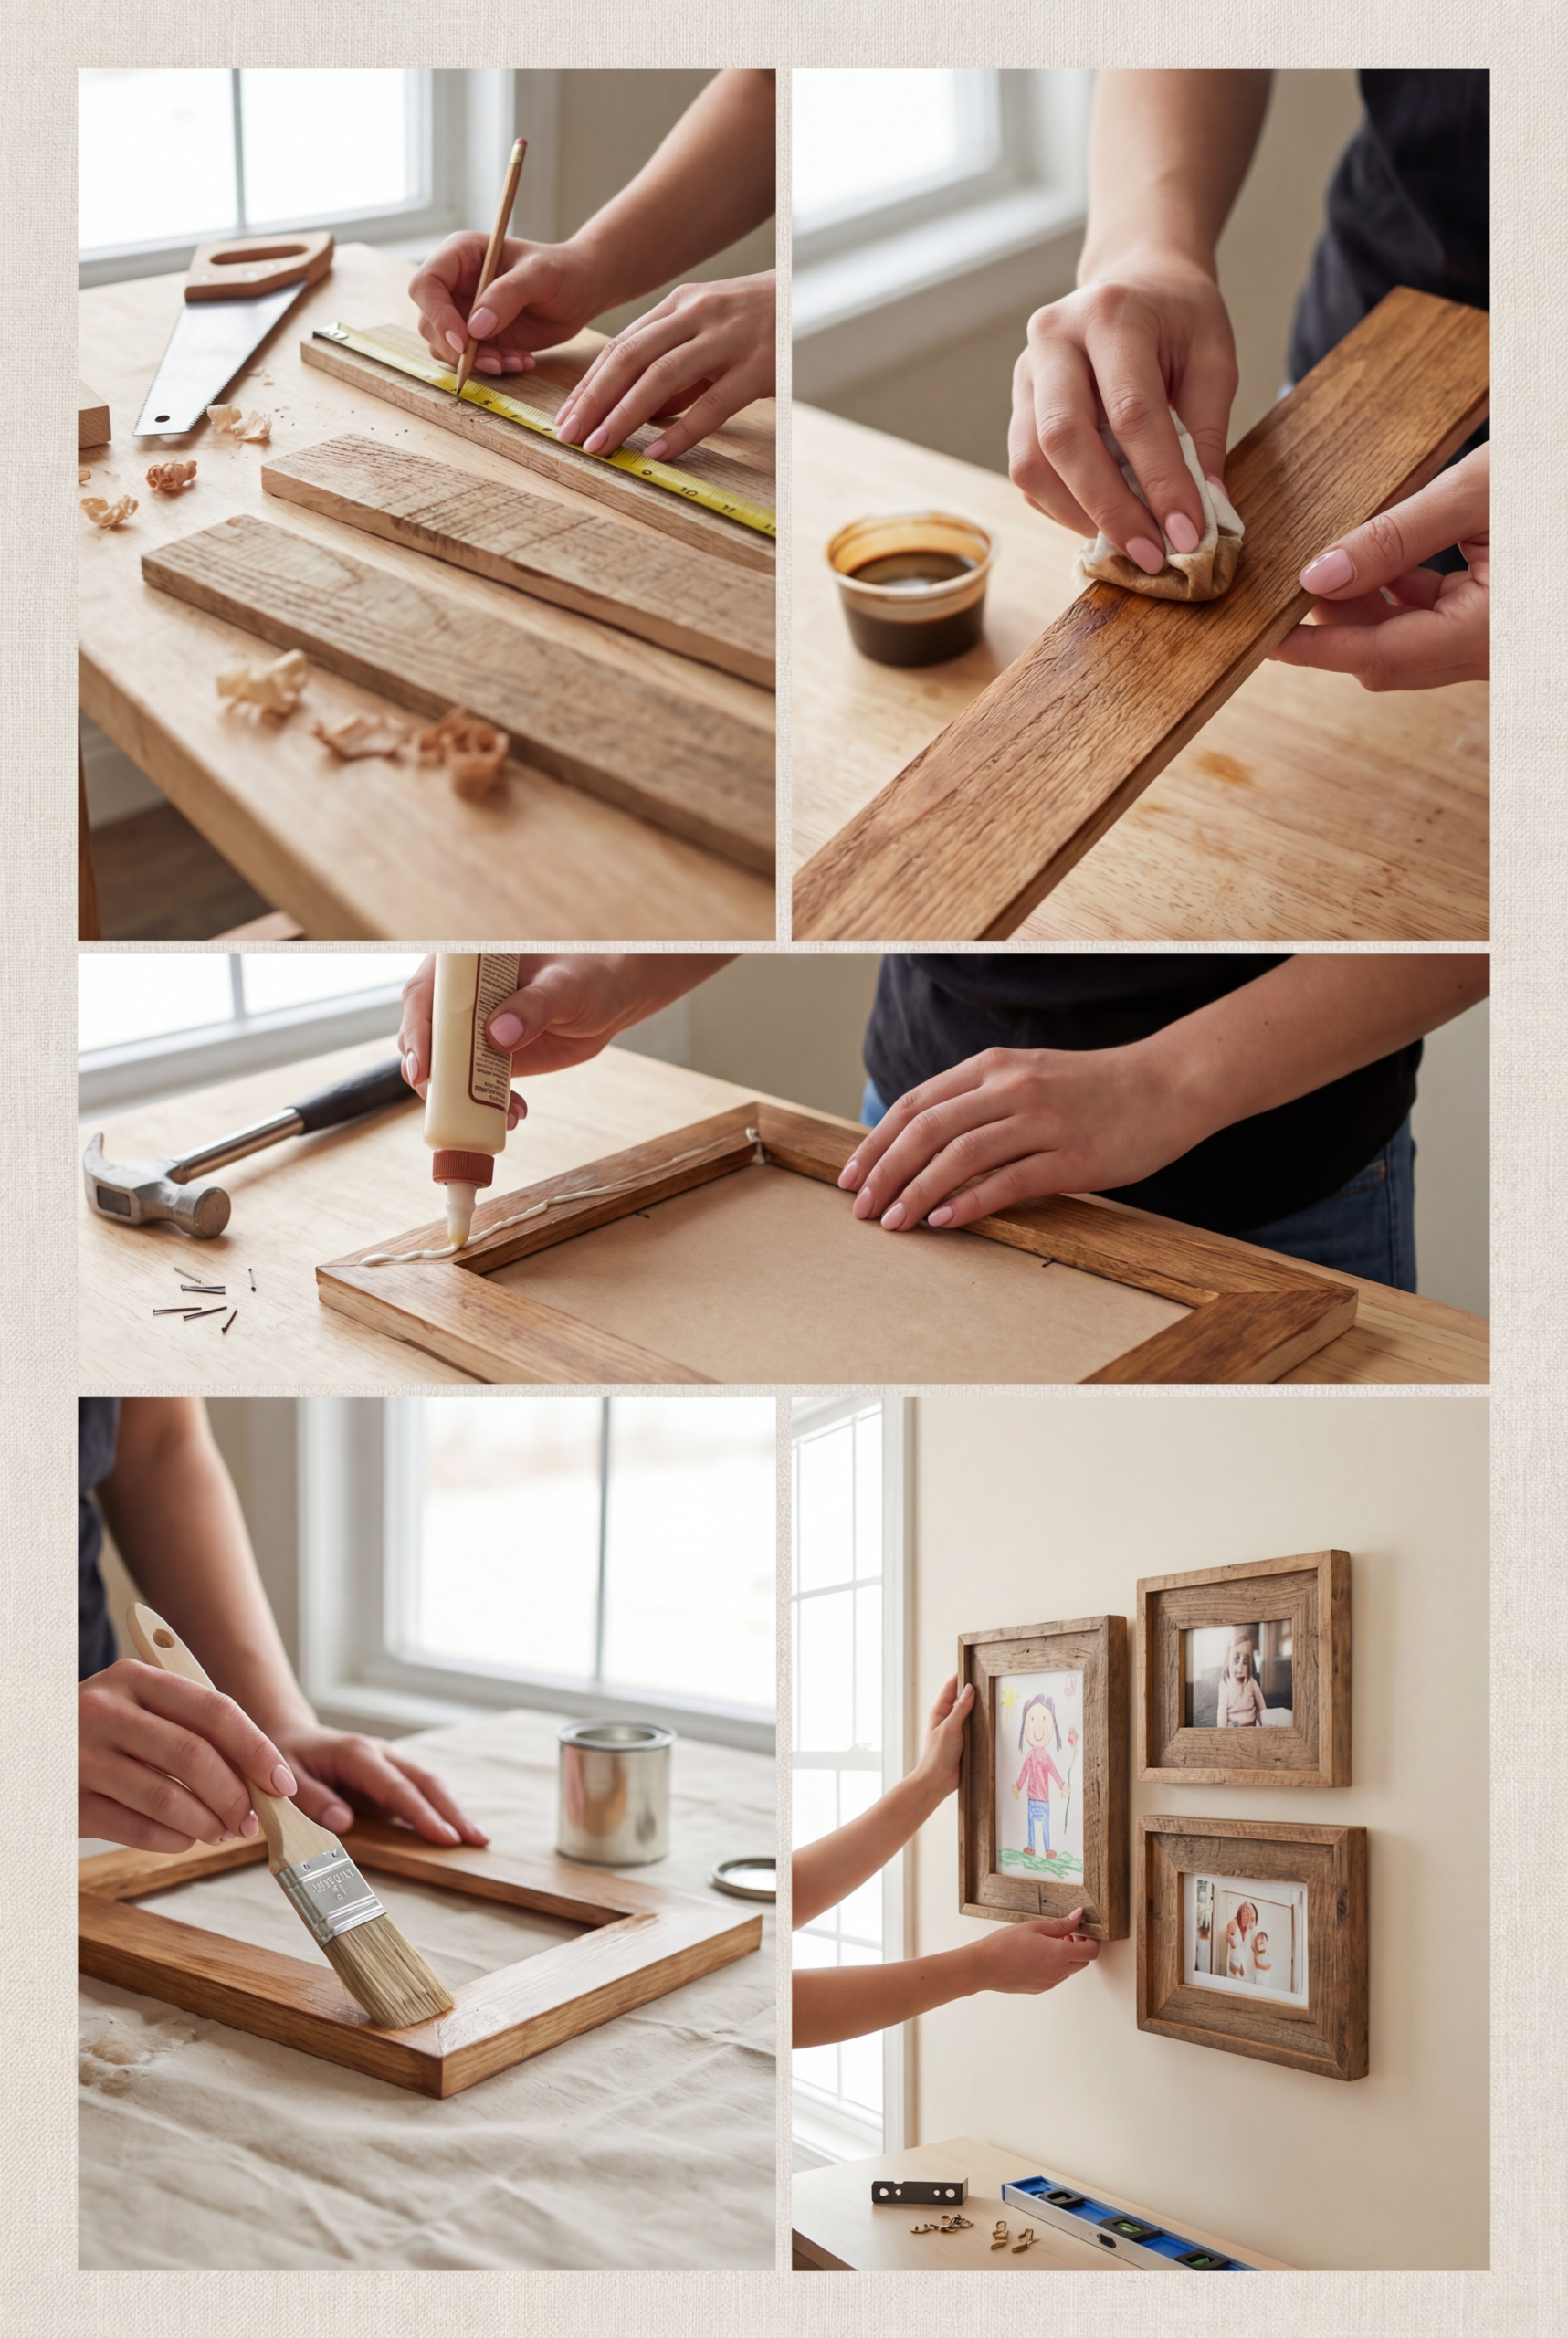
Thin wood gives these picture frames a barnwood look. The project takes about 1 to 2 hours, suits a beginner, costs $10-$40, and creates personal wall art.
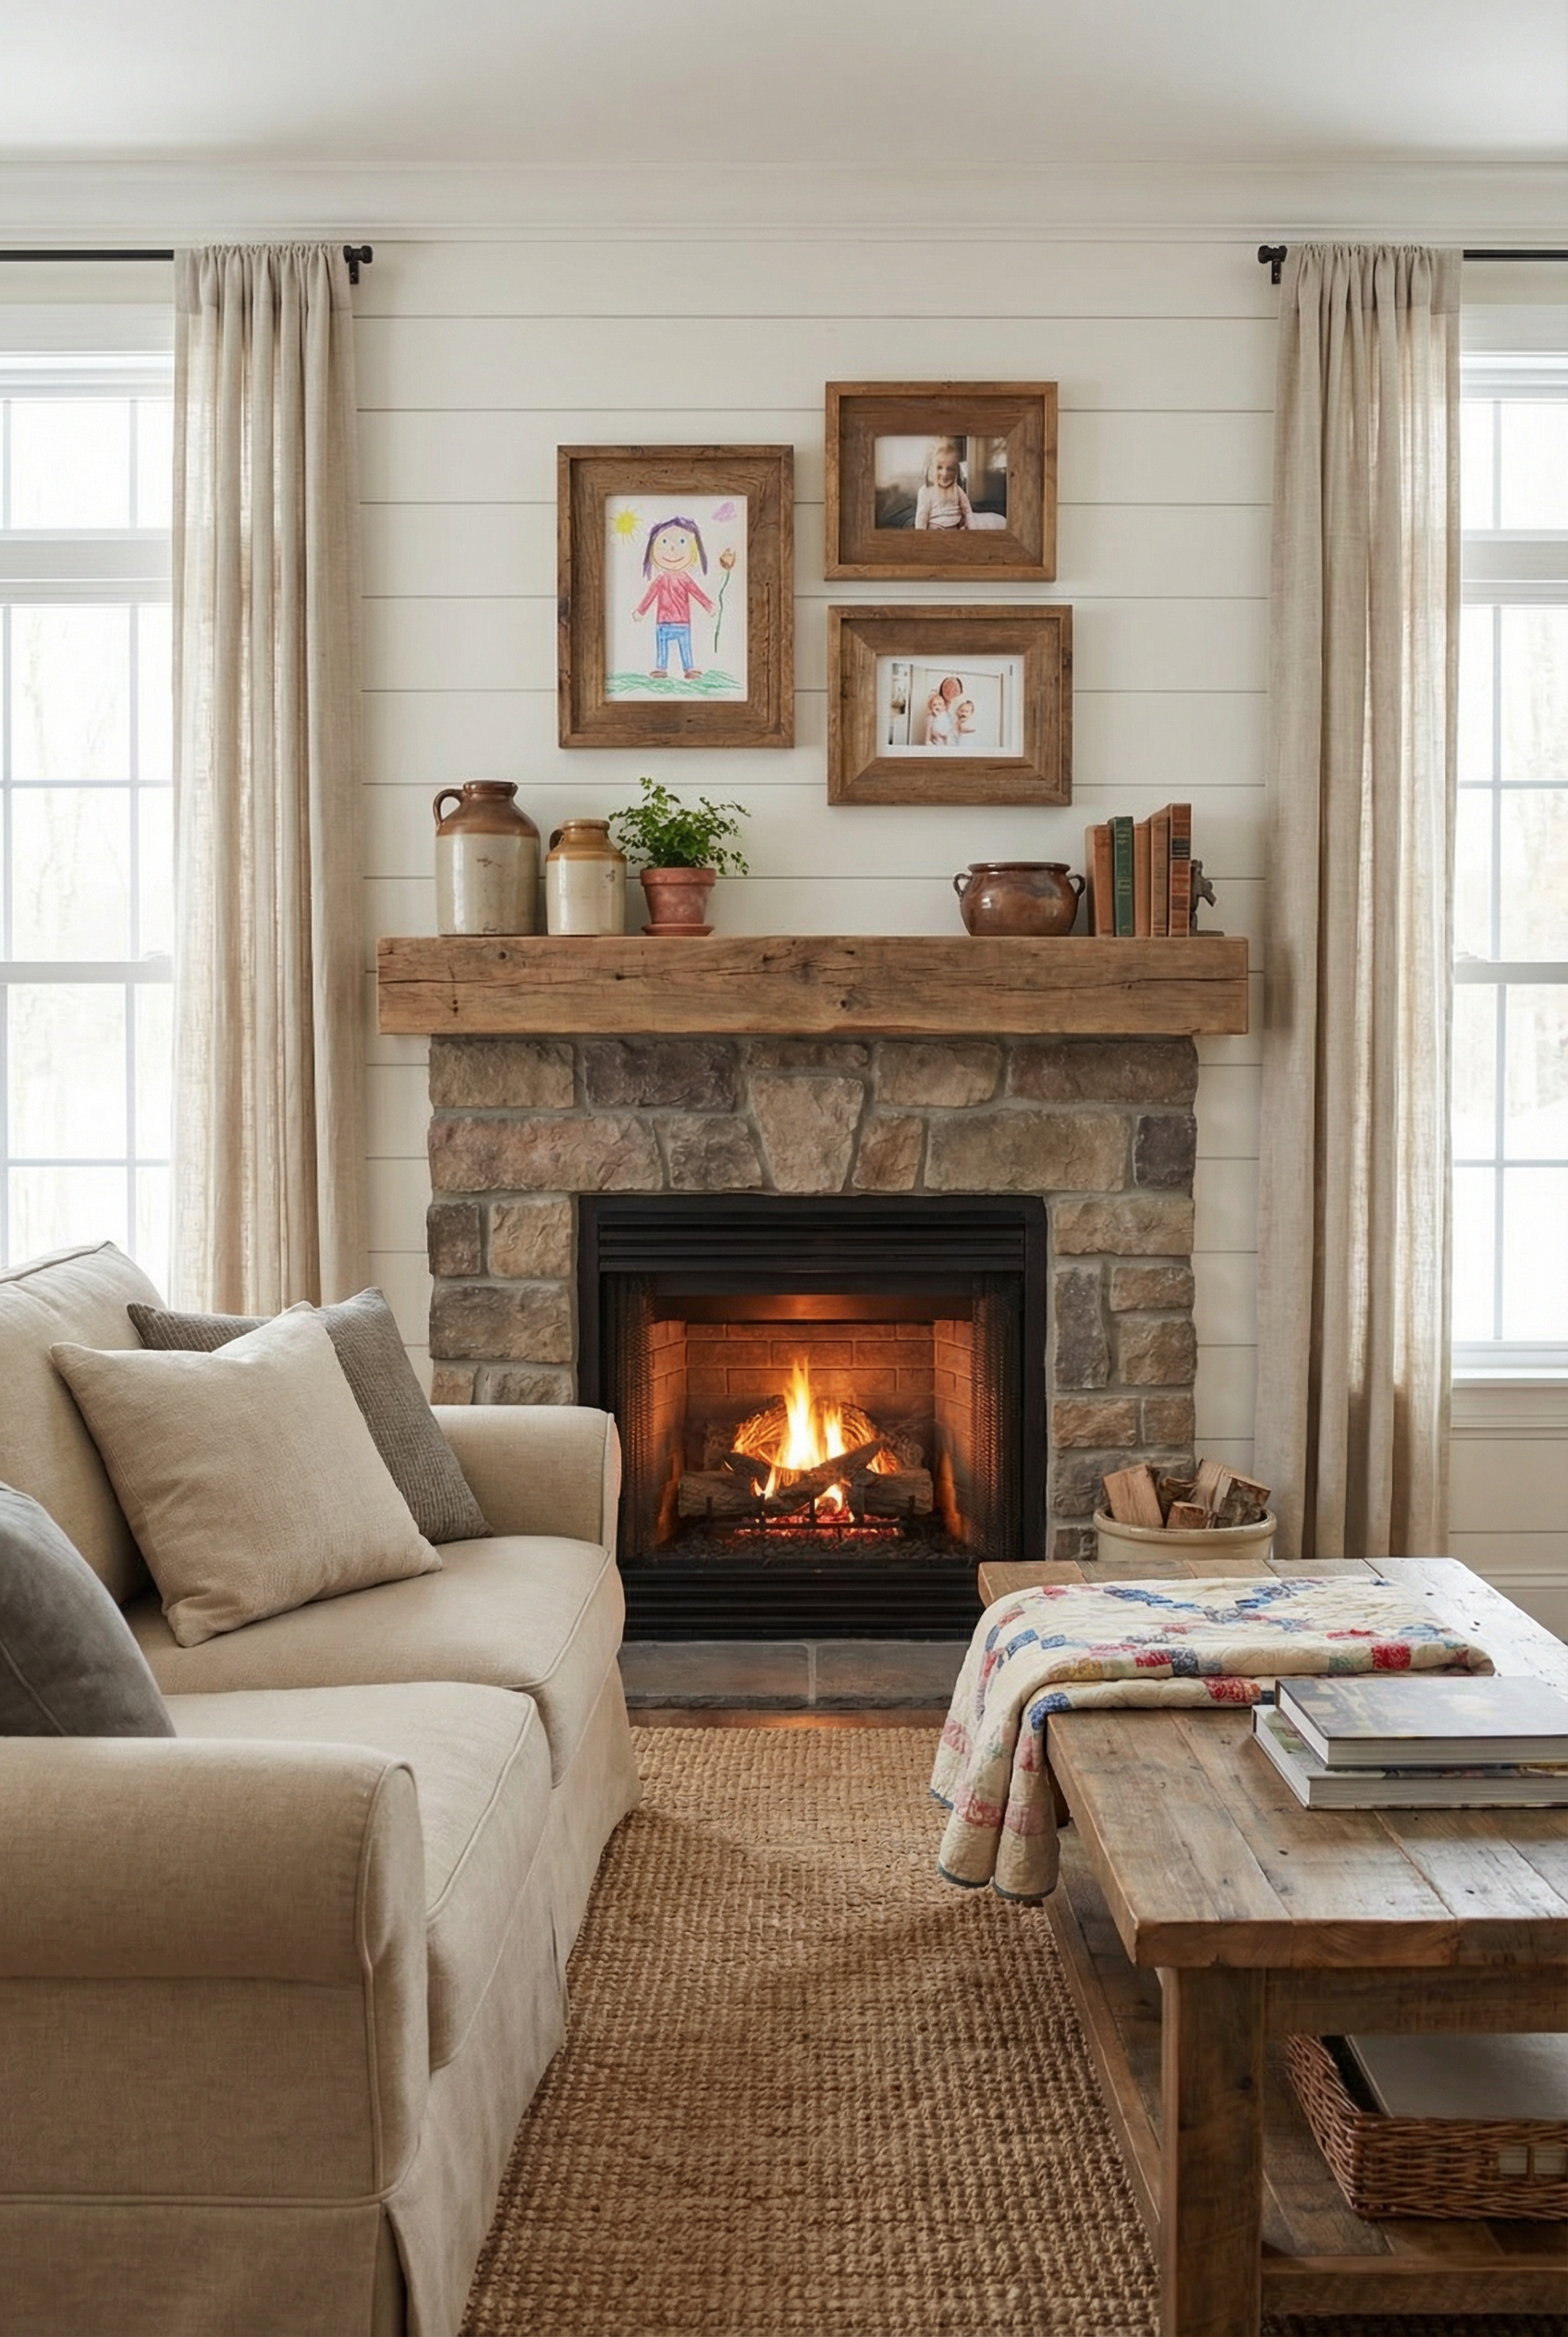
Chunky wood framing can make ordinary photos look better while adding warmth.
- Thin wood strips form the outer frame.
- Use basic frames or backing behind the wood.
- Glue or nails can hold the pieces together.
- Stain gives the frames their color.
- Hardware lets the finished frames hang on the wall.
- Cut the wood strips to fit the frames.
- Stain the pieces first.
- Attach the strips with glue or nails.
- Seal the frame after assembly.
- Hang the frames in a cluster.
Mix frame sizes but keep the wood tone consistent for a collected look without visual messiness. A kid’s drawing can also personalize the farmhouse-style frame.
Rustic Mantel Shelving
Shelves provide storage and display space while drawing the eye upward. Use baskets on storage shelves, and leave some negative space on display shelves so the arrangement does not feel crowded.
Rustic decor combines especially well with a mantel and shelving.
Faux Beam Mantel
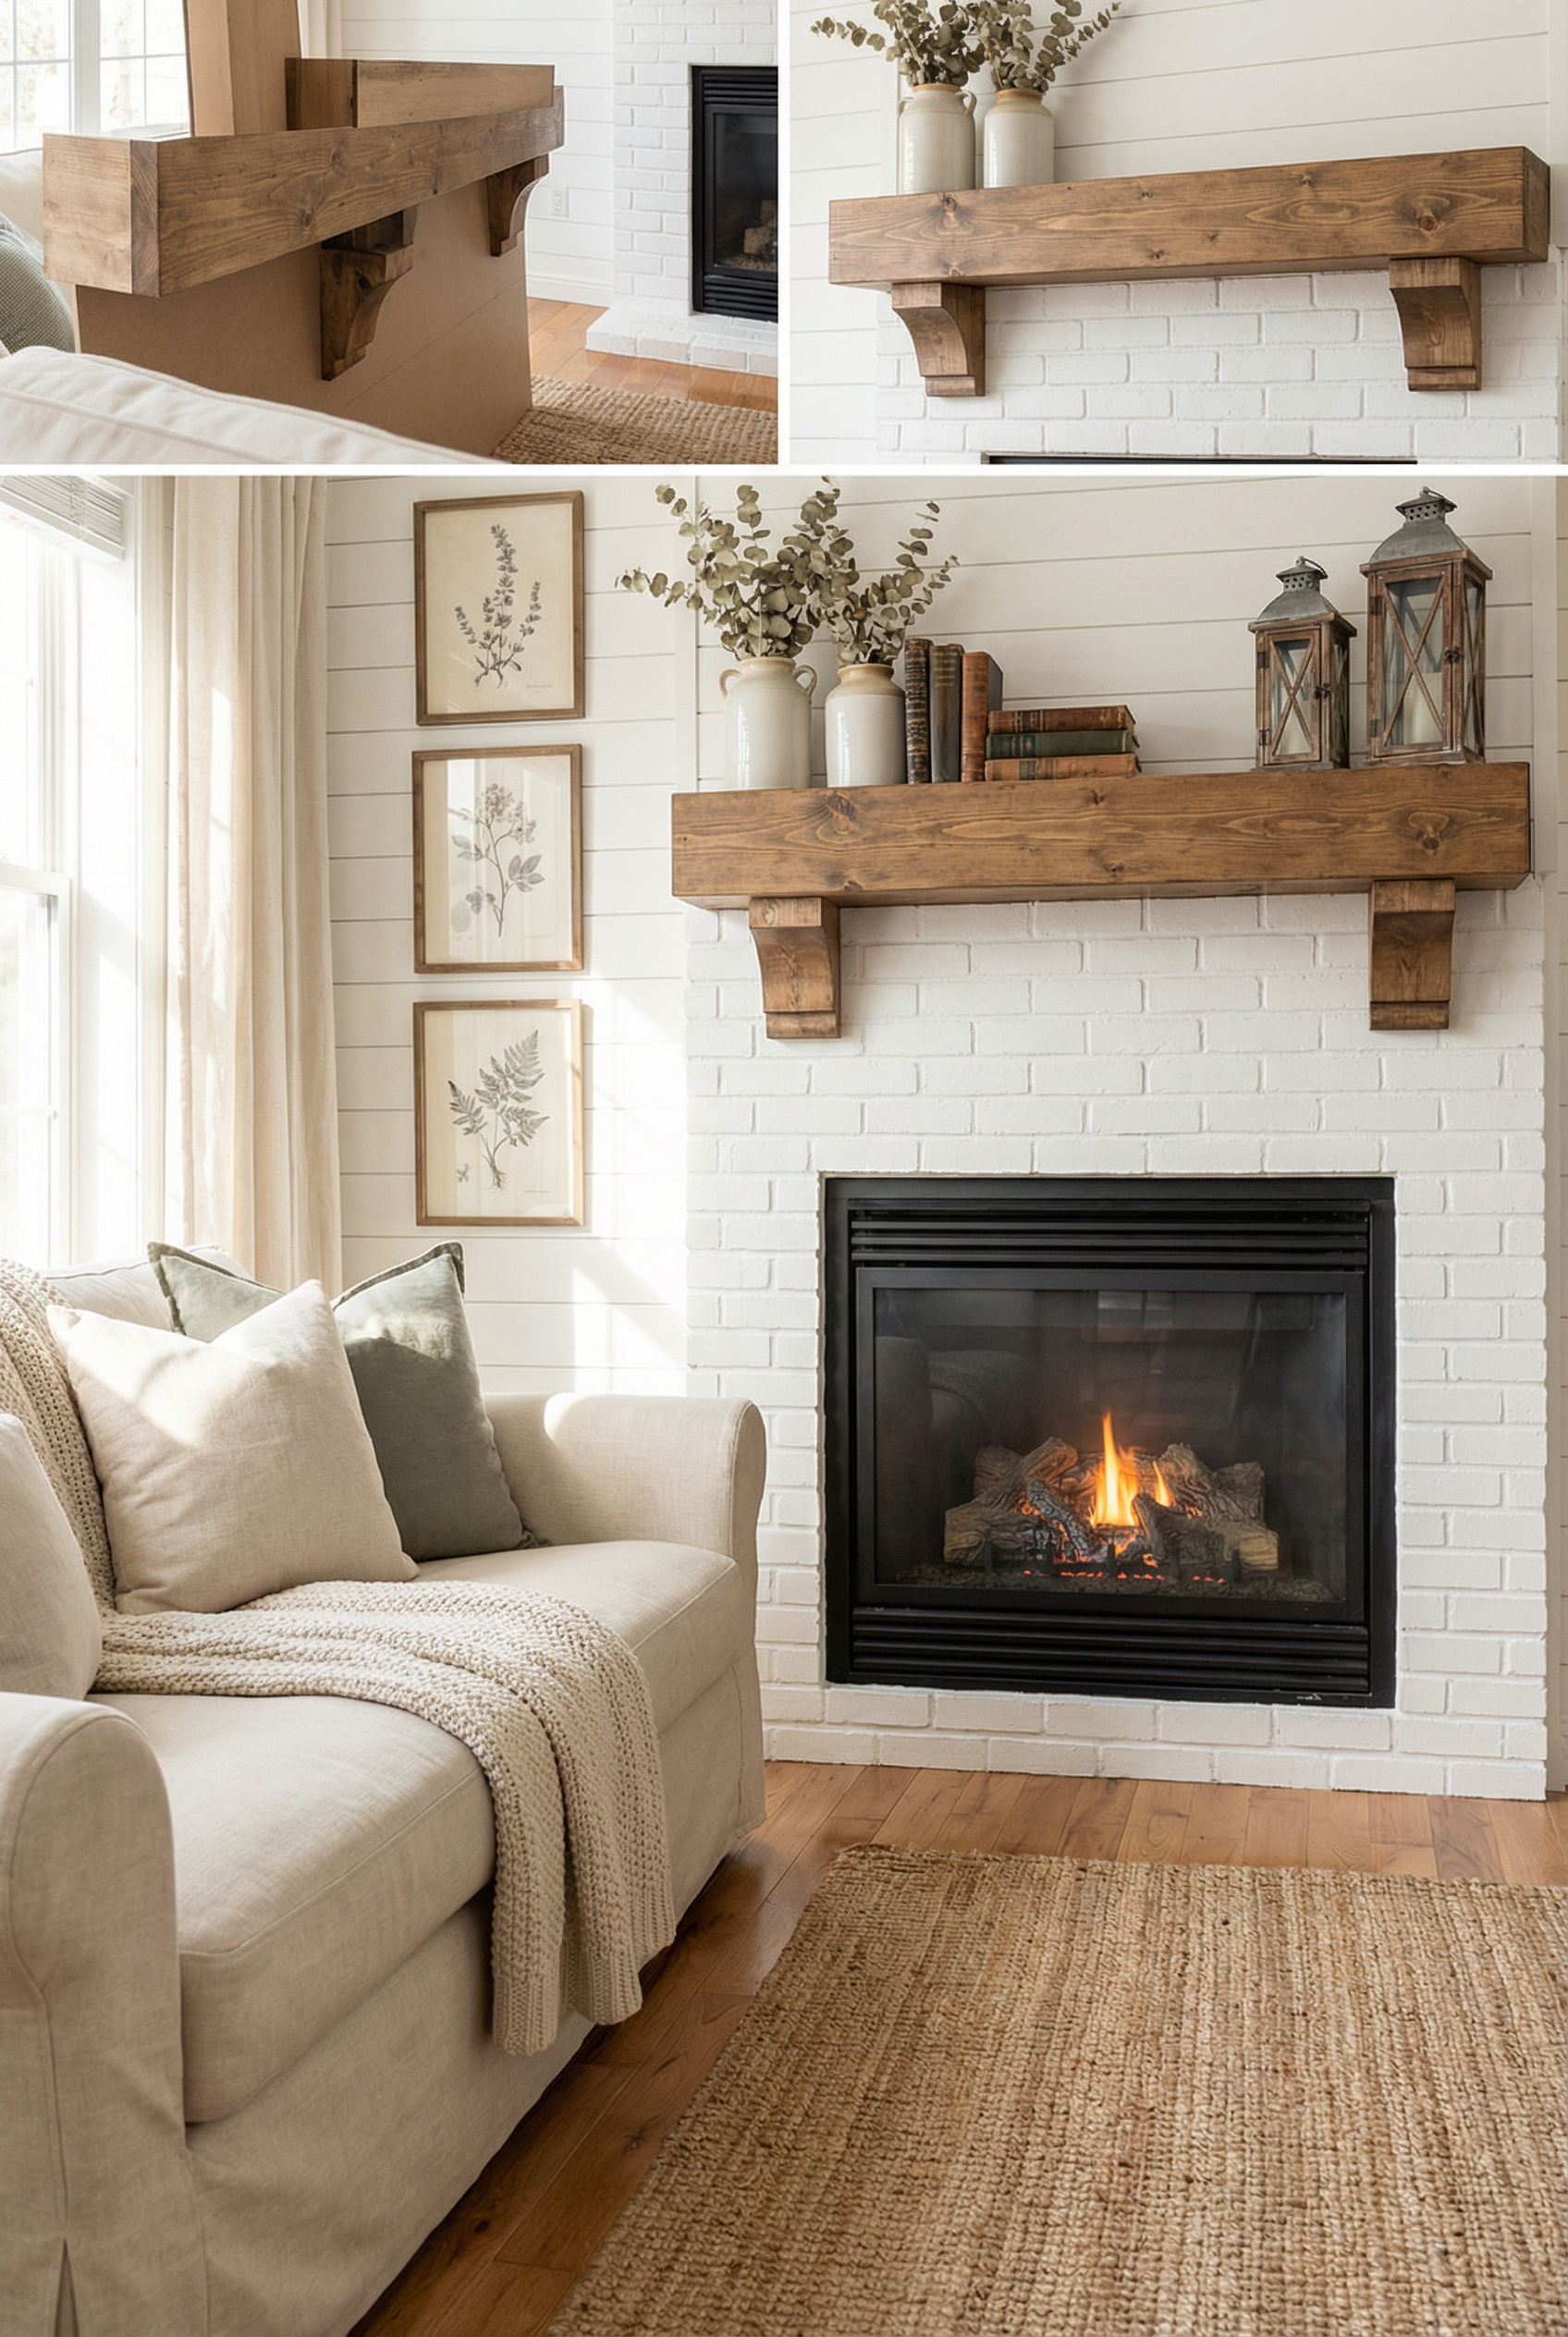
A weekend is enough time for this intermediate project, which costs about $60 to $160. Anchor the mantel to the wall, then use the ledge for styling and a bit of farmhouse warmth.
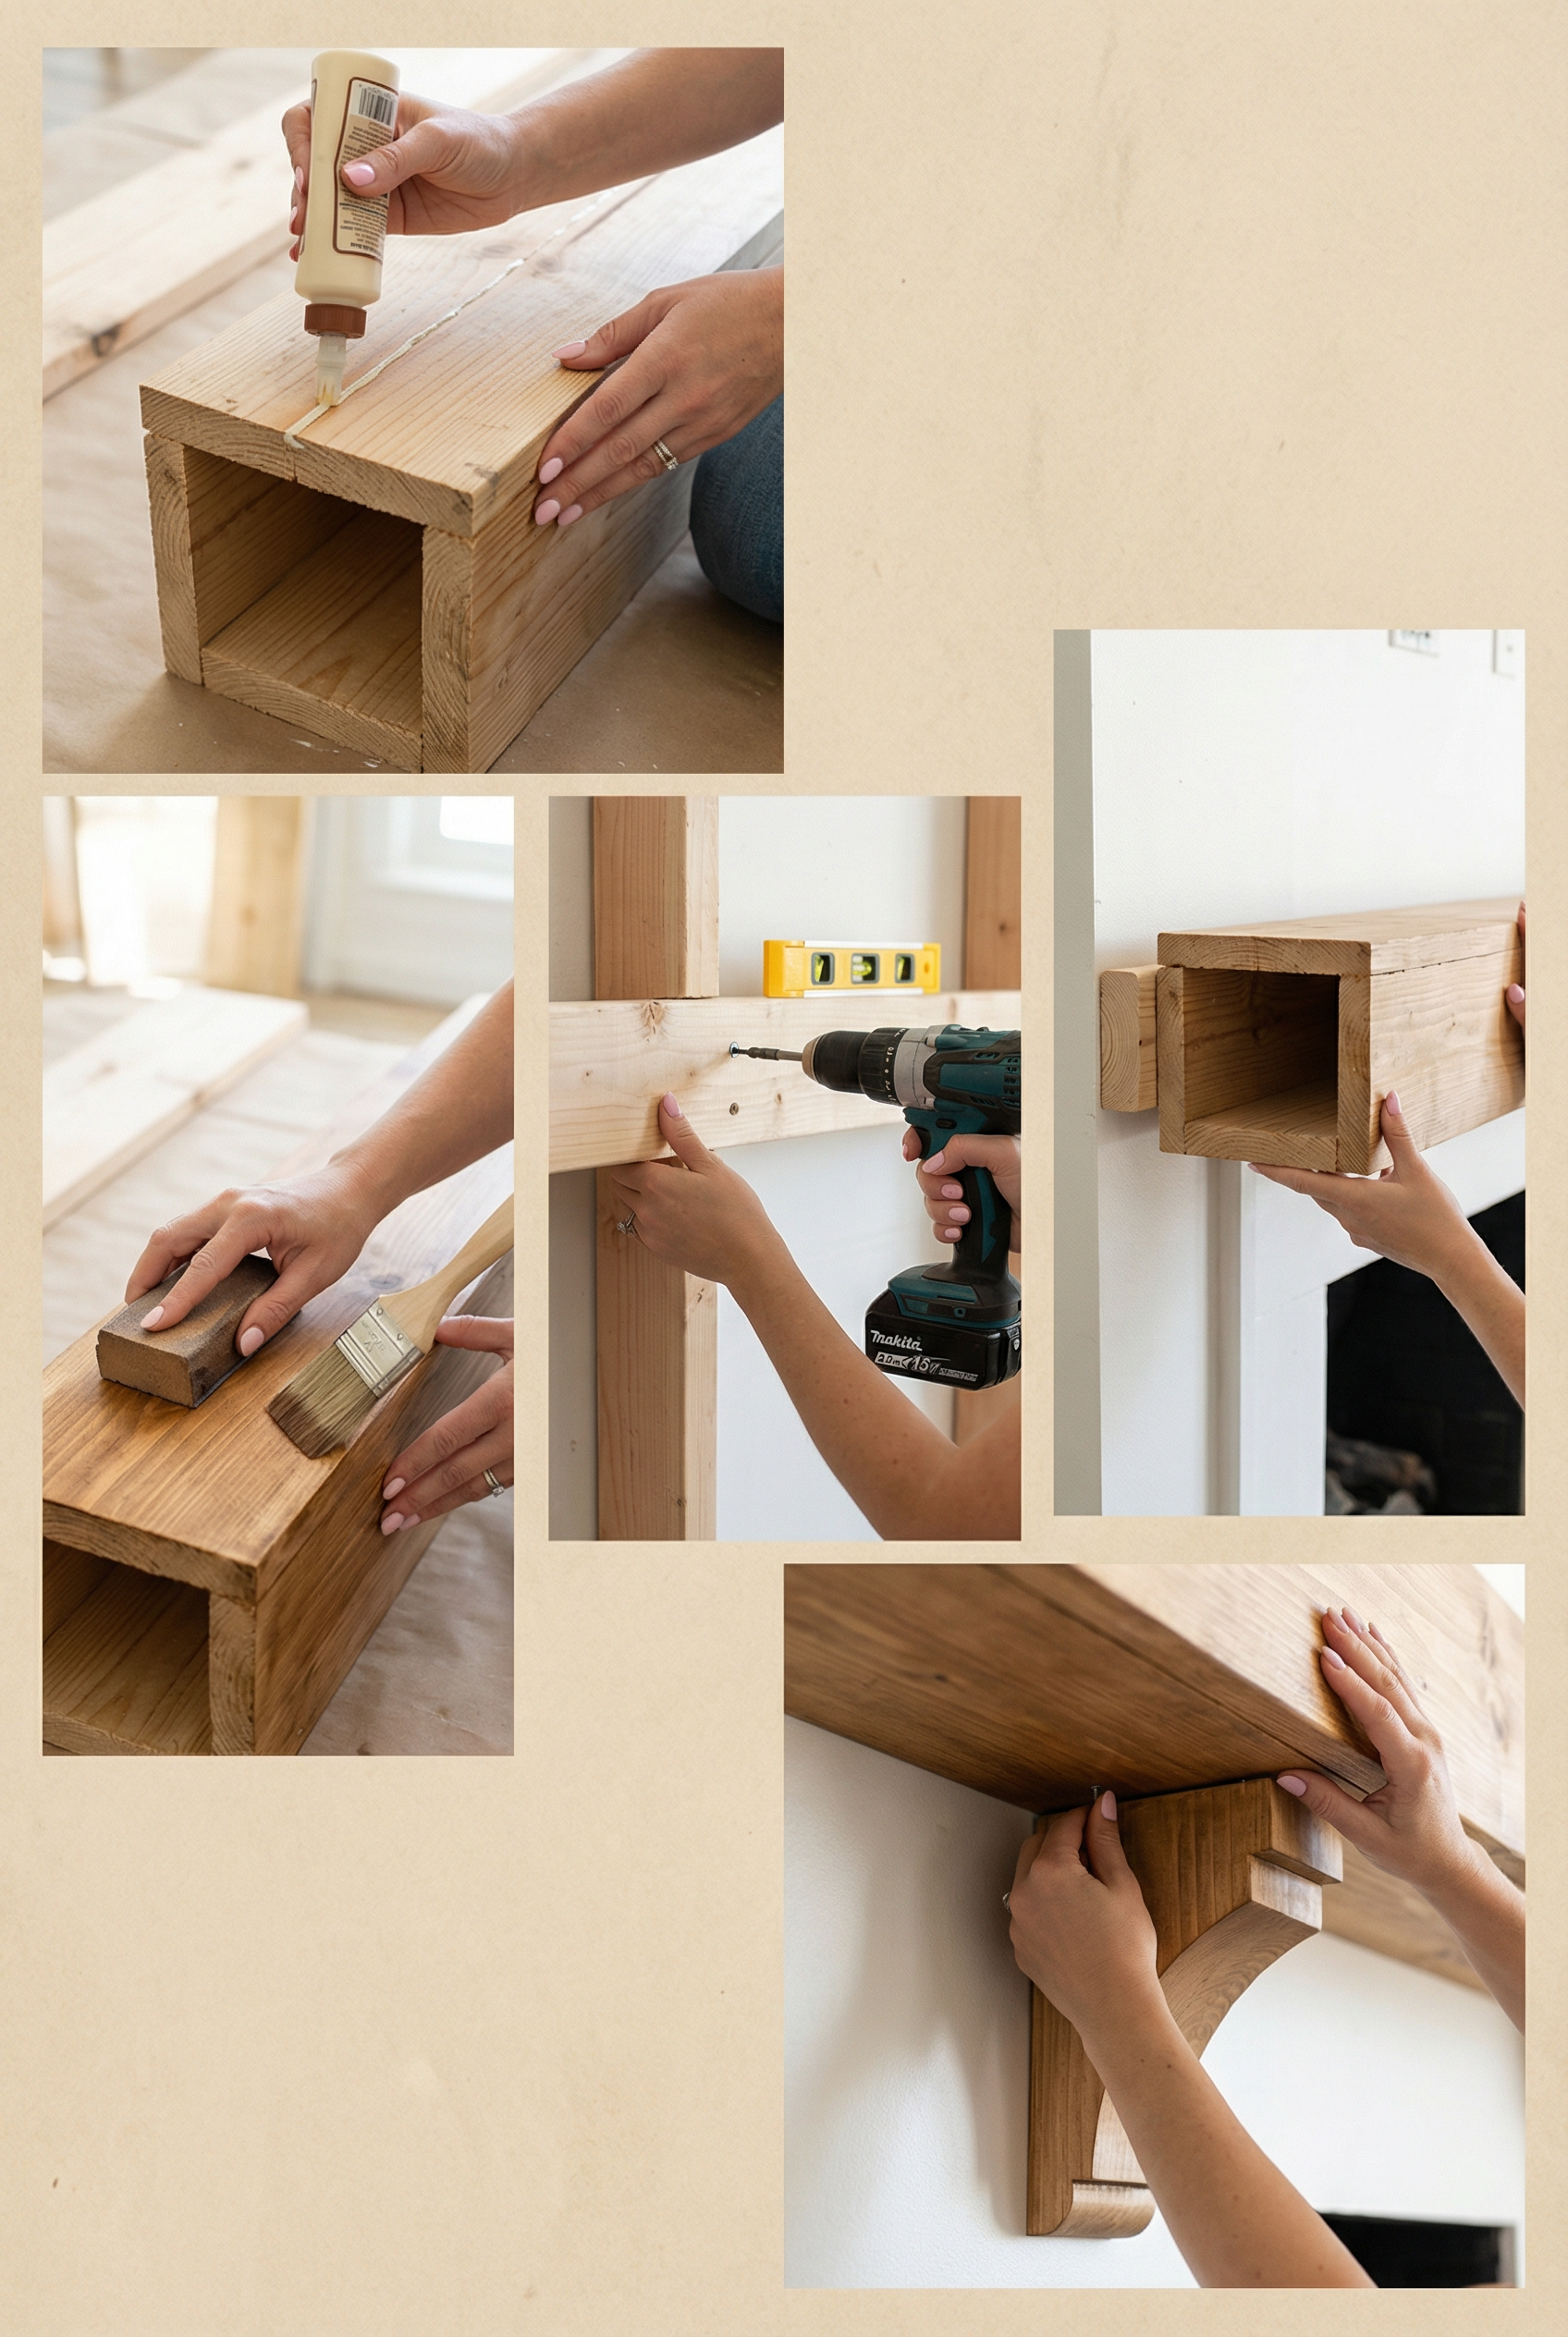
Gather these materials for the faux beam mantel:
- 1×10 boards and 2×12 boards
- A 2×4 ledger board
- Screws and glue
- Stain or paint for the finish
- Optional corbels
- Build the mantel as a three-sided beam.
- Finish the beam after building it.
- Mount the ledger into the studs.
- Slide the beam over the ledger.
- Secure the beam in place.
Warm wood paired with simple styling reads as timeless. For the mantel styling, include one tall item, one low item, and one unusual item.
Sag-Resistant Floating Shelves
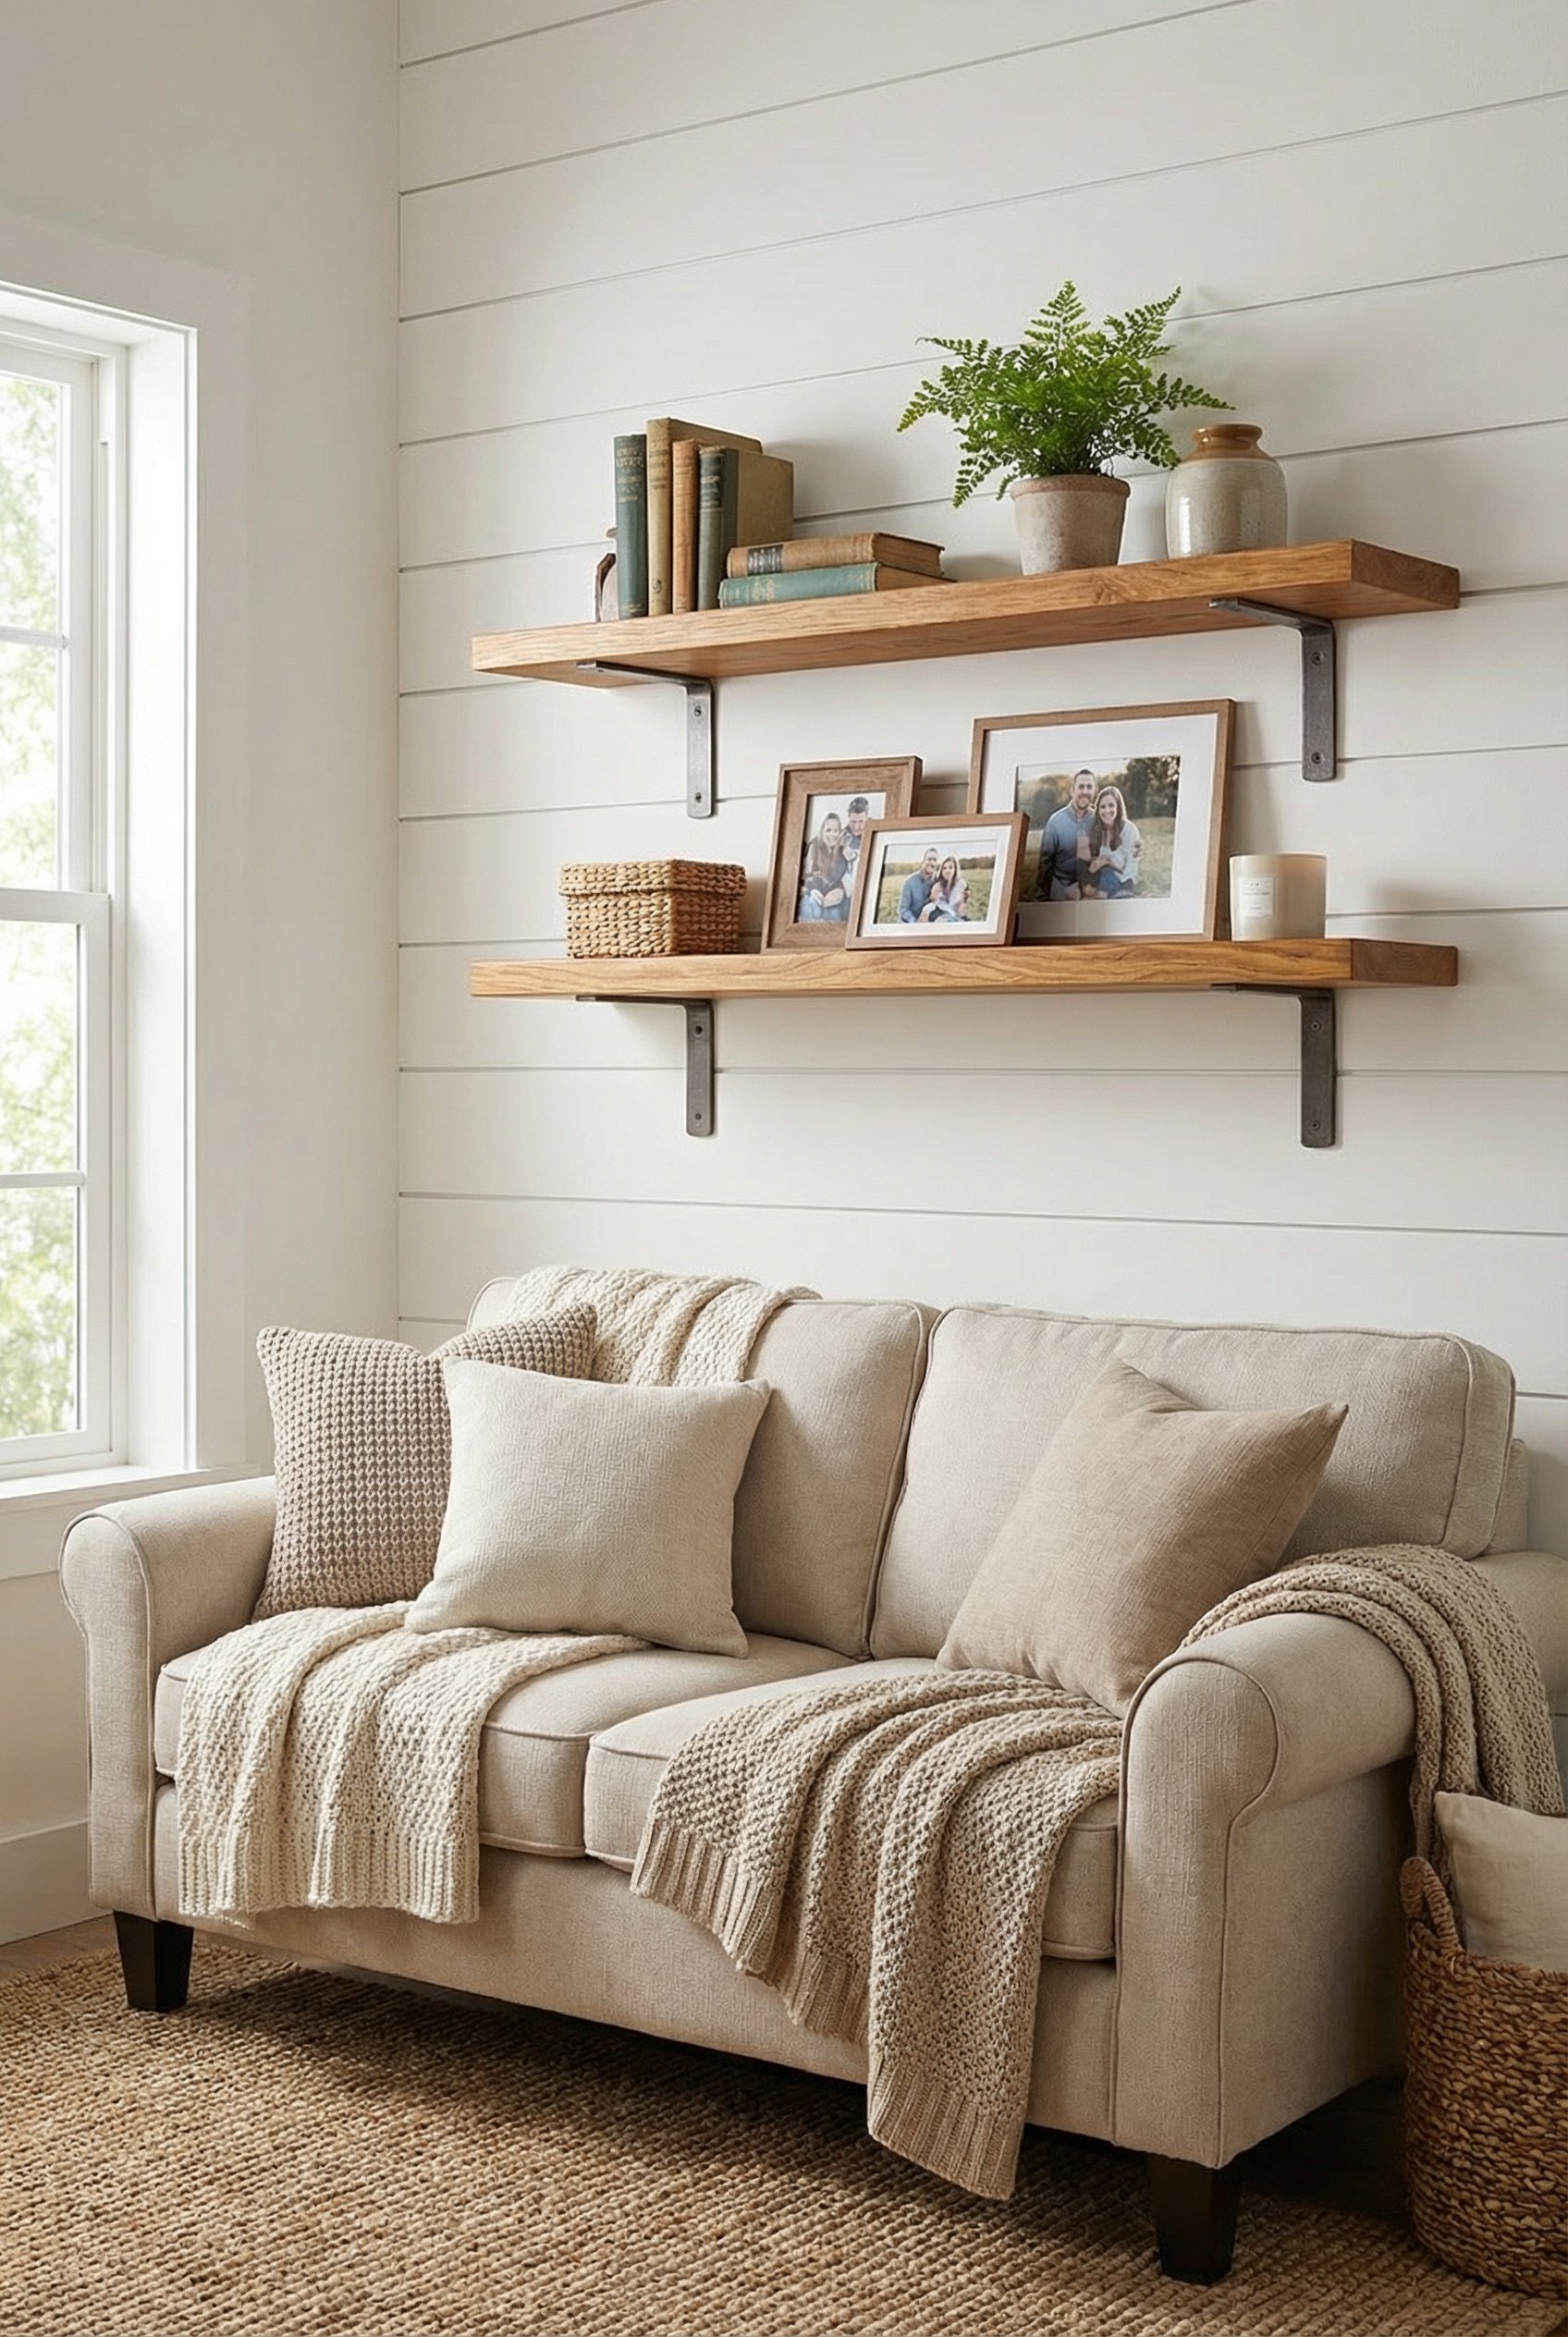
Floating shelves take about 2 to 3 hours and suit beginner to intermediate skill levels. They can work in small rooms for vertical storage and styling, with costs ranging from $40 to $140.
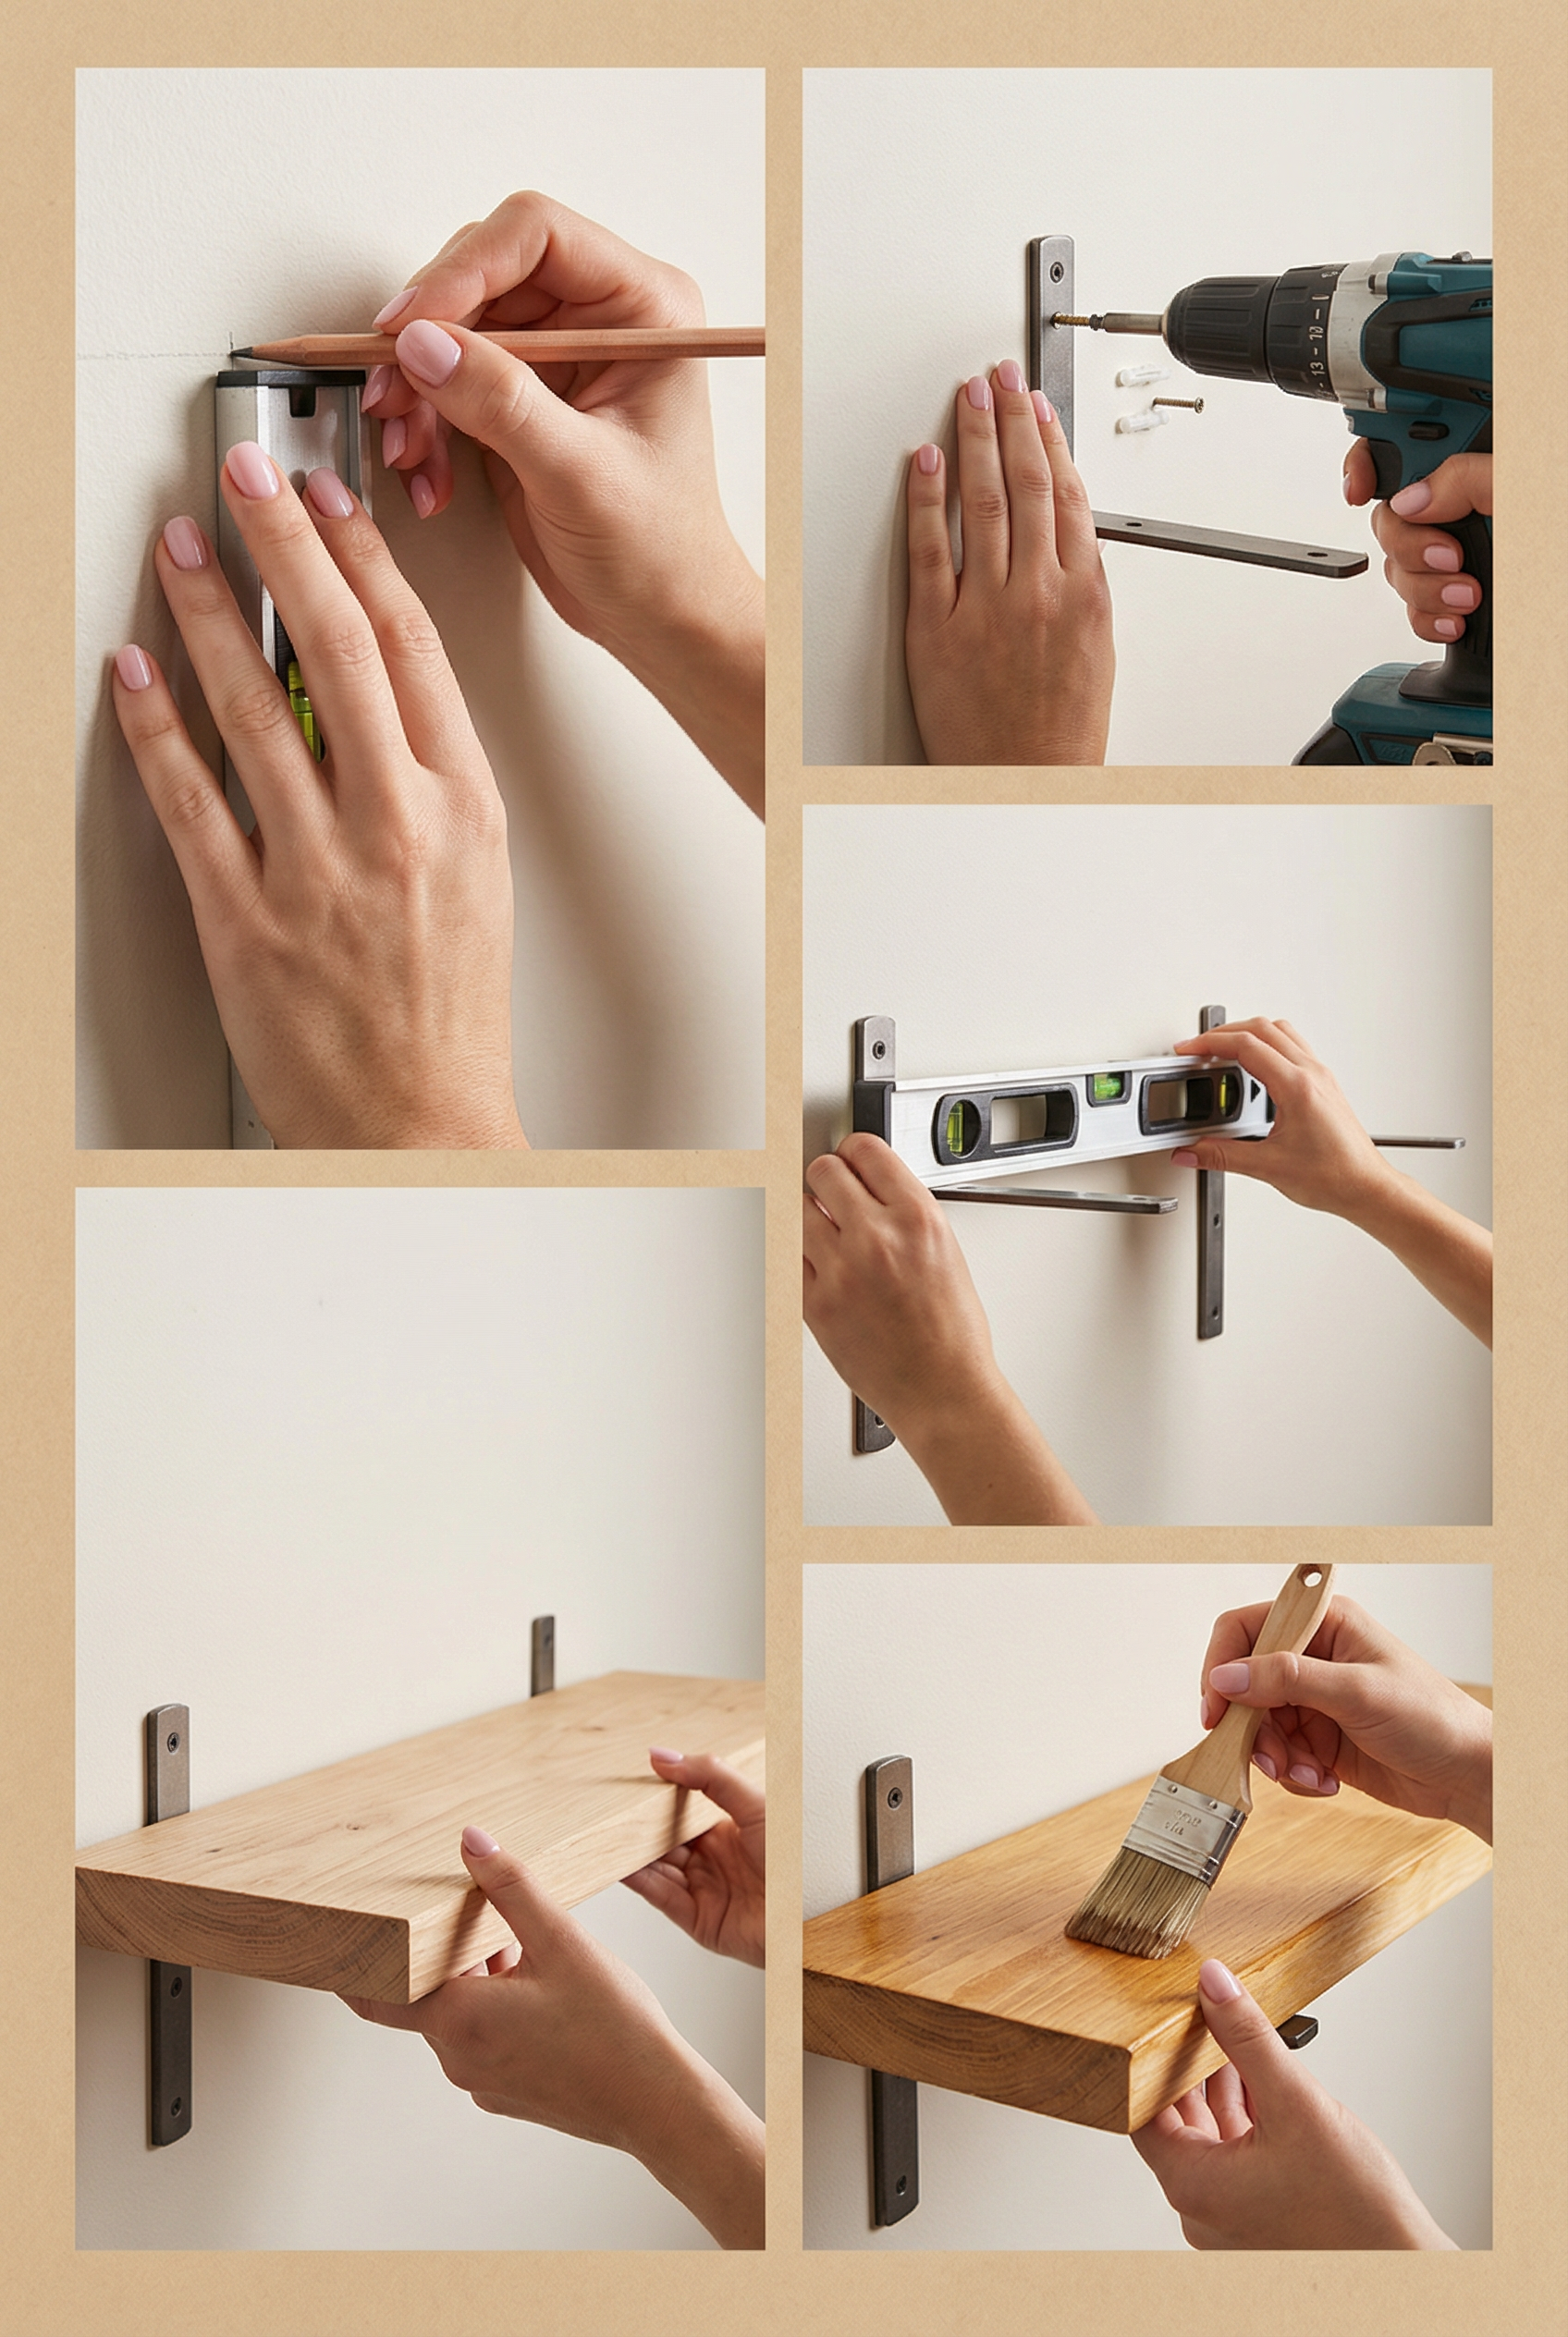
Gather these materials for the floating shelves.
- Use 1×10 boards for the floating shelves.
- Use brackets to support the floating shelves.
- Use a drill and level.
- Use screws and anchors.
- Finish the floating shelves with either stain or paint.
Follow these construction steps:
- Mark the studs before installing the floating shelves.
- Install the brackets level.
- Attach the boards to the brackets.
- Seal the surfaces of the floating shelves.
Place one basket on each shelf to conceal clutter, and place a lamp near the floating shelves so its warm light adds coziness to the arrangement.
Industrial Farmhouse Pipe Shelving
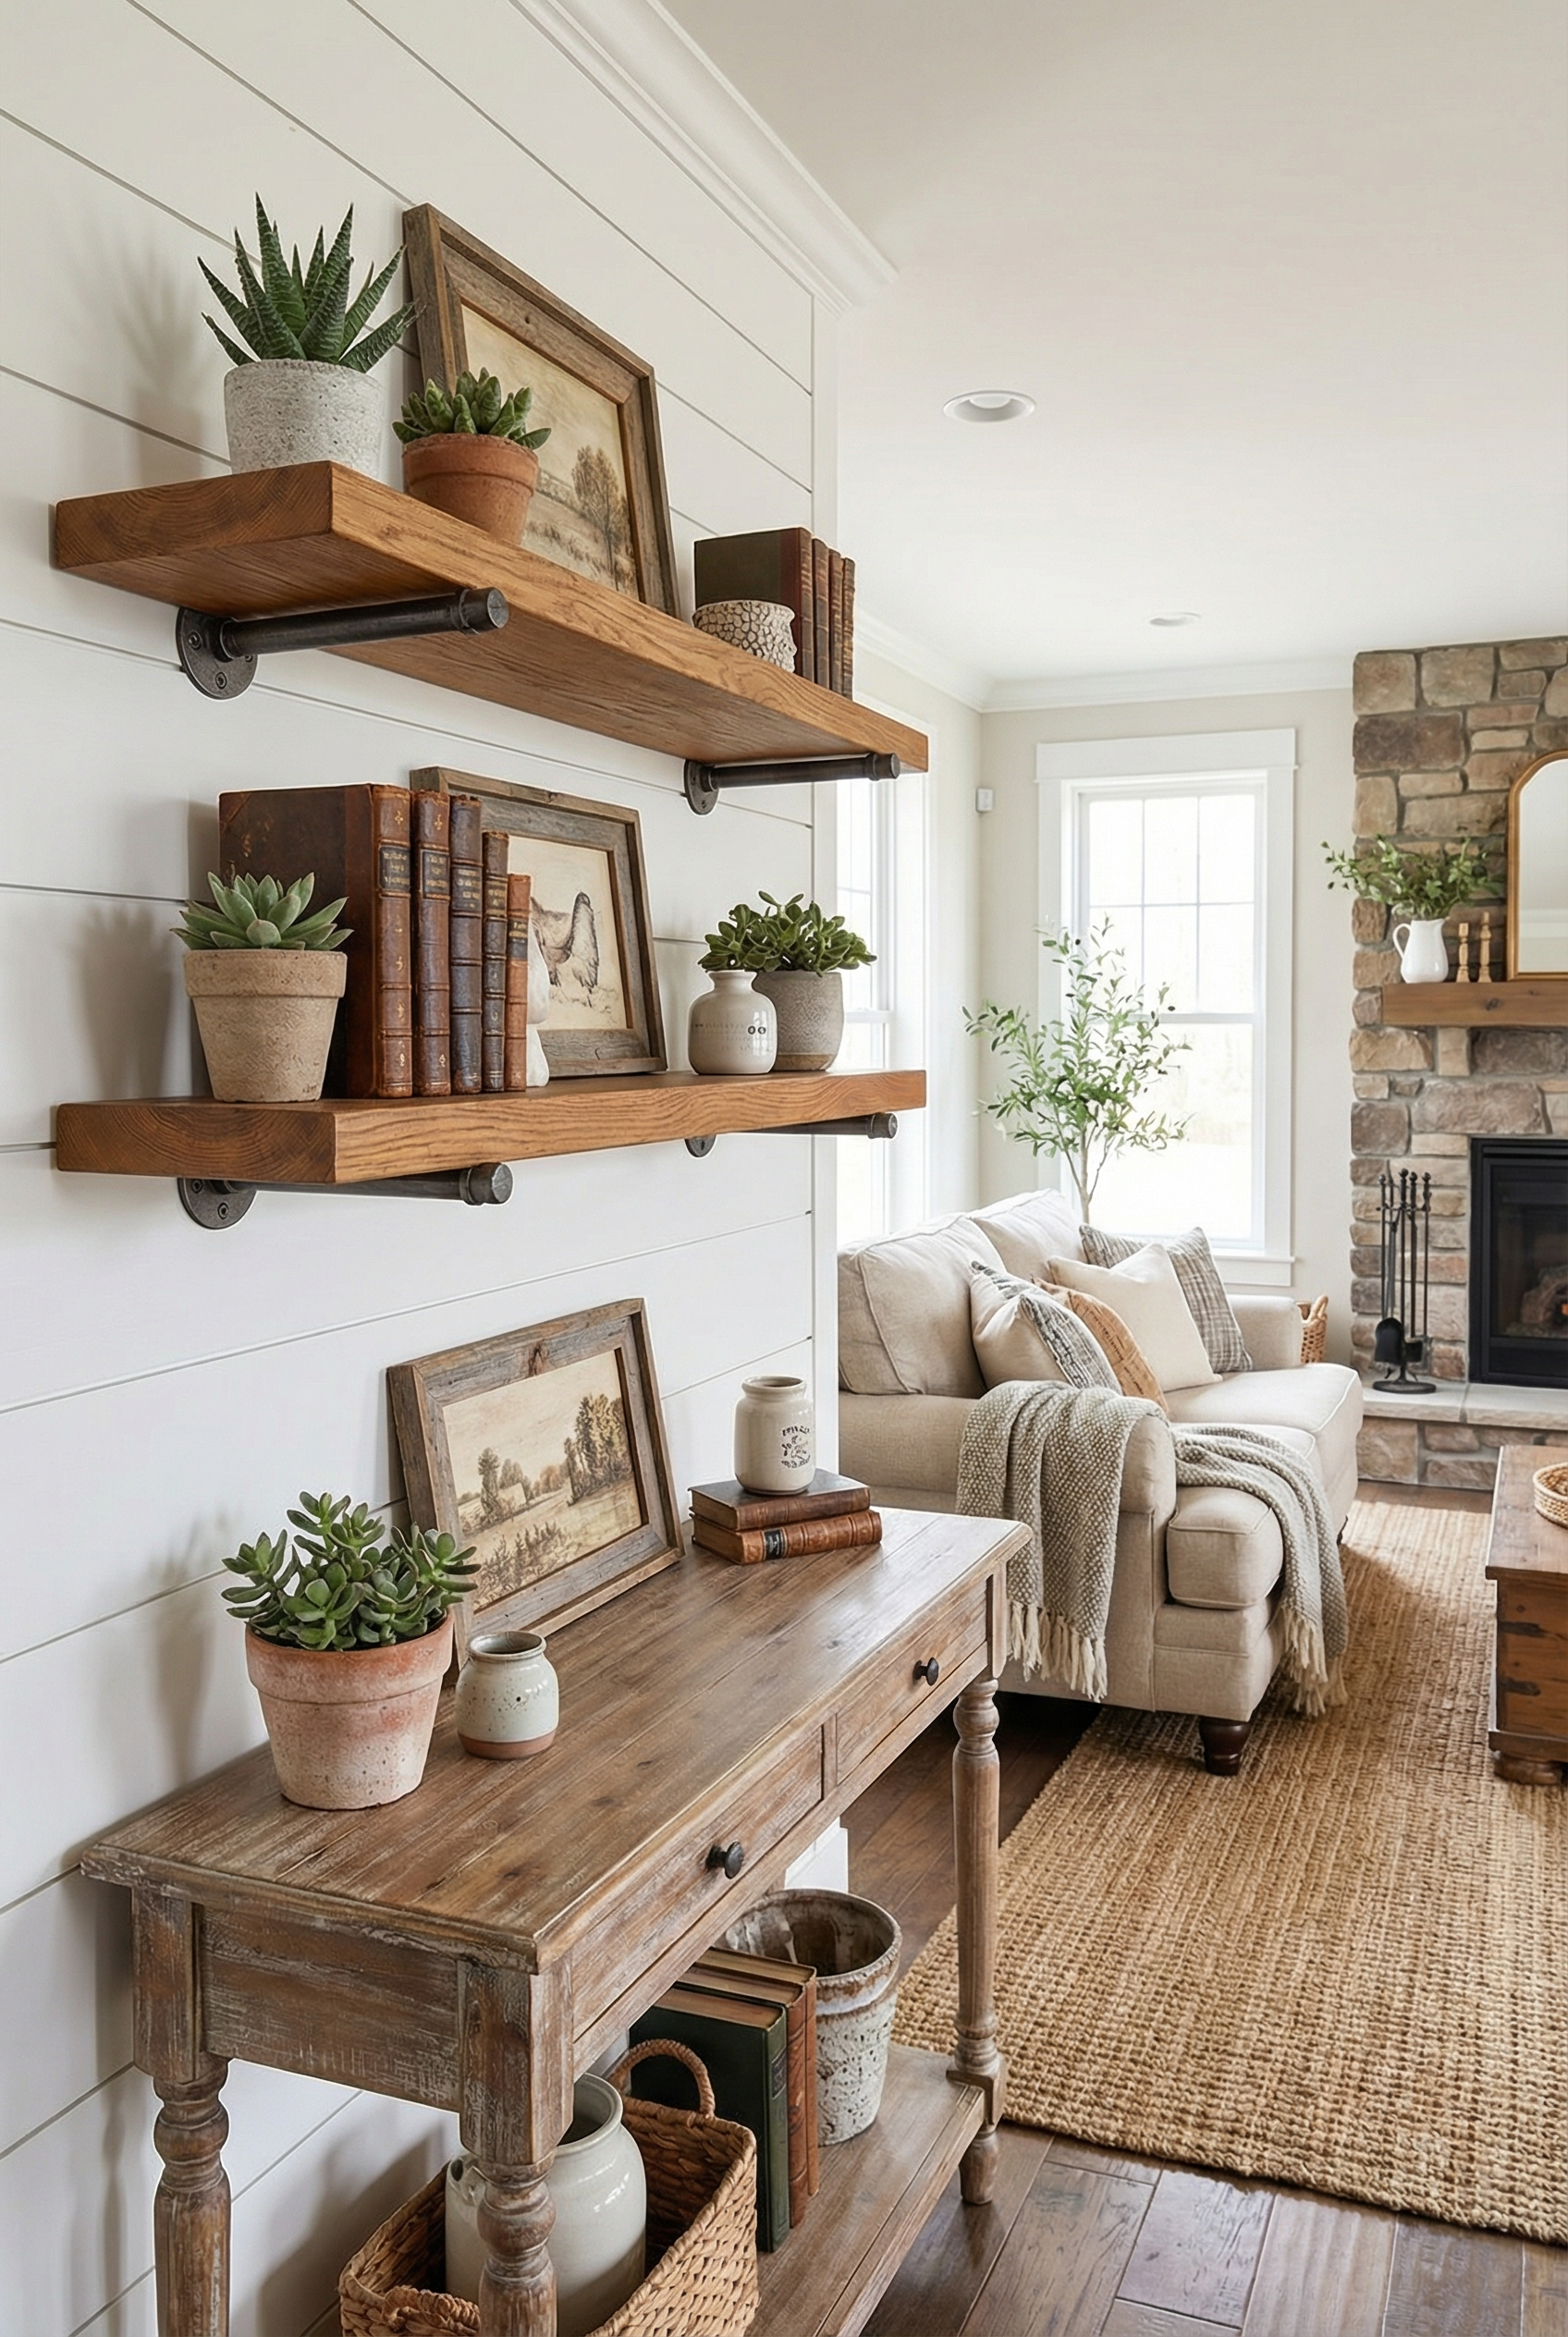
Pipe shelving takes about 2 to 4 hours and requires intermediate skill. It costs around $60 to $150 and can add contrast in a reading nook or bar nook.
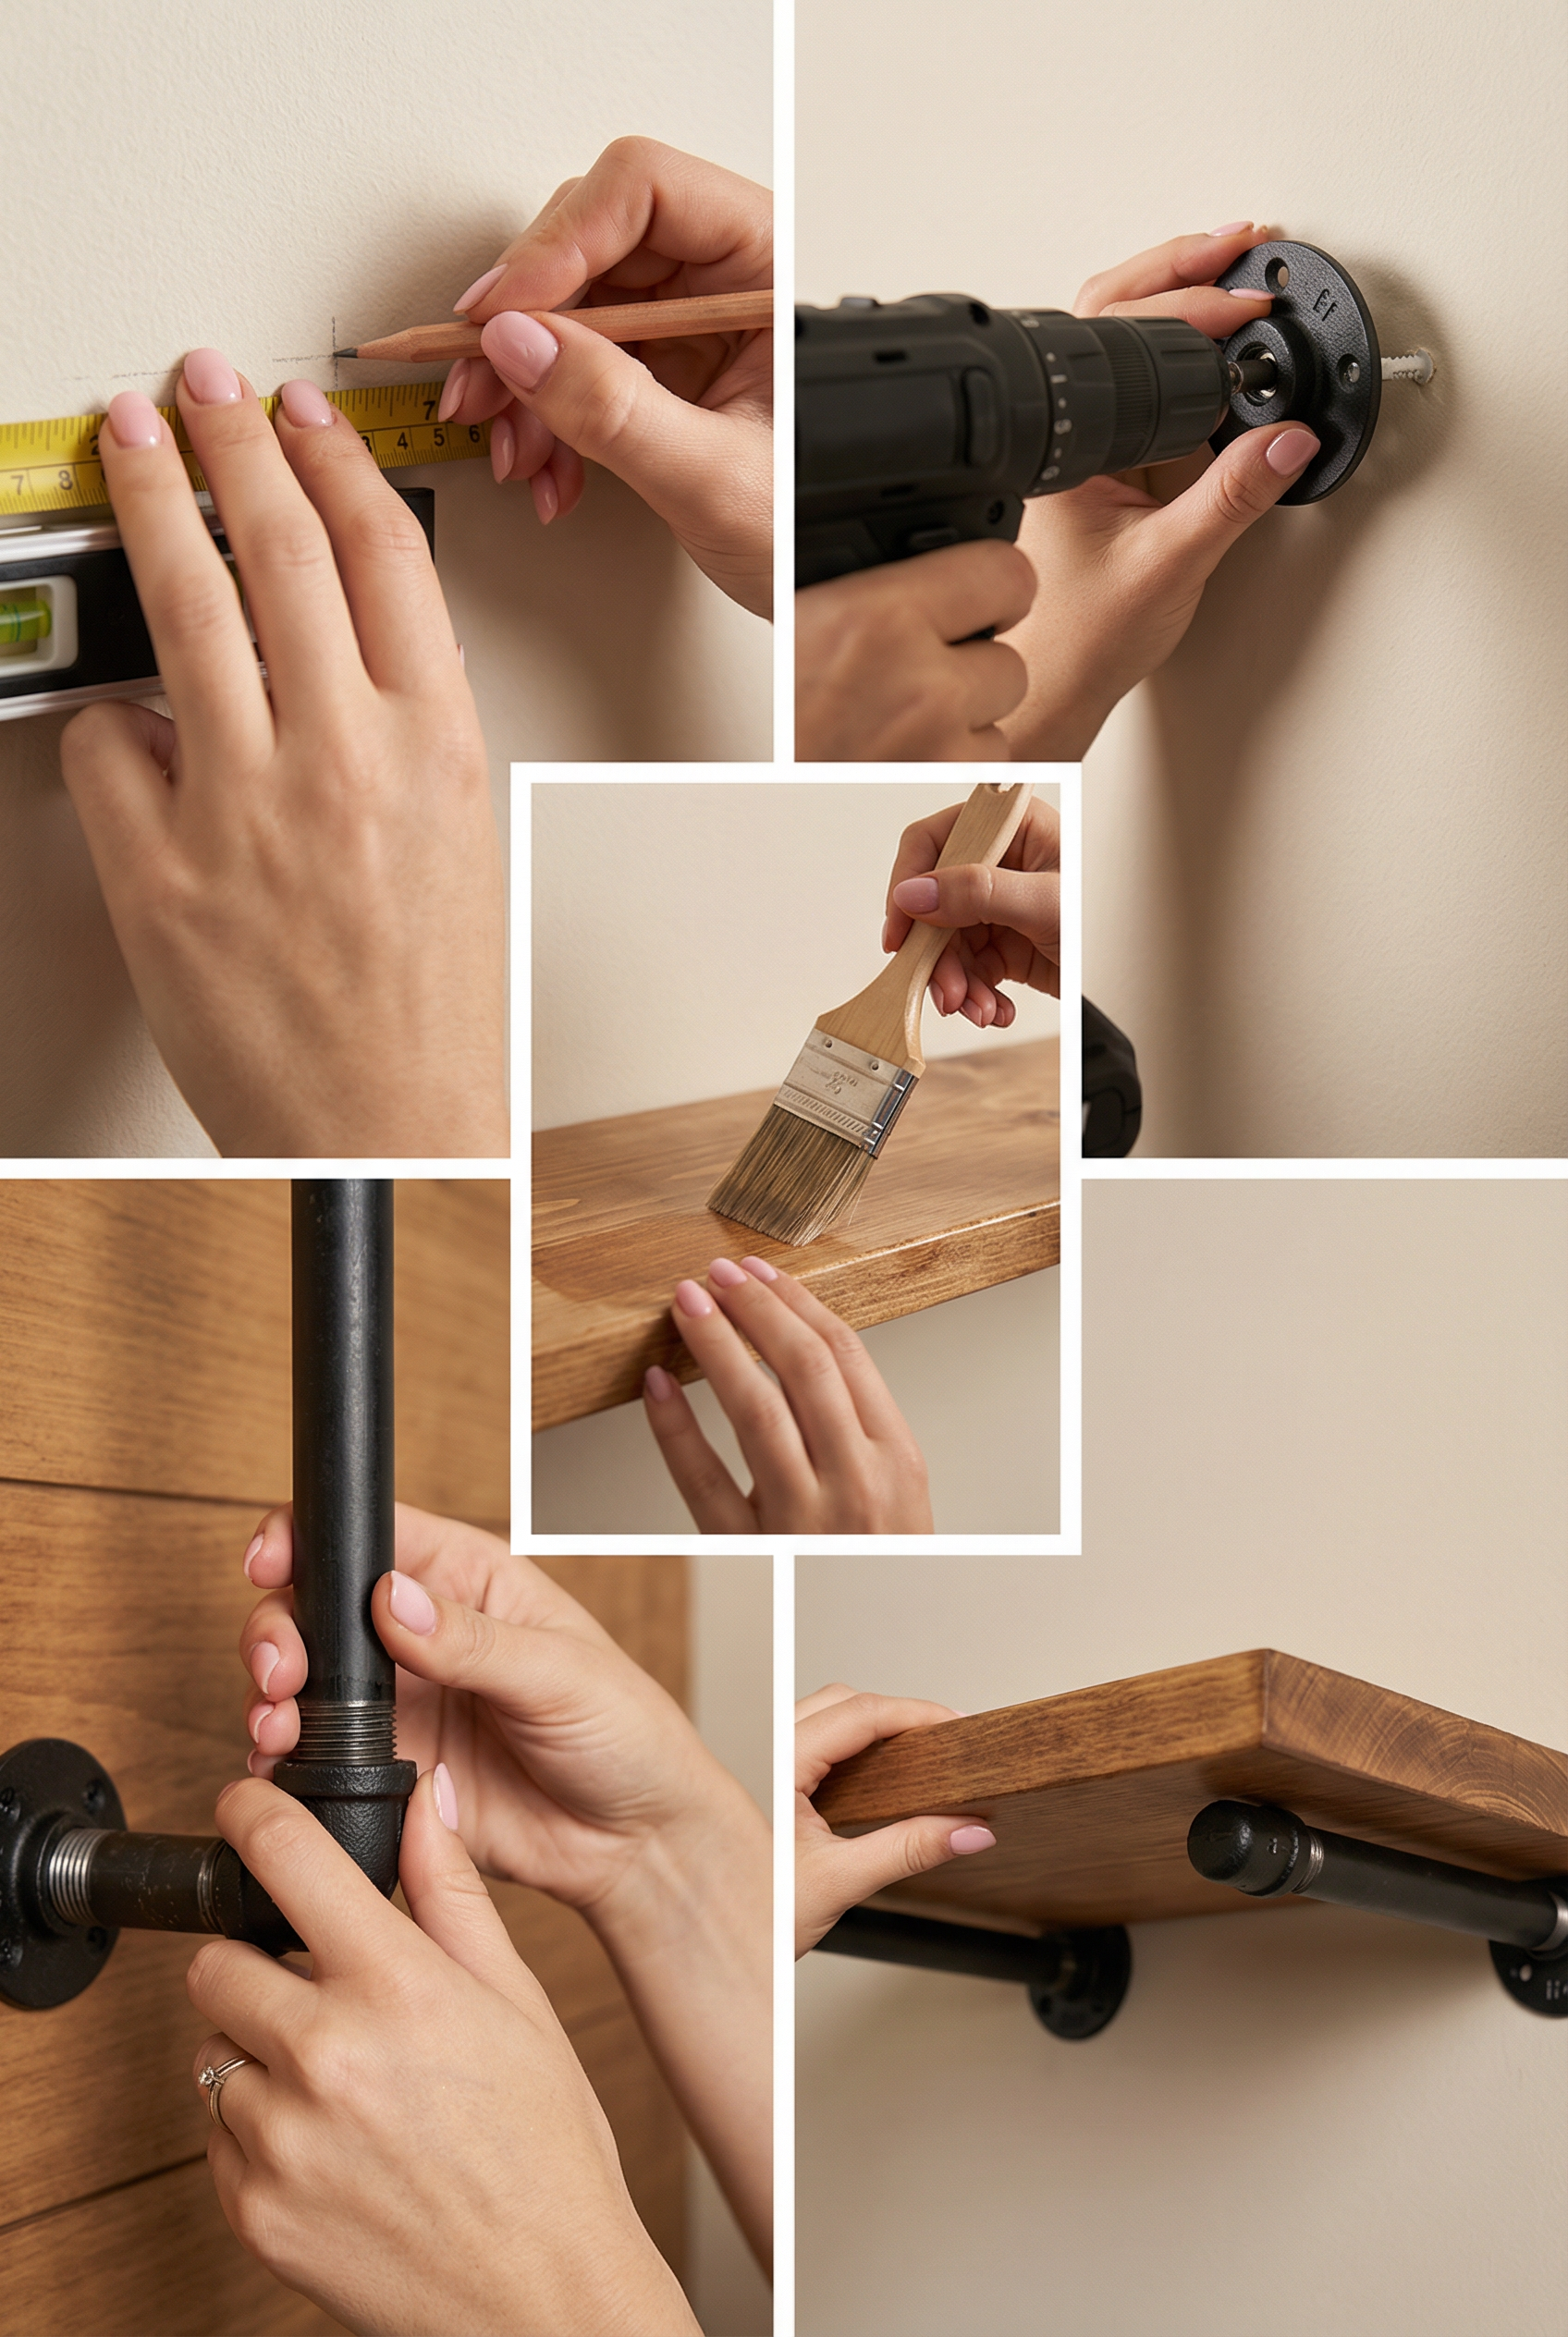
Gather these materials for the pipe shelving:
- Black pipe pieces and flanges for the shelving structure.
- Wood boards for the shelves.
- Anchors and screws to secure the shelving.
- A finish to complete the shelving.
Construction steps:
- Plan the spacing for the shelving.
- Mount the flanges securely.
- Assemble the pipes for the shelving.
- Add the boards to the shelving.
- Seal the surfaces of the shelving.
Keep the decor simple so the pipe shelving serves as the main statement. Style it with one plant and one stack of books.
Unfussy Vintage Window Frame Mirror
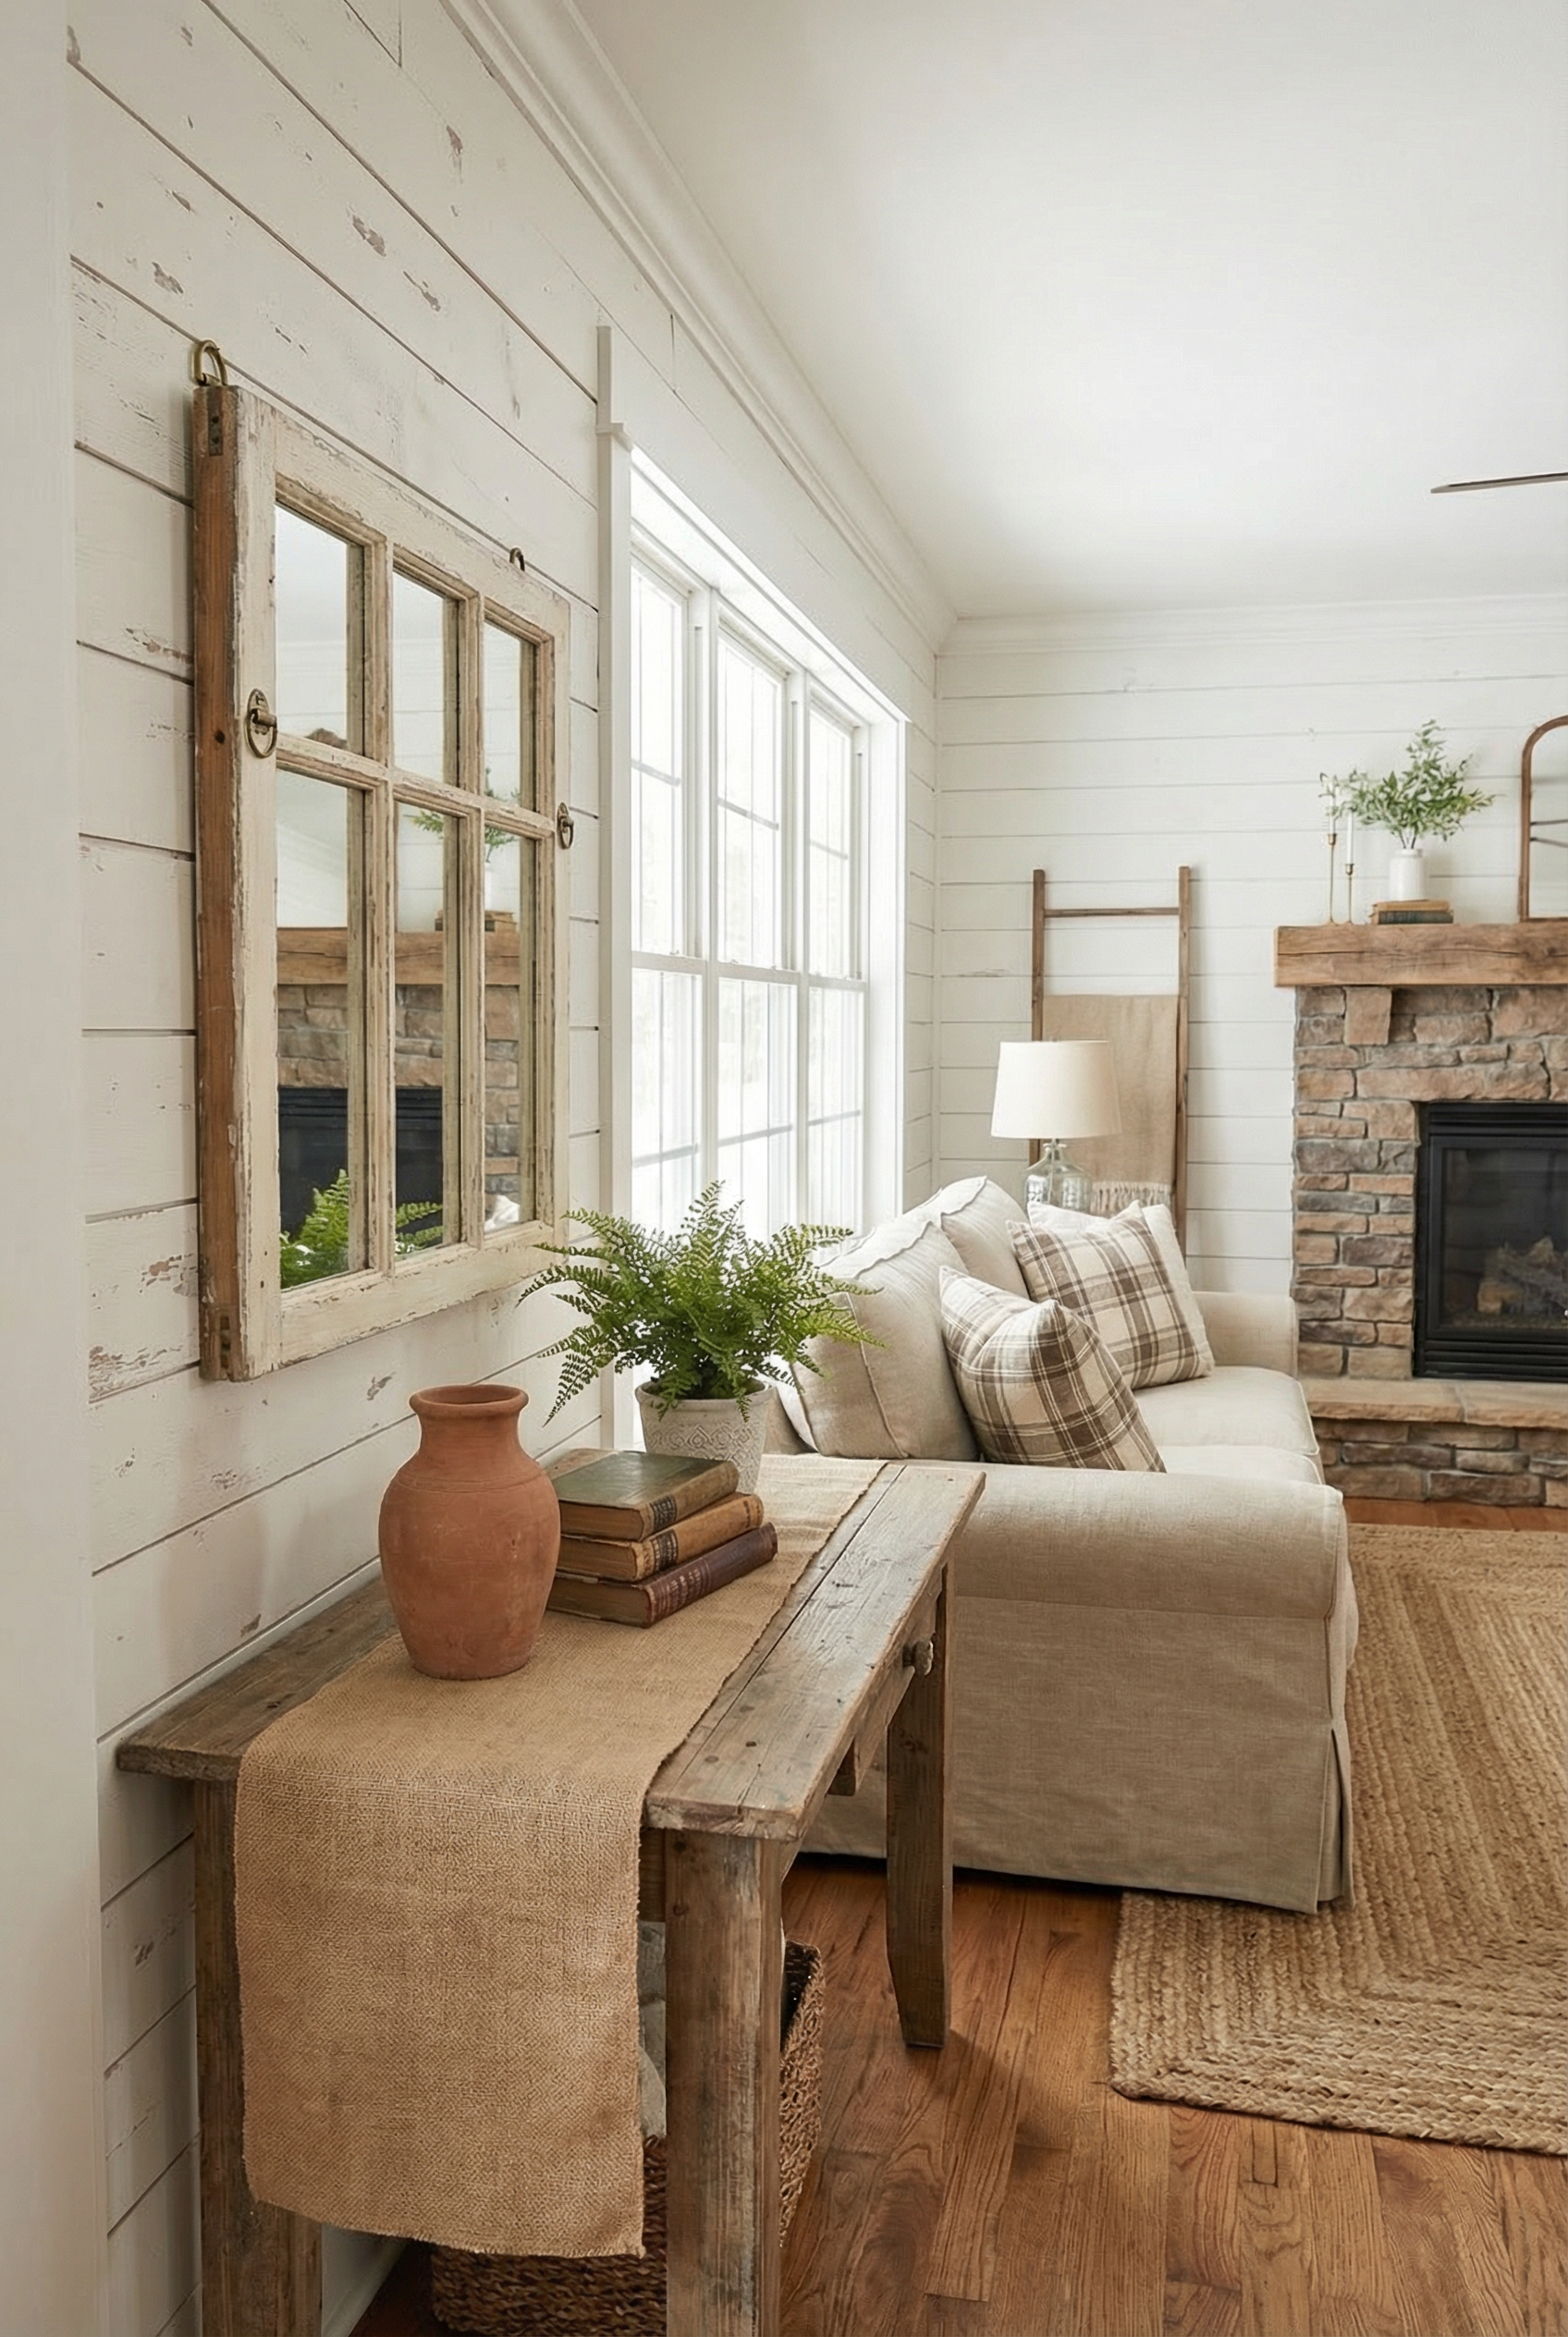
Hanging adds time to this intermediate project, which takes about 2 to 4 hours and costs around $80 to $220. A vintage window frame mirror can reflect light and make a room feel more spacious.
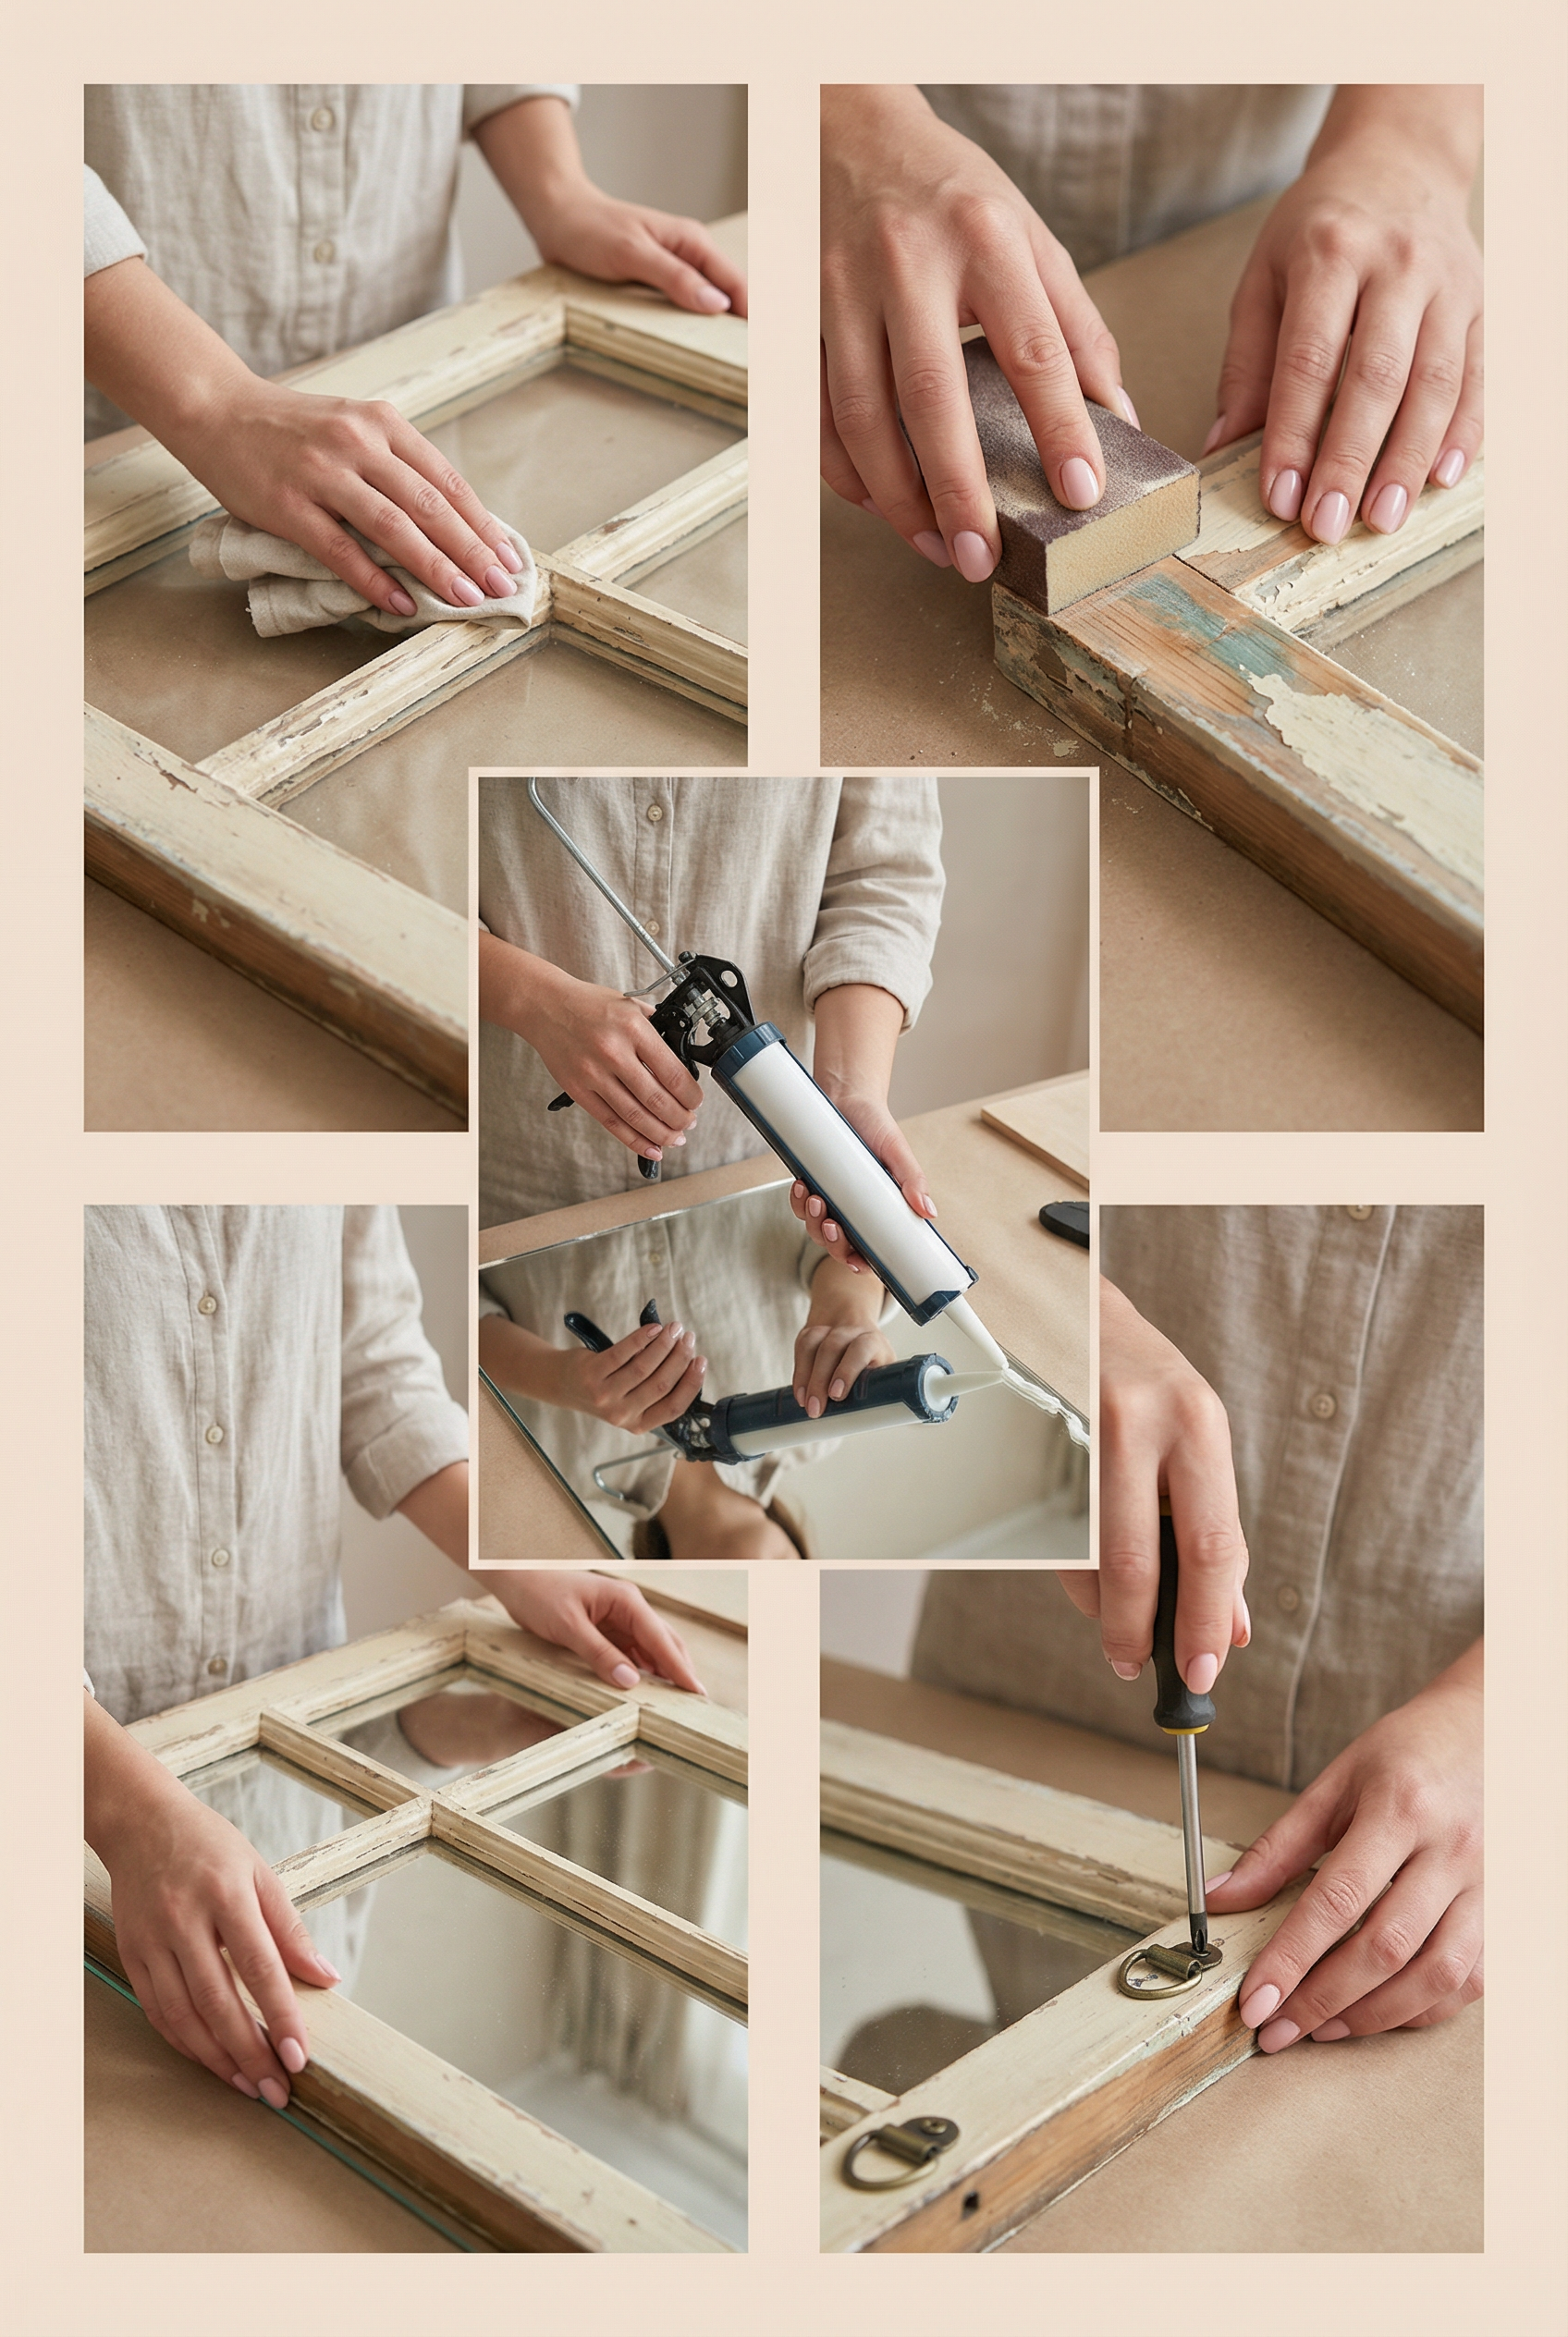
Gather an old window frame, a mirror, a backing board, adhesive, and heavy-duty hanging hardware for the mirror.
- Clean the window frame before assembling the mirror.
- Paint the window frame or retain its worn finish.
- Secure the mirror to the backing board.
- Attach the frame to the mirror assembly.
- Hang the window frame mirror properly.
A little wear can add vintage character, but too much can make the mirror look neglected, so keep the finish balanced. Hang the window frame mirror opposite a window so it can reflect and spread more light through the room.